| This installment is a collection
of useful tricks for outboard
motors that are each too small to warrant an entire
column.
Another Kind of Kill Switch
We’ve all read about how a kill switch is vitally
important when running a motor. If you fall overboard
you don’t want the boat continuing on its merry
way to run down you or someone else. It’s easy
to wire a kill switch, and Max Wawrzyniak covers how
to add the wiring to “unwired” outboards
in his book, Cheap Outboards. You can find the same
information online too, if you look around, but the
book has it in its most complete form.
I’m not afraid of doing the wiring, but I wanted
the safety feature to be in place until I got around
to pulling the flywheel for the next ignition rebuild.
You’re in luck if you have it set up for remote
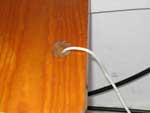
controls. So here’s my quickie safety lanyard.
I tie a line to the throttle stick
And run it through a hole in the thwart.
This would be better if it were a screweye level with
the top of the control box.
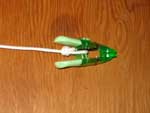
And the other end of the line is tied to a pinch
clamp that connects to my belt loop.
The idea is that the clip holds on strongly enough
to close the throttle, but that if it doesn’t
and you fall overboard, it will pop off the belt loop
before it drags you. I am not sure how completely
reliable this is, so I don’t treat it as an
ironclad backup. Actually, I think nobody should treat
any of these things that way, because it it easy to
forget to clip a lanyard back on after going forward,
for example. I only bother wearing this when I’m
out solo, since I’m pretty sure my wife could
grab the tiller. In a planing boat I’d always
wear it, but I would probably also make a higher priority
of installing the real thing.
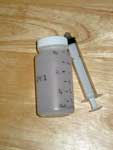
Oil Ratio Measure
Measuring the correct amount of oil is always a pain
unless you have a dedicated measuring vessel. They
make jars with gradations on the side, but they’re
for large motors and accordingly are way bigger than
we need. So I made one. I think any plastic jar would
do. This one happened to be from an engine oil test
kit, so it has another jar it fits inside. This is
convenient because it contains the mess if I make
one. Setting it up is easy. Divide 128 (ounces per
gallon) by your fuel to oil ratio. Make your life
easier by multiplying this by 29.57 so you can measure
it in milliliters. Then you can use a metric syringe
available at any agricultural supply store or veterinary
office. (Tell them you don’t need the needle
if they’re worried. And get a few because these
are really handy!) Measure water into the jar and
mark the amount of oil needed for ¼ gallon,
½, ¾ and a full gallon. More if your
jar is big enough. But beware, because ethanol erases
most permanent markers! I covered mine with packing
tape, but I’m not sure how perfect that solution
is. Time will tell.
 |
After I made this, I found an oil measuring syringe
at Farm & Fleet. This might be an improvement
on the jar method, since you can suck up some gas
to rinse out the oil. But I still think you need a
jar to store it in to contain the oily mess and keep
dirt from finding its way into your fuel.
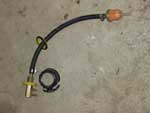
Homemade gas can adapter
In most cases the purpose-made gas tanks are the
best way to go. But many times sailboats don’t
really have a good place to put one. Outboard gas
tanks under 6 gallons are rather exotic where I live.
The simplest solution is to use one of the readily
available 2-gallon gas cans. But it needs an outboard
connector.
They make a system like this called “Adapt-a-Can”
in Canada. It costs $30 and might be worth it if you’re
in a hurry and don’t have parts already laying
around. But you know me – I have tons of junk
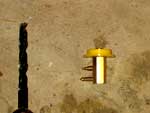
laying around. So I found a brass fitting that had
¼” hose barb at one end and ¼”
female pipe thread at the other end. This fits an
OMC fuel tank connector. It also fits through a ½”
hole drilled in the disk that seals a standard 2 gallon
plastic gas can.
Well, it almost fits. It took a little belt-sanding
to expose enough thread.
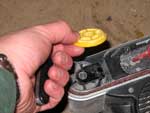
Then it goes together with some Teflon tape. Be sure
it’s the yellow stuff that’s rated for
petroleum. The white stuff only handles water.
I added a foot of fuel line and an inline pickup
filter to make something very much like the Adapt-A-Can
system.
That’s about $15 in parts. So it might be
worth the $15 difference to simply buy one depending
on what you have for parts and time. Nonetheless,
it’s good to know about this if your fuel tank
ever quits on you in the middle of nowhere.
Actually, the most useful feature of this is far
simpler. You never need to pour gas from one tank
to another underway. Just move the adapter to the
next tank.
Spill-Free Refueling
Speaking of gas can mods, this is not my idea at
all, but it so good I have to draw attention to it.
Take note if you have a motor with a built-in tank.
I found THIS
on the Shallow Water Sailor site. The trouble is that
it is terribly easy to spill fuel when refilling a
small tank underway. Walt Elliot figured out how to
fix this by adding a valve and tubes to the gas can.
You put the tubes in the tank and the hose clamp
sets them at the right height inside the tank. Lift
the gas can and open the valve and the fuel will run
into the tank until it blocks the vent tube. That
shuts off the fuel flow! No vent air means no fuel.
Close the valve, lift the hoses, let the drip a bit,
and put all the caps on. See the link above for a
diagram and construction details.
One limitation should be noted, however. The cheap
plastic gas cans I use are too flexible for this.
Even if you close the vent, fuel will continue to
flow and partly collapse the can. This only works
well with a rigid gas can. Without a rigid gas can,
the best way might be to pump fuel into the motor’s
tank with a small hand pump. Harbor Freight sells
them for like $5, but you’ll want to glue the
connections to prevent leakage. Or you could use a
primer bulb as a pump (and develop really strong hands).
Remote Controls for Motors Without Locks
This might not be the most common request, but I
found I needed remote steering on an old 5.5 hp Johnson.
Remote steering on a small motor is handy on a sailboat,
and I could also see a powerboater wanting to remote
control both the big motor and the kicker. But little
motors generally don’t have the cable locks,
even though OMC is kind enough to provide all the
other fittings. Fortunately, adding the lock is easy.
Actually my old 1954 didn’t have the throttle
fitting either, but it was cheaply and easily swapped
from a later model. Likewise the holes for the throttle
lock were there, needing only the lock itself. The
shift lever also had all that was needed. The trouble
was the shift lock. OMC never imagined anyone would
want to remote control a small engine, so the cowling
wasn’t made with the requisite standoff.
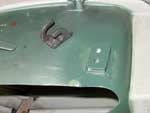
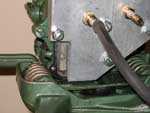
I got this one wrong the first time around. I assumed
that measuring the position of the lock on another
motor would work, but I didn’t account for the
fact that this other motor had a much bigger cowling
than mine. Here’s what my first attempt looked
like. I cast it in JB Weld my making a little coffer
dam of paper and tape.
It sure looks nice, but it’s too close to
the shift lever! With actual cable in hand I learned
that the lock has to be forward of the control panel
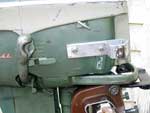
on these little motors. So I bent a piece of scrap
aluminum and screwed it on.
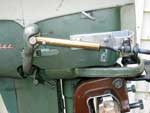
Here it is with the cable in place.
I keep telling myself I’m going to start measuring
twice…
Quick & Dirty Shift Cable End
Speaking of remote controls, control cables have
a sleeve actuator at the ends. The cable is fastened
to a sleeve that slides back and forth on the outside
of the rigid brass tube at the end of the cable. That
outer sleeve is plastic, and breaks if you step on
it. You guessed it – I found that out the hard
way. (Don’t be a dummy like me – hang
your cables up out of the way until you install them!)
These are common parts and very cheap from your local
AOMCI guru, but my local contact didn’t have
any. It was going to be a couple weeks before he visited
the regional AOMCI grand poobah up north. And I didn’t
want to wait!
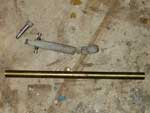
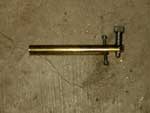
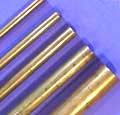
Fortunately, the fix was pretty simple. The cable
end is ¼” tubing, so I just needed something
that could fit over that. I happened to have some
scrap ½” brass
rod and a couple of hours free.
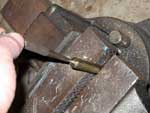
The first step was to center punch both ends of
the rod. This can be done by eye, but look at it from
two places 90 degrees from one another.
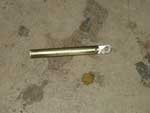
Then I bored the rod lengthwise to the same depth
as the old plastic sleeve fitting. Again, look at
it from two positions. Remember to use a sharp bit
with oil, and retract frequently to remove shavings.
I bored with a smallish bit, then enlarged to 5/16”.
I think it’s easier to control that way. Remember
to measure the depth of the original hole and mark
your bit with some tape.
From the other end I then drilled a hole just big
enough to accommodate the center wire of the cable.
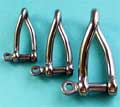
Then, again matching to the original piece, I center
punched the two side holes. The hole for the locking
pin is ¼” The other one is smaller, since
it needs to be tapped to 8-32 tread. After drilling
and tapping, the locking pin is fitted by driving
out the cross pin, inserting in its new hole, then
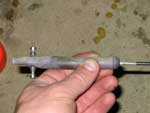
hammering the cross pin back in. The cable is set-screwed
into place just like normal. This is what it looks
like.
There we have a working shift cable end. If you
had to buy everything it would probably cost more
than getting one through AOMCI, but it works if you’re
in a hurry. And it’s free if you have scrap
laying around.
Crankcase Test Jig
One of the most difficult two-stroke engine problems
to diagnose is poor crankcase compression/vacuum.
After I did the fuel pump conversion on the Johnson
5.5. (For instructions, see Max’s book.) It
ran fine for a while, then stopped running. No pulsations
to the fuel pump. I took off the carb and manifold
to discover that my gasket sealant was gone! Maybe
I started running fuel through it before it was fully
cured. Or maybe my ethanol fuel ate the sealant.
While I was at it I decided to check crankcase compression
to make sure there wasn’t a bigger problem.
By pressing the palm of my hand over each crankcase’s
intake and turning the flywheel I should feel something.
As I turned the flywheel (spark plugs removed), the
lower crankcase predictably “burped” a
little air past my hand, even though I couldn’t
feel the vacuum at all. The upper crankcase didn’t.
I was pretty sure the upper crankcase seal was shot,
but I decided I needed a better way to measure this.
The “palm burp” is hardly foolproof.
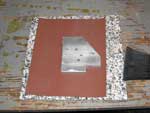
I cut a scrap of 1/4” aluminum plate about
the size of the gasket. Steel would work too, but
it’s harder to work. Using the gasket, I center-punched
the positions of the holes and bored them. I also
bored and tapped holes for a hose barb for each port.
Once bored, I lapped the plate to form a completely
flat gasket mating surface. Just like sharpening edge
tools, this was done on emery cloth laid on a flat
piece of glass. (Actually I have a marble tile for
this.)
Don’t be afraid of lapping – it’s
easy, even though it can take a while. Apply even
pressure and scrub the metal on the coarse abrasive
until it is evenly covered with scratches. Go to finer
grit and scrub until the scratches from the previous
grit are removed. This doesn’t take long. But
rotate the metal 90 degrees whenever you change grit
or it will be very hard to tell when you’re
done. Get four or five sheets of coarse emery, then
one each of medium, fine and crocus cloth. Any real
hardware store should have these abrasives for under
$2 per sheet. Here’s the lapping setup.
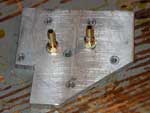
After lapping, I simply screwed in two hose barbs
with Teflon tape. I used the yellow stuff for the
reasons mentioned above.
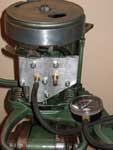
Then it is a simple matter to screw it on and use
a cheap automotive vacuum/pressure gauge. These are
$10-15 new, but I got this one for $2 at a yard sale.
It doesn’t zero accurately, but I only need
a relative reading. You might need shorter screws
than the actual manifold uses, or some stacks of washers.
I used some oversized nuts under the screw heads.
Don’t force any screws too deep or you might
ruin the casting, and definitely don’t over-torque
or you’ll strip the threads. Here it is in situ.
Notice that the test plate is shaped to leave the
crankcase bleeder valves in place. This is important,
because these valves could be the cause of poor crankcase
vacuum if they are leaking.
I’m really glad I built this before beginning
the (reportedly difficult) process of replacing the
upper seal. Both crankcases showed similar vacuum
and pressure pulses. I’m not sure why my hand
could seal better over the lower port, but it is reassuring
to know I can test it accurately whenever I need to.
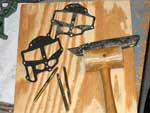
Making Your Own Gaskets
Speaking of the intake manifold, there are two gaskets
– manifold to reed plate and reed plate to crankcase.
These gaskets are not always available for older engines.
But they are easy to make. Fiber gasket material is
available quite cheaply at any auto parts store or
real hardware store.
First store the material overnight flattened between
two books. This keeps it from constantly trying to
roll up. Trace the old gasket onto the material in
pencil. Then carefully cut along the lines with a
razor blade. The smaller holes are best punched out
with leather punches. If necessary you can make such
punches by sharpening the edges of a piece of small
tubing.
If your old gasket didn’t come off in tact
things are not so easy. Then you need to do a crayon
rubbing of the mating surfaces and draw on the openings
based on the remnants of the gasket. Paste the rubbing
on cardstock and cut to the lines. This will then
serve as a template for future gaskets. Assuming you
didn’t miss one of those little oil holes and
cook your engine. Be certain you get all those holes!
You can see why it pays to take the time and care
to get the old gasket off in one piece.
So there you have a few more ways of making the old
outboard a little easier to live with.
Rob Rohde-Szudy
Madison, Wisconsin, USA
robrohdeszudy@yahoo.com

Other Articles by Rob Rohde-Szudy:
|