|
Bolger’s Light Schooner is drawn
with a simple daggerboard arrangement that I did not
want to mess up. Of course daggerboards do not kick
up. They kick the boat. An answer is provided in issue
164 of WoodenBoat. On page 44-46 Lang Warren describes
a rotating daggerboard. The “cap” is held
in by a pin and the board is held up into the case
by buoyancy. A shock cord holds the board vertical,
but stretches when it hits something, automatically
returning to full down when the obstruction has been
passed.
The more I thought about this, the more it seemed
like a pain in the butt to insert and retrieve. It
would try to fall apart every time. Not only that,
when running onto a bar, you could get it stuck under
the boat with no way of retracting it! Now THAT would
be bad. Then it occurred to me that the shallow mudflats
we call lakes in the middle of the country are totally
different from the essentially deep water full of
granite shoals off Maine. I didn’t need to take
THAT much stress off the hull, just reduce the impact
to keep the board from slicing right through a bulkhead.
Difficult when hitting granite. When hitting mud or
sand, I think I might get away a simple shock absorber.
So I figured I’d make rubber bumpers. I cut
a couple pieces from a large rubber stopper –
lab surplus – and screwed them to the top edges
of the daggerboard. Then I opened up the entire top
of the daggerboard case, which allowed an extra 2”
travel both fore and aft. This space was taken up
by the rubber bumpers mounted to the daggerboard.
Yes, I could have mounted them to the case, but it
was easier to mount to the board. And easier to replace
them if I managed to ruin them.
Well I did ruin them. Almost immediately, too. Knocked
them right off when stowing the board on the floor
of the boat! (Another disadvantage of daggerboards!)
But guess what… the daggerboard still stays
in place from gravity unless I hit something! When
I run into shallows with a muddy bottom, the board
lifts a little and bumps against the for’d bulkhead.
It bumps a little harder if I hit sand or rock, but
it’s still not terribly hard. I suppose wedging
the rubber back in the slot would still gain me a
little shock-absorption when I’m going really
fast, though.
Either way I can still yank the board up and out
of harm’s way – not possible with the
WoodenBoat system in a steadily shoaling situation.
An interesting note, however: In the same issue of
WoodenBoat on page 47 Robb White describes a PIVOTING
daggerboard that could be useful to those with short
boats. I will not attempt to describe his board, except
to say that it can shift its area forward or aft of
its center detent. Very cool. Very handy in a dink,
I should think. The system would apply easily to Michalak’s
double-braced leeboard system. What was especially
cool to me, though, are what he calls “Bernoulli
Bumps”. As his daggerboard case is open at the
top, it tends to turn into a geyser underway, a problem
shared by my motor well. He tried many things to seal
it and none really worked, so he switched tack to
reducing the pressure. Bernoulli’s principle
is well known to any sailor – when a fluid is
forced to move faster, its pressure decreases. This
is why sails draw, wings lift and carburetors suck.
The clever Mr. White put two strips of wood maybe
1/2" x 3/8” on the bottom, one about 1/4"
to each side of the daggerboard slot. Underway, this
works like a dinghy bailer and creates a suction that
reduces the water level in the daggerboard case when
underway. Clever fellow, that Robb White.
Draft control
It turns out the most annoying part of a daggerboard
is the inability to sail away from shallow piers.
That is apparently the only kind of piers there are
in southern Wisconsin. I knew this was a problem for
sailing, but it is also a problem for motoring sometimes.
This was driven home for me one day when I tried
to launch in 15-20 mph winds. The water at the pier
was only three feet or so deep – shallow enough
that I couldn’t put the board down. I tried
to motor out to deeper water, but the windage of the
masts well forward of the rudder would not allow me
to steer anywhere but downwind. Even full motor power,
full rudder AND opposed oar strokes could not turn
the boat. There was just too much force on two masts
forward pulling against the resistance of one board
(the rudder) aft. I might have done a little better
by steering with the motor, but I still don’t
think it would have come all the way around.
Reversing the motor would just hold us against the
wind at full throttle. Unfortunately, I was testing
the motor after a repair. The repair wasn’t
quite done, I guess, so it decided to quit. And my
anchor wouldn’t grab in the weedy bottom and
we fetched up on a private pier of one of those expensive
waterfront houses. Fortunately nobody was home. Even
more fortunately, the schooner is light enough to
fend off by hand with little way on. I started taking
the rig down in anticipation of a very hard row. My
wife, being the smart one, suggested we simply stepped
out in the four feet of water and walk the boat back
to the pier. We did.
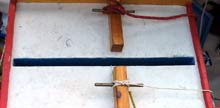
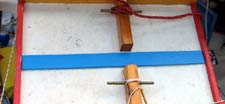
Clearly I needed some lateral resistance forward
to be able to motor across a strong wind. At least
with the masts up. And that resistance had to be shallower
that the daggerboard. After I identified this as the
problem, my wife asked why I didn’t just put
some holes or notches in the board, to support it
at different levels. Like I said, she’s the
smart one. In a grand total of ten minutes including
painting, I drilled one hole and cut a metal pin.
 |
|
(click
images to enlarge) |
|
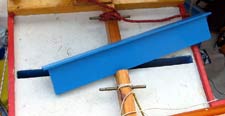
Now I can set my draft to about two feet and motor
easily across the wind. I can even sail under reduced
sail without too much leeway. Anything is better than
the 100% leeway I was making before! As if to drive
the point home, we went out on the same lake without
the motor and launched, sailed and re-docked. All
this was under sail and only possible because of the
reefed daggerboard.
But that pin needs a lanyard! I lose it all the time.
I really must get around to drilling a hole in it.
But I still haven’t ruled out getting rid of
that daggerboard and switching to the Michalak leeboard
setup. Michalak’s system looks unwieldy, but
in operation it’s the most convenient, foolproof
system I’ve ever had the pleasure to use. The
disadvantage is it’s more stuff out there to
catch the water and induce roll when motoring. But
for sailing I could gain a performance boost by putting
one on each side and optimizing the foil shapes and
angles. Like the bilge boards in those fast racing
scows, but easier to get to. Hmmm…..
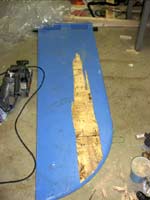
Delamination
I should mention another problem I had with this
daggerboard. It started delaminating in the first
couple months. The boat was made from the same stuff,
but had few problems. I suspect this is the unprotected
endgrain on the board. Paint does little to keep water
out. So I sanded it down and encased the entire below-waterline
part with glass cloth and polyester resin. No more
problem, even after taking a beating.
Motoring
Another annoyance with a daggerboard occurs when
motoring. When the board is not in the slot, the forward
motion of the boat sloshes water directly upward.
The only spray coming aboard is most often from that
slot, which is quite annoying to me. Stuffing a sponge
in the aft end of the slot helps a little, but only
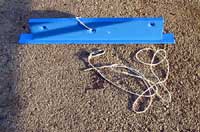
a little. So I set about fixing this.
The most obvious approach would be to make another
daggerboard, but cut off so it just plugs the hole.
But I was afraid some of that water would still spray
through. And it seemed to me that the drag of the
slot benefits nobody, so why not plug it from below?
My approach used a 2” wide strip of 1/4”
plywood to cover the slot on the bottom, with a “plug”
of 1x4 lumber extending up into the slot to keep the
plywood located. These are simply nailed and glued
together. The 1x4 also gets some holes drilled into
it for some light line, which cleats up on the deck.
This keeps the plywood tensioned against the bottom.
I suppose shock cord would be even better, but more
expensive and difficult to work with. 1/8” Dacron
line seems to work. Nylon would probably be cheaper
and better, since the stretch would tend to pre-tension
the plug against the bottom. But I had the Dacron
line on hand.
I was prepared to add a gasket of silicone caulk,
but it works well without it. A little water gets
into the slot, but there’s no pressure to make
it shoot upward, which is all I needed to prevent.
I also notice this makes the boat quieter under oars,
since there’s no gurgling in the slot.
Admittedly, this plug could be inconvenient to attach.
I’m fortunate that the slot lands between trailer
bunks, so I can put this plug in when the boat is
still on the trailer. I just drop the line with the
bit snap down through the slot, clip it to the loop
on the plug, and guide the plug into place a s I pull
on the line. Cleating it is simple, of course. It
would be trickier if my trailer didn’t accommodate
this method. But on the trailer it takes me like 20
seconds. It works well too. No more wet decks!
You may have noticed I have three holes in the plug.
I thought I’d need lines at each end to get
it tight enough, but I didn’t. Practically speaking,
this plug doesn’t even need to be all that tight.
We’re only preventing bulk water flow, not sealing
it out entirely.
I even got extra fancy and made a similar plug for
the top side, to avoid dropping anything into the
slot.
I figured I’d never use this since it’s
not like I’m playing marbles up there. But I
was wrong. I almost hate to admit that it keeps the
deck just as dry as the lower plug. I suspect the
lower plug does more to prevent slot turbulence, but
it’s not like I’m racing. I wouldn’t
be surprised if in a year I’m only using the
top plug.
Kick-up Daggerboards
This one is not my trick, but I think it’s
a good one, so I’ll include it here. Duckworks
publisher Chuck Leinweber came up with a nice way
of dealing with a daggerboard on the first boat he
ever built. He make the board unweighted, so it was
buoyant enough to float up. Then he held it down with
some magnetic strips on each “cheek” at
the top of the board. These stuck to steel strips
screwed to the top of the daggerboard case. This was
just enough resistance that a bump on the bottom would
send the board floating up, where it would wait to
be shoved down again.
While I’m glad it worked for Chuck, I’m
not so sure this would work in every case. The forces
are greater with a huge board like the light schooner
has, and particularly when going to windward, the
board can be pretty forcefully pinned to the side
of the case. I think I might improve on Chuck’s
system by raking the reverse-daggerboard case. That
is, the top of the case would be aft of the bottom,
so the board would angle forward. The good part is
that the board would raise itself easily when it hit
something, even if it didn’t float. The bad
part is that the board would tend to collect weeds.
But it might be a good strategy for those who sail
where it’s rocky and no very weedy. But that
ain’t me!
Summary
Daggerboards are still a mixed blessing, but now
they’re a little easier to live with. Maybe
even easy enough that I’ll leave it as a daggerboard.
And maybe not.
Rob Rohde-Szudy
Madison, WI
robrohdeszudy@netzero.net

Other Articles by Rob Rohde-Szudy:
|