|
By Rob Rohde-Szudy - Madison, Wisconsin - USA
New and Maybe
Improved Sail Ties
|
|
|
Some time ago I published an idea for
easy sail ties.
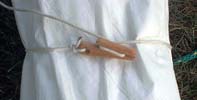 |
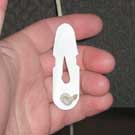
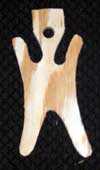
Gasket
in place
(click
images to enlarge) |
|
These are quick and easy to use. But they definitely
require two hands, since you have to hold the cleat
in place while jamming the line.
Recently I was looking at some shock cord tie-downs
and thinking about a way to adapt them to make a simpler
sail tie. Then I found a version ready-made on the
(UK) Hostelers’
Sailing Club (which also contains some
other good information for the budget cruiser). It
was hard to figure out who developed it, but the site
is run by a fellow named John Perry. (If one of you
UK sailors reading this knows if this is the right
person, please feel free to confirm or correct!) In
any case, the system is brilliant.
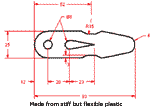 |
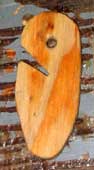
Sail ties
- British version
|
|
The above measurements are in millimeters (which
we in the USA should really get used to). These sail
ties are meant to be used with 3/16” polyester
line, and made of 3/16” plastic that is tough
but somewhat flexible. I made mine about 20% smaller
to use 1/8” line, and made a whole lot of them
from an empty laundry detergent bottle with my pocketknife
while talking to a friend. I later punched the holes
with a leather punch, and formed the tapered hole
with a chisel. Detergent jugs are maybe 1/16”
plastic. This is nowhere near enough for a reef tie
at the tack or clew, but it will hold the bunt in
many cases. And it will certainly hold a great many
things under less strain. Probably heavier material
is in order for serious reefing use, though.
 |
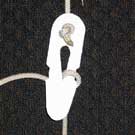
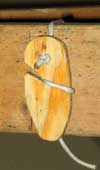
Perry
sail ties |
|
Mr. Perry’s version outdoes mine in many ways.
Mine are faster to set because you don’t have
to thread the line through a hole, and they’re
lightning-fast to remove. But Perry’s is more
secure when things are flapping around in wind and
probably win for cheap and easy construction, depending
on what plastic you can scrounge. (Think about the
cases of all those dead transistors radios.)
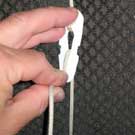
There’s another advantage that Mr. Perry doesn’t
mention. If you are very dexterous and/or lucky, you
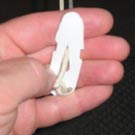
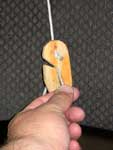
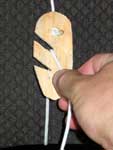
can thread a Perry sail tie with one hand. Like this:
First hold the plastic so the line comes out the
bottom of your hand.
 |
One handed
- step 1 |
|
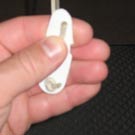
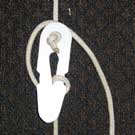
Then drop the line on the far side and reach under
with the hand holding the plastic. You probably need
a long line in most cases. Pin the flogging line against
the bundle and grab it between your first two fingers,
like a cigarette. You’re still holding the plastic
part between your third/fourth fingers and your palm.
Push away until you are holding the line near the
end.
 |
One handed
- step 2 |
|
Then guide the end of the line through the tapered
hole.
 |
One handed
- step 2 |
|
The thumb holds the line in place. (Sorry about
the blurry photos in these steps. It is a bit a of
a feat of coordination even without photographing
anything.)
 |
One handed
- step 3 |
|
The index finger releases the line and joins the
thumb to hold it.
The plastic is flipped over if necessary, and the
palm holds it against the bundle while the thumb and
forefinger feed line through to tighten the bundle.
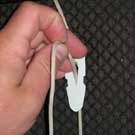 |
One handed
- step 4 |
|
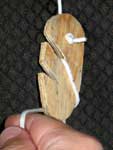
When finally tight, pulling downward jams the line,
and a couple turns under the “horn” locks
it.
 |
One handed
- step 5 |
|
 |
One handed
- step 6 |
|
 |
One handed
- step 7 |
|
All this might be easier if you make them longer
than normal, like this:
 |
Long Perry
|
|
Obviously this is not a quick or perfectly reliable
process, and it does require some dexterity. But I
don’t think you need to be a piano player to
do it. (Someone who isn’t a musician had better
try it before I go shooting my mouth off, though.)
I doubt this is possible with my wooden cleat design.
I tried.
Perry also doesn’t mention how gracefully his
design scales up to larger line. Here’s a version
made from a piece of scrap plywood and ¼”
line. I think you could tie a boat to a trailer with
something like this in ¾” plywood.
|
Plywood
Perry |
|
Once I saw Perry’s system, I realized it was
really nothing new at all. The Norse Vikings used
a very similar cleat. I couldn’t find a good
photo, so here’s the Norse cleat in plywood.
But these aren’t quite what we want, since they
are designed to act as either a tackle or a deadeye.
A better illustration is available on page 62 of The
Ship: An Illustrated History by Björn
Landström. You should have this book on your
shelf anyway if you are even remotely interested in
the history of ships. His blend of academic skepticism
with real experience with boats and water make this
book a real gem.
 |
Norse
Cleat |
|
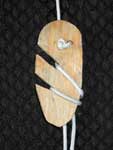
However, my wife complained about the Perry design
because she didn’t like having to thread the
lines through holes. So I came up with this modification
in ¼” plywood.
 |
 |
Wooden
modified Perry cleats |
|
This appears to have the benefits of both with none
of the failings. But there’s one thing I don’t
like here. Going back to one-handed operation, it
is pretty hard to cinch these down. The jam slot is
too efficient, and it hangs up before the bundle of
sail is fully gathered. It’s hard to see in
the photo, but there’s plenty of unwanted space
there.
 |
Modified
Perry problem |
|
So I tried separating the pull-tight slot and the
jam slot – more like my original carved wood
cleat. Here are a few versions side-by-side.
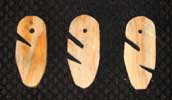 |
More Perry
cleats |
|
The latter two are only a little more effort to
make, though you do need a small round file to fair
the round slot. A chainsaw file works well. With these
you have some chance of pulling the line to gather
up the sail.
 |
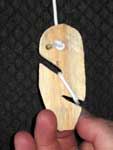
Version
3 - step 1 |
|
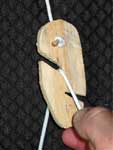
This third version tends to flip over as you wrap
the line around it to get to the jam slot.
 |
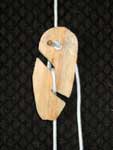
Version
3 - step 2 |
|
But it fastens quite securely.
 |
Version
3 - step 3 |
|
The fourth version reduces that tendency to flip
over, though I’m not sure if it’s really
any handier. I think it takes about the same dexterity
to jam it. But it might be a little quicker, since
there is a half-turn less. It seems to fasten almost
as securely as the previous version.
 |
Version
4 - step 1 |
|
 |
Version
4 - step 2 |
|
 |
Version
4 - step 3 |
|
In any case, there you have a number of different
line cleats with different properties. They’re
all dirt cheap, so make some of each and see what
you find the handiest. You can never have too many
of these things. Any time you notice something that
could move if you capsized, add some eyebolts or chocks
and tie it down.
Rob Rohde-Szudy
Madison, Wisconsin, USA
robrohdeszudy@yahoo.com

Other Articles by Rob Rohde-Szudy:
|