|
I’ve read about some people worrying about finding a good “connection” for lead shot to weigh down their rudders when there’s a much easier way. Certainly cheaper. Don’t waste your hard-earned cash on shot or epoxy for that kind of job. Casting lead is easy. Kinda fun too. Here’s how you do it.
Here I’m illustrating how I cast a sounding lead, but it works the same for weighting a daggerboard. You just pour the lead into something else.
Here’s what you need
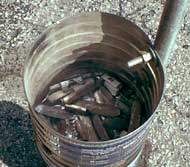
- 1. Find a steel coffee can. Where you work probably has them in the break room.
-
2. Go to your auto mechanic and ask if you can have some used tire weights. Chances are he’ll say yes. Fill up the can.
-
3. You also need a propane camp stove. Charcoal would work too. Don’t do this in the house!
First the necessary safety precautions and disclaimers. This is not kid stuff. Keep them away. Keep pets and uncoordinated people away too. (Apologies to the uncoordinated.) Wear suitable clothing. No synthetics! Cotton coveralls are ideal. Welding gloves are nice, but leather work gloves work. Safety glasses! Most importantly, be aware of what’s going on, and never leave this unattended until everything is cooled off. Nobody else will be held responsible for your actions when messing with hot metals, so be responsible.
That said, I’ve done plenty of this without incident. So on with the show.
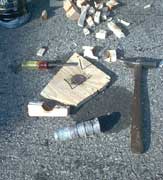
Here’s how I made the mold
For the sounding lead mold, I nailed together a stack of scrap wood, and bored it out with a 1.5” spade bit, about 6” deep. Then I nailed on a bottom piece. Nothing to it!
Make a solid base for the mold so the heavy molten lead won’t knock it down as it pours into, and probably all over, the mold. This will be the pour spout. Since we know the pour won’t be very accurate, be sure to keep your feet well-protected, and make sure the liquid lead won’t run anywhere it shouldn’t. Everything in your mini-foundry should be bone dry. At these temperatures water doesn’t just boil – it explodes into steam.
When I did my rudder sink weight, I simply screwed a scrap of plywood to the back and poured the cavity full. Of course I had some nails in the edges to keep the lead in. Sorry I didn’t take photos of that, but it’s the same process as this.
Preparing the can
Also drill ½” hole halfway or 2/3 of the way up the side of the can. That acts as a pour spout and makes pouring much more accurate that over the edge of the can.
Be sure to fit a handle. I bolted on some scrap steel electrical conduit, but anything would work. I wouldn’t try to use vice grips. Too likely to bend the can, and too close to all that heat! Long is good.
Smelting
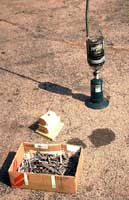 |
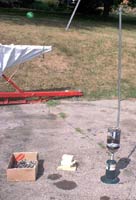
Here’s the setup, ready to heat metal.
(click images for larger views) |
|
| Note the handle on the can. |
|
|
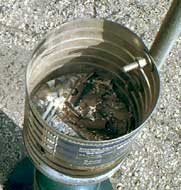
Put the can on a camp stove outdoors and start heating. The lead will melt and the steel clips will float to the top where you can skim them off. Use care and dress appropriately. Have I mentioned that this stuff is very hot?
 |
Getting hot:
|
|
| Starting to melt: |
|
|
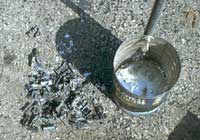 |
Here I’ve skimmed out the steel clips.
|
|
Pour the hot lead into the wooden mold and stand back. Any water in the wood will boil immediately, possibly spattering molten lead. Be prepared! Make sure there is nothing flammable or wet nearby. Fortunately, my wood was pretty dry and just hissed a little.
| Then walk away and let it cool. |
|
|
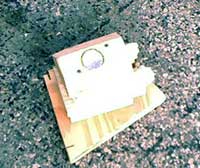
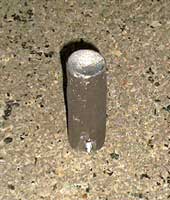
Then walk away and let it cool. Don’t try to quench it with water. It’s dangerous and usually ruins the casting. Lead takes a long time to cool. I waited overnight for the sounding lead, but a few hours might be enough for a rudder weight. If it’s a rudder weight, you skip right to shaping. I got to chisel the mold off.
 |
Lead can be worked with regular woodworking tools.
|
|
Lead can be worked with regular woodworking tools. To finish, I drilled and faired a hole in the top for the line, and used the natural depression from cooling as the cup in the bottom for some tallow to collect samples of the sea floor composition.
| smoothed |
|
|
A little Rustoleum primer keeps the lead off the hands in use.
I use no-stretch fishing line and store the line on a cheap fishing reel from a yard sale. I bet the right rod could cast this thing ahead of the boat to give it time to sink. But the little rods I have don’t look up to it and I’m sort of afraid to try.
Knot the line in increments convenient to your charts. My inland lake maps are generally in feet, so every ten feet I make a knot group with one knot for each ten feet. I add a 5-foot knot halfway between. So reeling the line in above 75’ of water, I would first see a single knot, then a group of 7 knots.
I also like to have better resolution in very shallow water, so I make a knot every foot from 0-20 feet. Obviously this would be different for those with ocean charts marked in fathoms. One can convert in one’s head, but why take the trouble? I’d just have another line marked in fathoms and wind than one onto the reel when I need it.
One of these days I’ll get around to making this easier by measuring how many inches each turn of the reel produces.
--Rob Rohde-Szudy
Madison, WI
robrohdeszudy@netzero.net

Other Articles by Rob Rohde-Szudy:
|