| Those of you who mess with old outboard motors
will feel right at home messing with sewing machines.
The used market is quite similar in many ways, and
working on them uses about the same level of technology
as well. Like a motor, a sewing machine is both a
power tool and a precision machine.
Modern home sewing machines will cost you $300 or
more for a decent one, but they don’t have the
guts to chew through canvas. (They handle polytarp
with ease.) If you want to tackle canvas you need
a commercial machine, and you can buy two new thickness
planers for the price of used commercial sewing machine.
Fortunately, times have changed. Older commercial
machines are still pretty expensive, but older home
machines are much more similar to their commercial
cousins than they are these days. Back then, home
sewing was heavy-duty sewing.
Here again, the sewing machine market is like the
outboard market. Collectors want the rare old treadle
machines. But often these collectors wind up with
some really solid electric machines they’re
not that interested in. Search online for “treadle
sewing machine” and you’ll find where
they hang out. One such site is www.treadleon.net.
Check their flea market postings. You are very likely
to find one of these folks in your area.
What to look for
Much like other power tools, a machine with no plastic
parts is promising. Name brands are easier to find
parts and service for. Singer, White, Bernina, Necchi
and Pfaff are probably the biggest names among the
old-line manufacturers. Bernina is considered the
“Cadillac” and is priced accordingly.
Viking, Elna and Husqvarna are reportedly excellent,
but I’ve only ever seen newer (expensive) models.
But sometimes the off brands aren’t bad either.
Newer models are more likely to have plastic gears,
but on some of the name brands you can have them replaced
with metal gears. You can identify a model and get
a manual at www.sewusa.com,
and there are many online forums devoted to the topic.
Sometimes you can find a good deal on an industrial
machine that has only one stitch option. If it is
zigzag, you’re in business. Many commercial
and very old machines were built with only straight
stitch. The user fits a “zigzagger” accessory
to get zigzag stitches. The good thing is that these
machines are generally built brutally strong. The
bad thing is that you had better stick with name brands
or you’ll never find the zigzagger you need.
They are not standard. For a 1920s Singer, this attachment
should cost you $10-15.
I’d avoid the really antique machines with
the very narrow bobbin. These are called “shuttle”
machines and you can usually get a more modern “rotary”
machine for the same money. Rotaries have been around
since running boards were common, so there are plenty.
Testing
Before you buy a machine, turn the hand wheel through
a few full turns. On most machines you rotate the
top of the wheel toward you, but sometimes it is reversed
on older machines to get around Singer’s patents.
It shouldn’t lock up in either direction, though.
If nothing locks up, it can probably be made to work.
Make sure you do this with a needle and bobbin in
place, since these are what often lock. Much like
testing an old outboard motor, I’d pass on any
machine that locks up.
Case Study
In my area we have a Yahoo group called “FreeCycle”.
(I think it’s elsewhere too.) When someone wants
to get rid of something, they post it as an offer.
Sewing machines in any condition go fast, so I got
lucky to get this 1950s White.
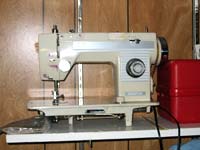 |
I got lucky on this 1950's
White.
(click images
to enlarge) |
The owner stated that this one kept breaking the
thread and she got tired of messing with it and got
a new one with more options. This is promising, since
it is probably a tension problem. And you can’t
beat the price, of course. It is an all-metal machine
with only zigzag and straight stitch. This too is
a good sign, since the manufacturer was probably selling
strength and reliability over features. I would have
happily paid $50 at a yard sale. When I picked it
up, it turned freely through as many revolutions as
I cared to turn it, and the motor ran fine. So far,
so good.
Identification
Identification was a little confusing. It also had
a “White” nameplate and a “Deluxe
Zig Zag” nameplate. These are two different
companies! Hmmm… Comparing this machine to photos
on www.sewusa.com,
I determined that it is a White Model 265. This is
mostly because of the strange sideways mounting of
the needle and bobbin. I assume this was done to get
around a Singer patent. I guess “Deluxe Zig
Zag” represents a marketing name that had nothing
to do with the actual model. After all, it is a zigzag
machine. I’m assuming the other company of the
same name was a cheap import labeled to cash in on
similarity with a name-brand machine. (We’ve
all seen the same tactic in power tools.) Unfortunately
there is not a lot of information about older White
machines, even though their mechanical quality is
reputedly excellent.
You need a manual, which you can buy for most machines
for about $7 from www.sewusa.com.
They show threading diagrams for free, but you need
to know where to lubricate the machine. This is just
as important as lubricating an engine or your trailer’s
wheel bearings, so don’t imagine you can be
cavalier about it. And don’t over-lubricate.
It will fling oil into places it shouldn’t be.
By the way, I’m not really going out of my
way to promote www.sewusa.com.
They just happen to have a repair section on their
website that tells you in detail exactly how the sewing
machine does its job. They also provide a troubleshooting
guide. They are probably not the only website offering
this information, but it was the first one I found.
I’d just as soon give my money to someone who
provides some useful guidance on their site.
Thread
First you need thread. I use V-69
polyester sail twine for pretty much
everything. This is sewing for manly men, remember?
Nothing dainty about a ¼” wide zigzag
and high-strength thread.
But test your thread. A lot of problems arise from
bad thread. Unroll three feet or so of thread and
let it hang between your hands like an electric wire
between poles. Now bring your hands together. Does
the tread immediately wind itself into a twist? If
so, it’s bad thread. A few turns are probably
tolerable, but sewing machines hate anything more
than that.
The reason for this is obvious once you look over
some diagrams of how the stitch is formed. As the
needle travels upward it forms a loop. This loop is
vital to the stitch because the “hook”
has to grab it and drag it fully around the bobbin
case to form the knot.
So no loop, no stitch. If the thread is so twisty
that it wants to wrap around the needle instead of
forming a loop, the stitch will never be reliable
no matter how perfectly you tune the machine.
This sort of problem is hardly unfamiliar to a sailor,
of course. Just think of the trouble caused by kinky,
cheap three-stranded polypropylene line. It makes
a terrible tangled mess no matter what you do, and
it’s so springy that trailing it behind the
boat doesn’t straighten it. Unfortunately, the
remedy is the same for bad thread. Pitch it.
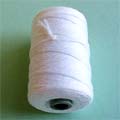
I should also note that sail twine doesn’t
come on normal spools. It comes on big commercial
spools that won’t fit home sewing machines.
Here’s a spool and the cheap adapter that lets
you use them.
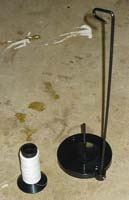 |
Spool &
adapter |
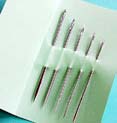
Needles
Needles too can cause trouble. They should be dead
straight. Roll them along a flat surface. If there’s
any wobble, pitch it and use a new one. A bent needle
will sooner or later skewer the bobbin case and break.
Probably sooner.
Use the smallest needle that will pass the thread.
For V-69 polyester sail twine I use a #16 sharp. (Make
sure you get the kind that fits your machine!) Sometimes
these are marked as “denim” needles. You
only want ball end needles for stretchy fabric. If
you are breaking a lot of needles there is either
a lot of old thread in the bobbin machinery, or the
bar that holds the needle is bent. Replacement parts
are available for major brands.
Tension Adjustments
The first step is to confirm the problem. You shouldn’t
need to mess with the lower tension (on the bobbin
case) unless you change thread size pretty radically.
But if everything is really messed up, the bobbin
should be set so that it can be held up by the thread,
but only just barely. A slight jig of the hand should
cause it to let out thread. In extremely heavy canvas
work it might need to be a more forceful jig of the
hand.
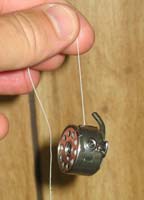 |
Bobbin Case |
Adjusting upper tension is something you have to
do every time you change thread or cloth thickness.
Rather like welding. Run a seam, examine, adjust.
If the stitches are loose on the bottom, you need
more tension on top to pull them tight. And vice-versa,
of course. I couldn’t get a very good photo
of what it looks like when stitches are loose, but
almost every sewing machine manual provides diagrams.
So does the link above.
Sometimes you can’t get enough tension with
the knob turned all the way up. Just pull the knob
off. Usually there’s a gear-like knob underneath
that you can tighten a lot further. Once you get it
adjusted, put the cover knob back on set to somewhere
in the middle of the range. The numbers are only there
to help you reset to a given tension so you can more
easily switch between different setups. Pros avoid
this by having several machines. I avoid this by only
using one kind of thread.
Back to My Old White
Thread breaking is likely to be a tension problem,
so I had a closer look at the tension adjustments.
These are simply a screw knob pressing against a spring.
The spring supplies the tension to the plate that
squeezes the thread. Any burr or slot worn into that
plate can break the thread. In fact, this true of
any part of the machine that touches the thread. When
making a stitch, the thread gets dragged back and
forth maybe 8 or 9 times over any given part of the
machine. You can see how it doesn’t take much
of a burr to saw through the thread.
Be careful when taking apart any part of a sewing
machine. Even these older mechanical machines have
lots of little parts that spring out when you remove
anything. Be aware and don’t lose any parts
or an eye.
I got lucky in this case. I got it to balance without
much trouble, though I did have to pull off the knob
to get enough tension. But when the tension was at
the right setting, I noticed that it was impossible
to rethread the machine. The plates were so tightly
pressed together that the thread would not slip between
them unless I loosened the upper tension know, threaded,
then re-tightened. Neglecting this would make it look
like the thread was between the plates, but it really
wasn’t. This means to upper tension and an immediate
mess of giant loops clogging up the bobbin mechanism.
Maybe that’s the trouble the prior owner was
having? Hard to tell. It might be that those plates
are wearing unevenly. Time will tell.
Another possibility is the lower tension. It feels
a little like the tension changes depending on which
side the bobbin is feeding from. This can be caused
by uneven wear on that little spring that applies
tension to the thread as it exits the bobbin case.
A bobbin case is a $5 part, so it’s not a bad
idea to start with a new one so you know that’s
not the problem.
For now, though, I seem to be getting good stitches.
Hotrodding your machine for canvas
Assuming you’re starting with an all-metal
machine, you can add quite a lot of power. Here I
can do no better than to refer you to the hints provided
by SailRite.
One thing you can’t get for a home machine is
a walking foot. These help to feed thick fabric. But
you can set up an incline. Sailmakers often have a
sort of ramp – maybe 8 degrees or so –
to help the fabric feed by gravity. Plywood and a
little ingenuity can facilitate some very large projects
if you’re so inclined. (Ouch...no pun intended.)
Rob Rohde-Szudy
Madison, Wisconsin, USA
robrohdeszudy@yahoo.com

Other Articles by Rob Rohde-Szudy:
|