Custom Search
 

   July Treasure Chest

January - February - March - April - May - June - July
August - September - October - November - December

Send items to chuck.leinweber@gmail.com for inclusion here next month.

The Treasure Chest is a place to put those cool sailing, cruising, motoring, boatbuilding or boating tips you have. Send us your ideas... We just need a photo and a short description.

This time we have...


How to Stop Your Rudder Going Hard Over With Rope Steering

I'd try tying figure 8's in the line where they'd stop on fairleads or turning pulleys in the corners. I'd think maybe 45 or 50 degree max. You may also need to make a quadrant to mount on top of the rudder.

John Boy

*****

I've been steering my EasyB canoe w/sail rig using a perimeter rope setup and am really pleased with it. One trick is to go to a pulley on a yoke setup with a two to one ratio, otherwise steering can be pretty quick. Another thing to consider is to use low stretch line it does make a difference.

Skip

*****

For me, rope steering is more intuitive if the rope leads to a tiller. This way, the boat goes in the direction that the rope goes. Attached to the stock - assuming this to be aft of the pivot point - and you get the opposite.

Chuck

*****

Slider's rope steering is set up the above way, or rather, to the crossbar that connects her tillers. You need some sort of leverage to move the rudders against the pressure of the water-- and a tiller is about the simplest way to do that. In fact, on Slider, because I'm always sailing across the flats and kicking up my rudders, which gives the rudders the advantage in the leverage department, I added a 2 to 1 purchase to my rope steering. That way the steering doesn't get so heavy when the rudders were kicked up.

There are pictures here:

https://slidercat.com/blog/wordpress/?p=497

Ray


Optimizing the Trailerable Sailboat

Optimizing the Trailerable Sailboat by Paul Esterle. 326 pages plus many photos and drawings. $27.95 hard copy - $13.50 as e-Book. www.captnpauley.com

A real tome written by our own Technical Editor, Capt'n Pauley, we've already referred to Optimizing several times since it's been here. Just about anything you can think of regarding the upgrading of your trailer sailer is covered in detail: Cabin steps, latches, ventilators, stoves, cockpit covers, tiller tamers, jacklines, wet core repair, blisters, hull graphics, roller furling- the list goes on and on. At a full 8.5" x 11" size, and 325 pages, this books goes about $10 per pound!

-Eds

(reprinted with permission from Small Craft Advisor Magazine)


A Simple Anchoring System

Written by Bill Nolen Photographs by Lewis Baumstark

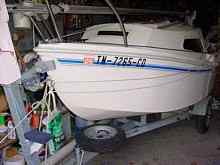
I had been trying to develop a simple way to deploy my anchor from the cockpit of my West Wight Potter 15, Piglet, yet keep the anchor rode (line) attached to the bow eye. There have been several methods employed in one form or the other that accomplished this, but I wanted something simple, easy and cheap.

In a discussion about anchoring on the Trailer Sailor Potter Forum, Lewis Baumstark, owner P-15 # 2312, told about the anchoring system he had developed and was using on his Potter. Lewis's system is very simple and requires the purchase of only one large Carabineer.

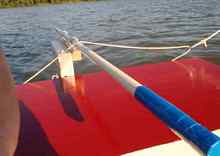
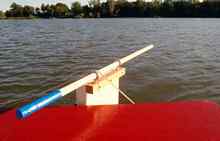
The system works like this: A short line is tied permanently to the bow eye and led to the cockpit area. If your boat has cockpit rails, tie the end of this short line rather tautly to one of the rails. If your boat doesn't have cockpit rails secure the line to a cleat, etc.

The boat's anchor should be stored in a bucket with the anchor rode placed inside the bucket first, with the anchor chain and anchor placed on top of the rode. To ensure that the Carabineer is readily available it should be attached to the bucket bail or the anchor or chain. When you are ready to anchor, remove the Carabineer from the bucket bail, drop the anchor overboard from the cockpit, and let the rode play out until you have established sufficient scope for your anchoring conditions.

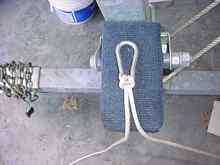
At that point take up some slack in the rode and form a small loop. Pass the loop through the Carabineer and then back over the top of the Carabineer capturing the Carabineer in the loop.

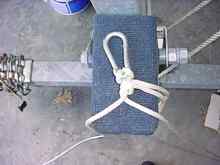
After the Carabineer is captured, a large loop from the loose end of the rode is formed, and two half hitches are tied on the anchor side of the Carabineer.

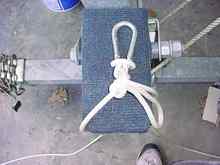
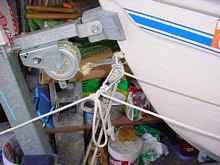
The Carabineer is then clipped onto the already installed permanent bowline, and the Carabineer and anchor rode is allowed to slip forward to the bow eye.

The force of the anchor will keep the Carabineer secured to the bow eye until you are ready to retrieve the anchor. The loose or bitter end of the anchor rode should be secured in the cockpit.

Pulling on the cockpit secured bitter end of the anchor rode will bring the Carabineer sliding back on the bow eye line, and the anchor rode and anchor can be retrieved from the cockpit.

Good luck and happy anchoring!

Bill Nolen https://www.wwpotterowners.com


Removing Silicone

Now before you say anything, I know this is a video about removing silicone from around a bath, but it does work with the bath (I tried it) and I think it should work with removing marine silicone. Worth a try and, if it fails, your wife will be happy with the bath (mine is). Let me know if you try it (on your boat, not the bath).

Mike John


New Tiller

This past weekend we were at the Lake Pepin Messabout. I had some really nice compliments on the tiller we have on our PD Racer #462. My wife, Sandy and I, brain stormed this tiller. I would like to share the idea and a couple photos with you. It is a telescoping model easily made with a 1" wooden dowel 4' long. We screwed 2 eyebolts into the top of the rudder head that accepts the dowel. You pull the tiller forward for the long version, or push back for a shorter version. I"m sure this can work for many different models of boats.

Brian Weber

To comment on Duckworks articles, please visit our forum


  sails
  plans
  epoxy
  rope/line
  hardware
  canoe/Kayak
  sailmaking
  materials
  models
  media
  tools
  gear