After having cogitated for a while, I decided to try the C100 solo this year which would require a new boat, 100 miles in a 12 foot boat just a little too much. First order of business then is to get spousal approval so Friday night, I asked Susie if it would be all right to build another boat for the C100. Then on Monday morning there’s an email from Chuck Leinwebber, asking me if I wanted to take a trip through Big Bend with a group that had been there before. That trip is pretty high on my list of “Gee I’d really like to do that someday” things. Only problem is the trip is last of February and EasyB is just a bit too small and doing a 5 day trip through a remote and rugged area in a wood stripper that’s getting a little long in the tooth is a tad questionable. So it’s back to Susie to amend my boat building permit, boat needs to be built right now.
 |
On Monday morning there’s an email from Chuck Leinwebber, asking me if I wanted to take a trip through Big Bend. |
Fortunately, the form for the 14’ version of EasyB is sitting under the house more or less ready to go. It is the only form I’ve ever used to build more than one boat on the same form. Steve Mattingly’s mahogany stripper and Robert Bowle’s stripper with the one of a kind mesquite decks both came off of that form. Robert’s boat has been in the water twice that I know of and usually hangs in his living room. Steve’s boat went straight to display mode and has probably never been wet. Seems fitting to have a down and dirty boat come off the same form.
For some reason Chuck is expecting an article about this build and it would be hard to say no since the invite for trip came from him and he did say he was going to write about the trip. So I suppose I’ll do this in a daily diary format which seems to work OK for me.
Monday, Jan 12
Received an email from Chuck about the trip. Several emails back and forth established neither of us had a suitable tandem, Chuck had a reasonable solo and a tandem rental was out of the question, you could build a boat for the cost of a five or six day rental fee. Talked to Susie and got an OK to do the trip.
Tuesday, Jan 13
Thought about different options for trip, EasyB’s too small and there are a couple of boats I could probably borrow but not really comfortable taking somebody else’s boat on such a remote rugged trip. A foam core/Kevlar boat off of the existing form would be almost ideal for the trip and the extra two feet plus would be good for the C100 also. Can I build the boat in time for the trip? I think so, form is ready, foam is at hand (1/2” 3# klegecell) along with almost two gallons epoxy.
Wednesday, Jan 14 Day 1
 |
Getting Ready |
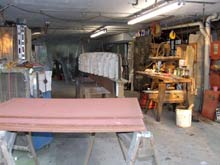
Moved things around in shop. Drug the form into place on sawhorses and generally took an inventory of what’s needed. Form is in pretty good shape, keelson piece is loose (unglued) in front half of form. Clear packing tape on forms is pretty ratty and needs to be replaced.
Thursday, Jan 15 Day 2
 |
Cutting Strips |
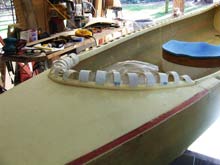
Real work. Stripped old packing tape off forms. Re-glued keelson. Ripped strips, four sheets of 32” X 48” should be just about right. Ripped strips 1 ¼” wide. Thought about ripping some narrower for the turn of the bilge but decided the strips were thick enough that fairing would not be a problem. Machined bead in strips. Bead and cove are ¾” diameter so that there is just a curved edge about an 1/8” high on edge of strips rather than a full half circle. Makes strips easier to fit and there’s less waste. Took eight strips and glued them up into two 16’ starter strips for gunnel. Balance of strips will be fitted on form in 4’ sections. Machined the cove in the remaining strips.
 |
Machining Strips |
Also ordered material
- From Soller Composites
- 10 yards 5 oz Kevlar (only need about 8 yards but there’s a price break at 10)
- Small spool of graphite tow(12k) for stiffening gunnels, I like a thwart less boat
- 30 feet of 1” braided fiberglass for gunnel pieces
- From Sweets Composites
- From Duckworks
Friday Jan 16 Day 3
Cold today but I need to forge on. Put new packing tape on form. Added nails in edge of forms at sheer, holes were predrilled. Put a strip of ¼” thick strips of mahogany along sheer to reduce depth of boat just a bit and to spread out the load between nails and form. First sheer strip goes on in one continuous piece to help keep everything fair; rest of boat is stripped with four foot pieces. Got shear strip and one extra layer on boat. That’s all; I’m not much good below 50 degrees.
 |
First Strips |
Saturday Jan 17 Day 4
Today it is warmer so I am looking forward making some progress. It takes about thirty minutes to fit and glue a pair of strips and then about another half hour for the glue to set enough to start another pair. Added seven pairs of strips today, stern has made the transition from side to bottom. Moved the strongback down from sawhorses to 5 gallon bucket plus 4x4 spacer to keep from standing on toes to finish bottom.
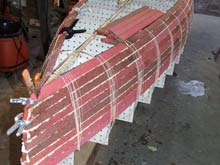 |
Getting there... |
Sunday Jan18 Day 5
A digression: Its cool enough this morning that it’s taking longer for glue to set so I thought I’d ramble a bit about materials and tools.
Foam; I’m using some ½”, 3#/cubic foot PVC foam (klegecell) that’s no longer manufactured. A similar PVC foam, Divinylcell is available, but I would recommend Corecell today. Corecell is manufactured using a different chemistry (SAN) and had equal or better physical properties including a much finer texture. Corecell is available from Noah’s as 2’x4’ cutoffs at fairly reasonable prices. Most appropriate for a stripper style canoe would be the 9mm 5.5#/ cubic foot variety.
Glue; Only place in the whole wide world to use foaming polyurethane glue, but its ideal for this application. It is necessary to moisten edges before gluing and the best tool I’ve found so far is a two liter pump up sprayer. I’m not too fond of the spray pattern, too wide when spraying a fine mist, but otherwise it works fine.
Rubber bands; I use #32 rubber bands primarily, a few #16’s come in handy at times. It’s best to get bands from an office supply or other source that is likely to have some fresh stock. It’s prudent to stay out of the plane of stretched band when applying.
Skins; I’m not a particular fan of Kevlar, but it's light, relative to its strength/stiffness and super tough. Biggest single drawback is you cannot sand it….ever. It’s also expensive, very difficult to cut and will rot if exposed to sunlight. In this case the outer skin is covered with 4 ounce s-glass, a marvelous material, and the intent is to shopvac bag the inside so no finishing should be required. And the whole boat will be painted and/or coated.
Tools; An old pull saw and a Stanley sureform shaper just about do the job. Nitrile gloves when using the glue.
Back to building; strip pairs are a little slower to fit, having longer cuts to make especially at the bow. Things go slower also because the glue is taking longer to set hard. Now that I think of it, probably as a result of leaving glue outside in the cold last night.
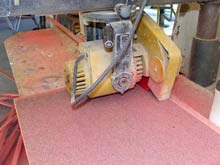
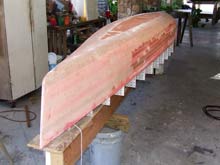
Finished up stripping, ran out of strips a little before I expected but got far enough into the bottom to finish with some flat panels. Since the glue was cured on the ends, I cut loose the rubber bands on the end stations and roughed out final shape. Started out using some 36 grit open faced paper in the DA sander. 36 grit cuts really fast so I went back to 80grit as soon as the ends were shaped up.
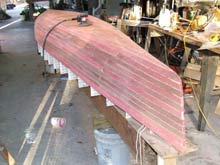 |
All Stripped |
Monday Jan 19 Day 6
Pulled rubber bands off after work. Took about a half hour, beats pulling staples. Did a little rough shaping taking off glue and knocking off edges. 36grit in the DA sander was a little too rough so I used some finer (!) 40 grit.
 |
Rough shaped |
Tuesday Jan 20 Day 7
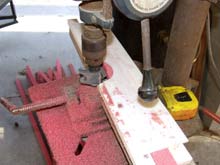
Materials arrived at office early this afternoon, looks like I can keep on schedule. Shaping going well, after taking off the glue and rounding off the edges with DA sander went to air file with 40 grit for fairing. After shape was pretty well developed, I filled cracks in joints and blowholes in foam with System 3 Quickfair.
 |
Filled |
Wednesday Jan 21 Day 8
Sanded down fairing compound and decided to fill foam cells with Quickfair until I ran out. Did bow and stern areas and a strip down the bilge on both sides.
 |
More filling |
Thursday Jan 22 Day 9
Skin the outside of boat. Got the outside resanded, everything laid out. Susie helped mix and apply epoxy to pre trimmed layer of Kevlar. Was quite windy so I decided to wet Kevlar out through fabric rather than fold back and apply epoxy between foam and Kevlar. Once Kevlar wetted out we rolled on the 4 ounce s-glass and wet it out. Followed by peel ply; had to squeegee more epoxy through peel ply in places since s-glass layer was a fairly dry layup.
 |
Kevlar ready for epoxy |
Some problem on part of gunnel, foam/Kevlar interface not quite wet out enough, would have been better to apply some epoxy directly to foam, but much risk of having Kevlar swarm in the wind. Oh well.
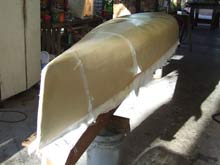 |
Glassed and peelplied |
Friday Jan 23 Day 10
No work on boat today, just pulled the peel ply off and rough trimmed the Kevlar/glass. There are some delaminated bubbles on hull, will have to grind them out and replace skin, probably 3 layers of s-glass.
Saturday Jan 24 Day 11
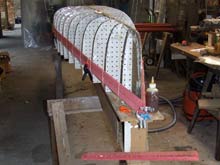
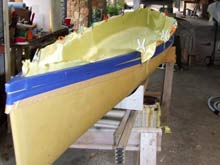
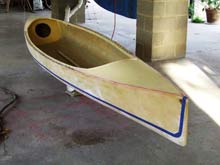
Start on inside. Marked approximate 4” waterline while boat was upside down and level. Also marked major bubbles to be repaired. Cut cradles to support hull right side up. Popped rubber bands loose from inside hull and lifted boat off form. Boat came off form easily. First trip to the scales showed the weighing just less than 17#, not too bad, close to theory. Trimmed the gunnels, sanding a 45 degree bevel on outside edge. Pulled rubber bands and shaped the inside, using sureform to take off the glue beads. Shaping was mostly with DA sander on bottom and sides and a piece of 2” pvc pipe wrapped with 60 grit on the bilges. Added a little klegecell to ends to get solid backing for bow and stern eyes and to simplify putting fabric in ends. Filled major cracks and blowholes with epoxy micro/microballon mix.
Sunday Jan 25 Day 12
Time to skin the inside. It’s cold and I probably need some help, so it’s also time to go seriously in arrears on spousal credit. Susie doesn’t like cold weather any better than I do.
Added tape to sheer to keep Kevlar skin from sticking to top edge of foam where decks will be. Added tape along hull sides to limits how far skin wraps around hull. Ran butyl sealing tape around hull for vacuum bag. Added a sealer piece of tape along top side of butyl sealer tape to keep epoxy from getting on tape. Cut pieces of Kevlar to fit along with pieces of peel ply.
 |
Kevlar cut and fitted |
Time to drag Susie out in the cold and she mixes and I spread epoxy. Process goes slowly even with Susie helping spread. Epoxy is thick in the cold and it’s hard to saturate cloth. Call it quits after inside is skinned except for filler pieces in stern, it’s time to get the peel ply, bleeder and bag on. Everything seems to suck down pretty good but the best I can do is get the vacuum to cycle about 50% on-50% off, think I should have added more energy storage foam under bag.
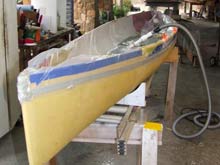 |
Bagged |
Monday Jan 26 Day 13
No work on boat, let epoxy cure
Tuesday Jan 27 Day 14
Pull vacuum bag and peel ply, things generally look good. One area near front bulkhead appears delaminated, probably pulled lose when removing peel ply. Epoxy still a little plastic.
Wednesday Jan 28 Day 15
Added Kevlar to inside stern of boat
Thursday Jan 29 Day 16
Cut strips for gunnel, gunnel spacers and seat slide from 3/8” Corecell. Glued various pieces together with Gorilla glue.
Friday Jan 30 Day 17
Made templates for bulkheads. Slanted bulkheads are a little trickier to fit than vertical. Vertical can be traced right at station lines or interpolated in-between. Laminated bulkhead blanks with a layer of Kevlar on both sides of 3/8” corecell. Vacuum bagged blanks in a spacesaver bag.
Saturday Jan 31 Day 18
Cut fit and glue bulkheads in place. Glue is epoxy/Kevlar pulp fillet. Shape and sand various pieces. Seat slide has 14 degree bevel plus some slots in bottom for tie downs. Gunnel strips are just sanded and edges eased, they need to be fairly smooth so braided fiberglass won’t snag when applied. Rough cut out decks from ¼” corecell prebent the bow piece a bit since front deck has quite a bit of camber. Applied Kevlar to inside face.
 |
Looking more like a boat |
Sunday Feb 1 Day 19
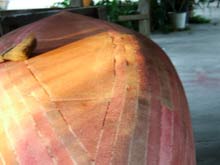
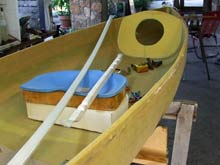
Cut and glued ledger strips for decks. Carefully pulled braided fiberglass sleeve over various parts and epoxied. Clamped gunnel strips along sheer so they would take proper curve. Routed slot in bottom of minicell seat platform with dovetail bit. Router is my least favorite tool, by a large margin, but it cut a beautiful clean slot in the seat base. Also drilled holes in seat front for 35mm film canisters (aspirin, electrolytes and antacids). Fitted decks and glued in place. Drilled out bow and stern eyes, shaped up foam and coated with quickfair.
 |
Bow eye |
 |
Deck |
Monday Feb 2 Day 20
A little touch up sanding, then glued seat slide in place and one gunnel and spacers.
Tuesday Feb 3 Day 21
Glued in other gunnel and spacers. Finished sanding bow and stern eyes, then added a piece of braided glass reinforcing using a balloon to force glass into place. Have wanted to do the balloon bit for years since I saw in Gudgeons first book. Really should use bigger balloons but used what was at hand.
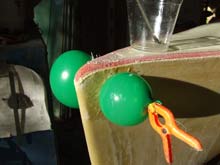 |
Balloon |
Wednesday Feb 4 Day 22
General cleanup and glue in ridge piece on decks. Cut and trimmed off Kevlar wrapped around edge of hull. Filled edge of klegecell with quickfair, will run a piece of uni carbon or glass as final reinforcing. Generally prepped deck to sand and glass tomorrow.
 |
Ridge piece clamped |
Thursday Feb 5 Day 23
Sanded deck edges and coaming . Glassed decks, 4 oz cloth went over coaming lip easily.
Friday Feb 6 Day 24
Took boat out in the yard and sanded hull. Cut out major voids and fit pieces of Kevlar felt in voids. Epoxy coated hull and covered Kevlar patches with 4 oz glass and peel ply.
Saturday Feb 7 Day 25
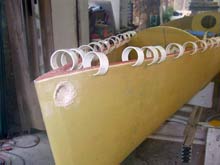
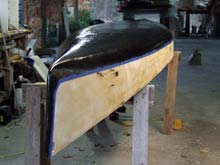
Got an email from Louis, trip looks like it’s still on, a good thing, would hate to have a new boat done and nowhere to go. Was still dark when I went out to get the paper and I pulled one of the pieces of peel ply off as I went by the boat. There’s a line of light generated along the edge of separation, unusual phenomenon. Later in the day it turns out the Kevlar felt can be sanded without fuzzing near as bad as cloth. Added some quickfair and did general cleanup. Sanded hull and masked separation of bottom from hull including a sweepup at the ends, the idea borrowed from Will Myer’s Karankawa. Coated bottom with graphite/epoxy (50% by volume).
 |
Bottom masked |
 |
Bottom masked |
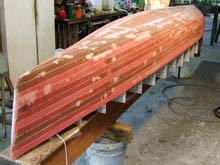
Sunday Feb 8 Day 26
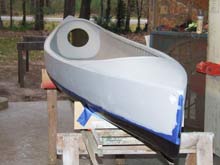
No sanding! I’m tired of sanding but do scrape the graphite/epoxy with utility knife blade to take off rough spots particularly at Kevlar felt. Let epoxy cure, then remask separation then coat balance of boat with primer. From 10’ it looks like a real boat finally. Already decided no more work on bottom even though it’s a little rough. Rio Grande trip will probably scratch it up a bit and I’m tired of sanding.
Monday Feb 9 Day 27
No work on boat except for a little quickfair at deck edge.
Tuesday – Thursday Feb 10-12
No work on boat
Friday Feb 13 Day 28
Sand primer and recoat
 |
In primer |
Saturday Feb 14 Day 29
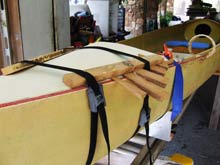
Sand primer and recoat. After primer has dried paint with polyurethane porch enamel. Remove masking tape after paint starts to harden. Sand down shaft of double blade, coat with epoxy.
Sunday Feb 15 Day 30
Paint still a little tacky weather has turned cool and damp again. Moved boat out into sun. Start checking out other gear, tent hasn’t been set up since the Ruta Maya five years ago. Screw in hatches and cut some lines for tiedowns. Start fabricating foot rest, cut out and glue pieces together. Revarnish paddle shafts, single and double.
 |
Almost there |
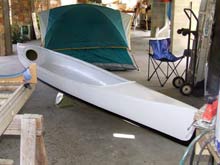
Fini
Managed to take the boat out for a quick paddle at Lake Woodlands once before trip. A cool, overcast drizzly day, but boat was a little more stable than I had anticipated, should be no problem at all with a week’s worth of supplies and gear.
 |
Ready to go |
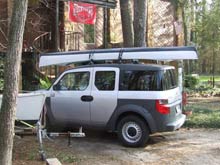
The trip
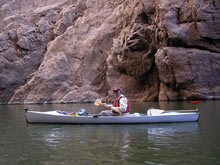
Magnificent, the hassle of a quick build in the dead of winter is long gone, but the memories of the trip will stay with me for a long, long time. The trip through Mariscal Canyon was every bit as humbling and inspiring as anticipated. I didn’t know any of the group except Chuck when we started and now I’ve got nine new friends, travelling companions beyond compare, an unanticipated bonus. As a further bonus Chuck and I got to do a gut check the last day finishing the last nine or so miles into a howling norther. Took us seven hours to make nine miles, walking the boats where we could, walking was faster and easier than paddling. The weather the previous six days had been excellent. Fortunately rest of the group made it out OK also, starting later than we did.
One last comment, there are few pleasures in life to compare with contemplating a boat of your own devising pulled up on a gravel bank in Mariscal Canyon, I feel blessed.
Pulled up on a gravel bank in Mariscal Canyon
|
 |
*****
Other Articles by Skip Johnson
|