|
Almost There - the build |

|
| By Milton "Skip"
Johnson - Houston, Texas - USA |
Skip Johnson took
his new boat Back
to the River with a new partner this year and
they were able to finish the grueling 100 mile race.
Here is his report on building this unique boat.
|
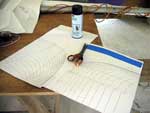
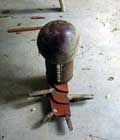
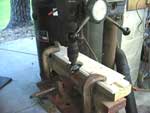 Foam
strips are ripped 1-1/8” wide then
run through the shaper that’s cleverly
disguised as an old drill press. The ½”
thick strips are bead and coved with a
¾” diameter bit, full depth
bead and cove isn’t necessary and
is a little wasteful of material. Foam
strips are ripped 1-1/8” wide then
run through the shaper that’s cleverly
disguised as an old drill press. The ½”
thick strips are bead and coved with a
¾” diameter bit, full depth
bead and cove isn’t necessary and
is a little wasteful of material.
(click
images for larger views) |
|
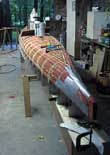
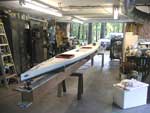
| 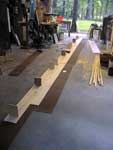 Building
box beam strongback. A strongback under
a stripper is handy as you can move to
different height sawhorses at different
stages to keep from bending over too much.
As I get older I spend much more time
thinking ahead to keep everything within
an arms reach. Building
box beam strongback. A strongback under
a stripper is handy as you can move to
different height sawhorses at different
stages to keep from bending over too much.
As I get older I spend much more time
thinking ahead to keep everything within
an arms reach.
|
|
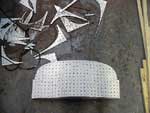
|  Full
size patterns pretty much a necessity
when you’ve got so many of them.
Patterns spray glued to poster board,
cut out around outside pattern. Trace
on pegboard (flip pattern for other side).
Cut around next pattern, repeat. Full
size patterns pretty much a necessity
when you’ve got so many of them.
Patterns spray glued to poster board,
cut out around outside pattern. Trace
on pegboard (flip pattern for other side).
Cut around next pattern, repeat.
|
|
|  Bow
sections cut out. Bow
sections cut out.
|
|
| 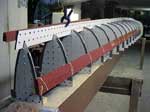 Set
up and started stripping. This is going
to be a one off boat, no sense in spending
time to notch all the molds for a keelson.
I brace the molds at the center with some
blocking and then keep everyting lined
up and square with a notched piece of
scrap pegboard until there are enough
strips in place to hold everything square. Set
up and started stripping. This is going
to be a one off boat, no sense in spending
time to notch all the molds for a keelson.
I brace the molds at the center with some
blocking and then keep everyting lined
up and square with a notched piece of
scrap pegboard until there are enough
strips in place to hold everything square.
|
|
|  Stripping
right along. The handheld pumpup sprayer
is a very useful tool when using polyurethane
glue. Even East Texas 90% humidity isn’t
enough moisture to make this glue work
right. You must moisten the joint before
applying glue. Stripping
right along. The handheld pumpup sprayer
is a very useful tool when using polyurethane
glue. Even East Texas 90% humidity isn’t
enough moisture to make this glue work
right. You must moisten the joint before
applying glue.
|
|
|  High
tech gluing jig for bread and butter glue
up on stern (bow similar). High
tech gluing jig for bread and butter glue
up on stern (bow similar).
|
|
|  Almost
done stripping. Sundry weights stacked
up to hold last fit pieces in bottom.
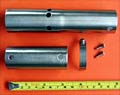
Stern and bow pieces glued in place. The
rudder cut from a piece of ¼”x4”
aluminum is visible on end of beam. I’ve
been known to hold rudder up in place
and make little burbling sounds at this
stage. Almost
done stripping. Sundry weights stacked
up to hold last fit pieces in bottom.
Stern and bow pieces glued in place. The
rudder cut from a piece of ¼”x4”
aluminum is visible on end of beam. I’ve
been known to hold rudder up in place
and make little burbling sounds at this
stage.
|
|
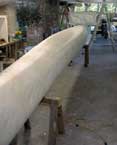
| 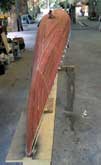 Shaping
up, a lot easier and quicker than a wood
stripper. A sureform style tool is really
helpful at this stage followed be a little
airfiling or sanding. Shaping
up, a lot easier and quicker than a wood
stripper. A sureform style tool is really
helpful at this stage followed be a little
airfiling or sanding.
|
|
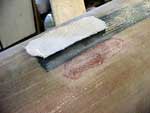
| 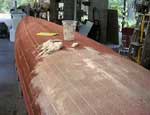 The
dark side of foam stripping. The relatively
coarse pores of the foam need to be sealed
or you will use enormous quantities of
epoxy laminating the hull. Here I’m
squeegeing a very thick mix of microballons
into the foam to seal it. The
dark side of foam stripping. The relatively
coarse pores of the foam need to be sealed
or you will use enormous quantities of
epoxy laminating the hull. Here I’m
squeegeing a very thick mix of microballons
into the foam to seal it.
|
|
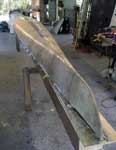
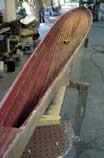
|  Done,
the difference in color is due to using
up different bits of different epoxy systems
to clear out stuff. Done,
the difference in color is due to using
up different bits of different epoxy systems
to clear out stuff.
|
|
|  Almost
ready to glass. The 17 ounce biaxial cloth
laid out on hull but not yet trimmed. Almost
ready to glass. The 17 ounce biaxial cloth
laid out on hull but not yet trimmed.
|
|
|  Laminated.
The dark stripe along the keel is a 15’
strip of 3” unidirectional carbon
fibre under the cloth for longitudinal
stiffness. The transverse dark stripes
are a little gunk left in the biaxial
cloth from being in a couple of floods.
I used some epoxy from Fiberglass Industries
that was far thicker than what they used
to sell. Resin would not pump so we marked
up a bunch up cups and Susie poured and
mixed. I was a little concerned about
wetting out the carbon and the less than
pristine biaxial and really slobbered
the epoxy along the keel joint. That was
a mistake, The carbon floated a bit in
the sea of epoxy and I ended up with a
wavy surface over part of the bottom.
And probably added an extra 5 or so pounds
of epoxy. Laminated.
The dark stripe along the keel is a 15’
strip of 3” unidirectional carbon
fibre under the cloth for longitudinal
stiffness. The transverse dark stripes
are a little gunk left in the biaxial
cloth from being in a couple of floods.
I used some epoxy from Fiberglass Industries
that was far thicker than what they used
to sell. Resin would not pump so we marked
up a bunch up cups and Susie poured and
mixed. I was a little concerned about
wetting out the carbon and the less than
pristine biaxial and really slobbered
the epoxy along the keel joint. That was
a mistake, The carbon floated a bit in
the sea of epoxy and I ended up with a
wavy surface over part of the bottom.
And probably added an extra 5 or so pounds
of epoxy.
|
|
|  Insult
to injury. I missed one spot toward the
bow where the biaxial puckered and got
a bubble about 2” wide and 6”
long. Easy to fix, cut off bubble and
sand a taper ½” or so wide
around cutout. Taper down to the foam.
Patch piece is cut out and ready to laminate
in. Insult
to injury. I missed one spot toward the
bow where the biaxial puckered and got
a bubble about 2” wide and 6”
long. Easy to fix, cut off bubble and
sand a taper ½” or so wide
around cutout. Taper down to the foam.
Patch piece is cut out and ready to laminate
in.
|
|
|  Patch
done, except for some serious sanding.
Glass patch plus a piece of peel ply held
in place with some southern-engineered
“vacuum bag”. Patch
done, except for some serious sanding.
Glass patch plus a piece of peel ply held
in place with some southern-engineered
“vacuum bag”.
|
|
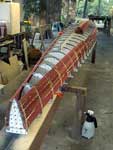
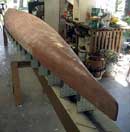
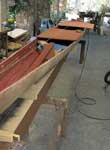
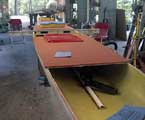
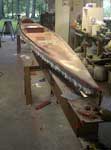
|  Turned
over. The molds are taken off the strongback
(any one interested in a special deal
on a set of mold?) Turned
over. The molds are taken off the strongback
(any one interested in a special deal
on a set of mold?)
A set of cradles (4
in this case) hold the hull in place and
in shape. Everything is still pretty flexible
at this point. The mold in foreground
is out to check the shape of hull, which
was OK. Once again a sureform style tool
is handy for shaping inside.
|
|
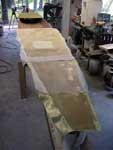
|  Preliminary
fitting of deck pieces. Preliminary
fitting of deck pieces.
|
|
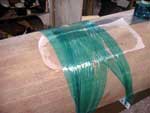
|  Vacuum-bagging
(sort of). I’ve had some good results
with vacuum-bagging small parts using
‘space saver’ bags and a shop
vac. Here I’ve tried to extend the
idea using 6 mil visqueen, duct tape and
the vacuum valve from a torn space saver
bag. Too many leaks, had to keep hitting
the bag with a shot of vacuum every 3-4
minutes. Not quite a didaster but not
really worth the hassle either. Vacuum-bagging
(sort of). I’ve had some good results
with vacuum-bagging small parts using
‘space saver’ bags and a shop
vac. Here I’ve tried to extend the
idea using 6 mil visqueen, duct tape and
the vacuum valve from a torn space saver
bag. Too many leaks, had to keep hitting
the bag with a shot of vacuum every 3-4
minutes. Not quite a didaster but not
really worth the hassle either.
|
|
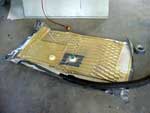
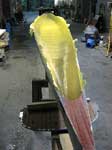
|  Kevlar
on underside of deck. Go back to the techniques
I know, more or less. Not that much experience
with Kevlar but this works fine. The lighter
yellow is 5 ounce kevlar, the darker is
a super fine 2 ounce. Most is covered
with peel ply and the light squareish
area is where a hatch will be. Kevlar
on underside of deck. Go back to the techniques
I know, more or less. Not that much experience
with Kevlar but this works fine. The lighter
yellow is 5 ounce kevlar, the darker is
a super fine 2 ounce. Most is covered
with peel ply and the light squareish
area is where a hatch will be.
|
|
|  Kevlar
inside of hull. Five ounce in this case,
goes much easier than I expected at least
partially because the epoxy is so thick
and sticky. Kevlar
inside of hull. Five ounce in this case,
goes much easier than I expected at least
partially because the epoxy is so thick
and sticky.
|
|
|  Gluing
on deck. The drain tube between footwells
is visible, made from a slit piece of
1” light pvc pipe. Gluing
on deck. The drain tube between footwells
is visible, made from a slit piece of
1” light pvc pipe.
|
|
|  More
deck fitting. More
deck fitting.
|
|
|  Marking
the fore deck for the raised blister in
front of Sue Marking
the fore deck for the raised blister in
front of Sue
|
|
| 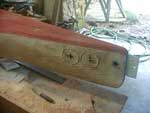 Stern
showing the start of cutout for hand hold
and the ACM (aluminum composite material)
tab for the rudder mount. The (waxed)tab
was inserted into a cutout in the foam
filled with epoxy/graphite/wood flour
mix. Stern
showing the start of cutout for hand hold
and the ACM (aluminum composite material)
tab for the rudder mount. The (waxed)tab
was inserted into a cutout in the foam
filled with epoxy/graphite/wood flour
mix.
|
|
|  Glassing
the deck. 6 ounce in the middle half of
boat, 4 ounce toward the ends, still using
scraps. Even the 1-1/2” wide unidirectional
along the gunnels was leftover from another
project. Glassing
the deck. 6 ounce in the middle half of
boat, 4 ounce toward the ends, still using
scraps. Even the 1-1/2” wide unidirectional
along the gunnels was leftover from another
project.
|
|
|  Rudder
pedal mockup. Maybe not completely necessary,
but I wanted to check out the real amount
of cable movement to help size rudder
quandrant and check feel. Much better
feel with the assemblies angled out a
bit. Rudder
pedal mockup. Maybe not completely necessary,
but I wanted to check out the real amount
of cable movement to help size rudder
quandrant and check feel. Much better
feel with the assemblies angled out a
bit.
|
|
|  Caution,
non boat related content. Younger granddaughter
Brynna manages to be first to sit in boat. Caution,
non boat related content. Younger granddaughter
Brynna manages to be first to sit in boat.
|
|
|  Graphiting
the bottom. Turned out to be a lot of
work, even minimized a lot of area and
tough to sand plus those wavy bits in
the bottom. Took four rounds to get it
reasonably good. Graphiting
the bottom. Turned out to be a lot of
work, even minimized a lot of area and
tough to sand plus those wavy bits in
the bottom. Took four rounds to get it
reasonably good.
|
|
| 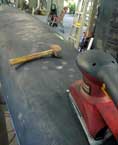 The
sanders version of punch drunk. Sanding
and sanding and sanding; mind wanders
“is this really worth it?”
Take hammer in hand and whack bottom to
see. Not hard enough to drive a 16d nail
but easily hard enough for some 6d finish
nails. Not a scratch, not a mark. Continue
sanding. The
sanders version of punch drunk. Sanding
and sanding and sanding; mind wanders
“is this really worth it?”
Take hammer in hand and whack bottom to
see. Not hard enough to drive a 16d nail
but easily hard enough for some 6d finish
nails. Not a scratch, not a mark. Continue
sanding.
|
|
|  Amost
done with Almost There. Except for all
the fitting out and trimming, but it is
getting closer. Amost
done with Almost There. Except for all
the fitting out and trimming, but it is
getting closer.
|
|
|  Sue’s
seat. I had gone to hobby shop to get
some more expanding foam and they no longer
carried product. Closest, quickest alternative
was West Marine at $100 quart. Nope. Tried
some leftover spray can material and learned
what works and what doesn’t. Part
of a new $5 can of spray foam and Sue
has a fitted seat. Time will tell how
the spray foam holds up and holds its
shape. I was going to get a picture of
Sue sitting in the mold but we were busy
talking about the finer details of double
blade paddling. Sue’s
seat. I had gone to hobby shop to get
some more expanding foam and they no longer
carried product. Closest, quickest alternative
was West Marine at $100 quart. Nope. Tried
some leftover spray can material and learned
what works and what doesn’t. Part
of a new $5 can of spray foam and Sue
has a fitted seat. Time will tell how
the spray foam holds up and holds its
shape. I was going to get a picture of
Sue sitting in the mold but we were busy
talking about the finer details of double
blade paddling.
|
|
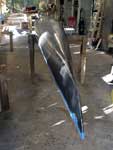
|  Out
in the sunlight, time to get front mount
fitted and start paddling. At this stage
boat weighs about 63# and is a load for
an old man to move around. Working in
stages help. Out on sawhorses, bow up
on ladder, swing stern up on rack, then
bow. Its much easier at the lake there’s
two of us. Out
in the sunlight, time to get front mount
fitted and start paddling. At this stage
boat weighs about 63# and is a load for
an old man to move around. Working in
stages help. Out on sawhorses, bow up
on ladder, swing stern up on rack, then
bow. Its much easier at the lake there’s
two of us.
|
|

Other Articles by Skip
Johnson:
|