Part One - Part Two
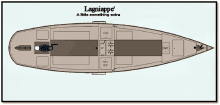
Lagniappe'
Here’s what’s sailing around in my head.
A 25 foot aluminum sharpie being built for camp cruising on sounds and bays all around the country.
In Louisiana Lagniappe’ (pronounced LAN- YUP) means “a little something extra” and I wanted to give my design that extra something by borrowing ideas, details and design elements from others in the boating community that I admire. I don’t think there are that many original ideas coming out these days but I’m not shy about borrowing the really good ones.
I borrowed the lee board and general layout from Jim Michalak’s Laguna design which was commissioned by Chuck Leinweber (I bought the plans); but my boat has a 5’ wide bottom instead of Laguna’s 4’. I also enclosed my center into a multi-compartment affair with a fresh water tank (not necessarily for ballast but I figure it’ll help anyway), twin ice chests, propane locker and self-built double burner propane cooker.
I borrowed the round stern and balanced rudder from myriad builders of New Haven Sharpies from the early 1800’s up until now and added the flat on the bottom of the rudder which I learned of from Phil Bolger who I’ll bet borrowed it himself. Phil also advocated that sharpies should have their bows rise slightly above the surface of the water. Jim follows that philosophy and so did I. New Haven sharpies just look so salty to me.
Since my design has a round stern and balanced rudder, an outboard in a well is necessary. I got that from Dories with motor wells. The New Haven design means that the stern rises quite a bit above the waterline. As a result the motor well shows a bit from the rear and will negate any tendency to “geyser”. I hope!
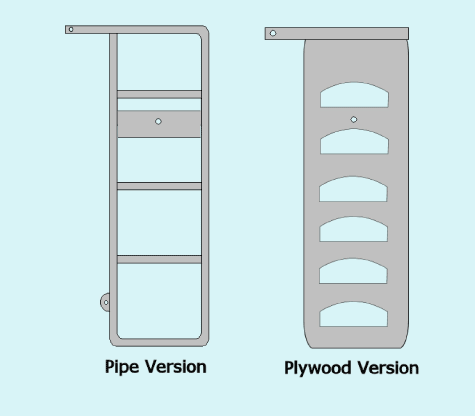
Boarding Ladder
No room on the stern so the closest thing to an original idea I had was for a boarding ladder. I came up with a variation on the pivoting leeboard and built a pivoting ladder mounted the same way. The ladder and leeboard are interchangeable and can be mounted on either side. This has not been tested yet. The idea is that if you and your crew are swimming, one can hold down the side opposite the ladder while the other climbs on board. Then the second swimmer can dive under or swim around to the ladder while the first to board sits opposite to hold things down. Testing will determine if/how it will work with only one on board. Maybe because of the 5 foot bottom…or maybe use a drogue? One final thought; in case your leeboard got damaged perhaps slipping a sail bag over the boarding ladder would enable a sailor to sail to windward using it as an emergency leeboard.
Design Departure
Where I departed from these wise men of boat design was in the material I would build her from…Aluminum. Learning to weld Aluminum is easy these days but it does require specific procedures to be learned. There are books that can give that information; and I think I’ve read them all!
In addition, there are articles, forums and videos all over the internet that can be of enormous help in learning all you need to know. You had a learning curve working with epoxy didn’t you?
I bought the materials I need for the boat... ten sheets of 1/8” x 4’ x 8’ and two sheets of 1/8” x 5’ x 12’ for the bottom along with several lengths of pipe for the gunnels and etc. Unlike plywood, aluminum can be bought as much as 8 ft. wide and up to 40 ft. long in many thicknesses. Great if you can handle the big sheets by yourself. I recommend a chain hoist or a forklift if you have one.
If you duplicated these sizes in plywood you would need the same equipment to handle it.
Working with Aluminum
Welding wire serves as the fillet material substitute for epoxy in a plywood design and when building in aluminum it hardens full strength instantly. This fact alone saves much building time.
Compared to using an epoxy/glass/plywood composite, building a boat from aluminum could be called high speed boatbuilding. The old timers only used nails or drifts to hold their sharpies together which had the benefit of a fast build but also had the faults of leaking like a sieve until it “swelled up” and it had a short life span whereas welded aluminum has the benefit without the faults.
All else in aluminum is done mostly with woodworking tools. WARNING: IT’S LOUD; WEAR EARPLUGS! ALSO LONG SLEEVES, GLOVES, A HAT AND FULL FACE SHIELD. Aluminum “sawdust” flying out of your saw can hurt and the radiated ultraviolet light from welding can give you severe sunburn.
Washing it out of your hair and ears isn’t fun either…just like wooden sawdust.
I had several of the full sheets sheared into 2’ x 8’ side pieces at a local fabricator’s shop for not very much. He also sheared the bow & stern angles but I have to use a circular saw to get the sides shaped after welding them all together to form the whole side panels. He also has a Press brake and I had him brake (fold) the seat and seat fronts from one piece of aluminum. Of course I have to make ¼” plywood templates and cut the arcs in them where they meet the sides and bottom, but sub-contracting the brake and shear work cost very little and saved me a bunch of work. WARNING: CLEAN YOUR METAL AFTER GETTING IT BACK WITH ACETONE TO CLEAR AWAY OIL AND GREASE
I’m going back to the fab shop to have the bulkheads sheared at the 20 degree flare angle after I lay them out. Very clean and precise cuts that way…leaves a bit of a burr on the edges but it only takes a couple seconds to sand them off.
Sawing them is a good alternative if money is short...a little more sanding but not much.
Interpreting a plywood design into aluminum building takes some thought. Aluminum needs to be supported well so I studied several other aluminum designs and realized that most of them use two feet or more span between frames and bulkheads… perhaps more/less depending on the thickness used. My boat only has two foot high sides and length-wise the seats bisect that on the sides and the seat fronts, baffles and bulkheads reinforce the bottom on the inside and on the outside there is a half-pipe keel strip welded down the center stem to stern. The result is that nowhere is there more than a 12 inch span in any direction. Therefore, I chose 1/8” thick aluminum in alloy 5052 H-32 (a good general purpose marine grade material). Since I won’t be tonging for oysters there is no need for Lagniappe’ to have side decks and so the gunnels (gunwales), leeboard guards and some fittings are made from extruded pipe in alloy 6061 T-6… also marine grade and tough as nails. The pipe is slit (not split) down its length on the table saw and pressed onto the sides using a rubber mallet. It is then welded in place on both sides to complete the gunnels. Angles are calculated and cut to fit at the bow and on both sides of the stern where the curve starts. My stem will also be of pipe.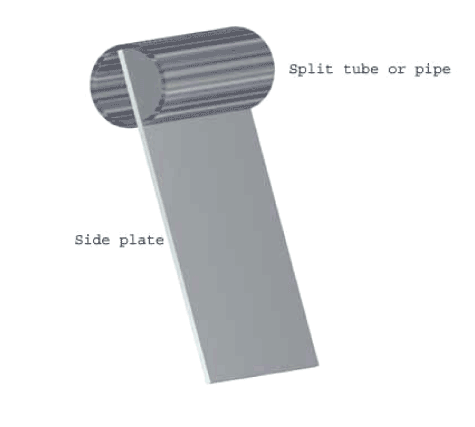
Cost?
I figure it will total about the same as marine grade plywood plus the epoxy and cloth you’d need for a quality build in ply but without all the mess and without all the waiting for epoxy to set. Time is the principle savings since it won’t take as long to complete the boat. Yes, you could do it cheaper from lumber yard materials and PL Premium but my aluminum boat will outlive me and my grandsons many times over and if someone ever decides to scrap it, it will be worth even more than now due to the inevitable rise in scrap aluminum prices over the decades & maybe even centuries.
Building Techniques and Special Tools
I’m the tool nut…remember? It never ends.
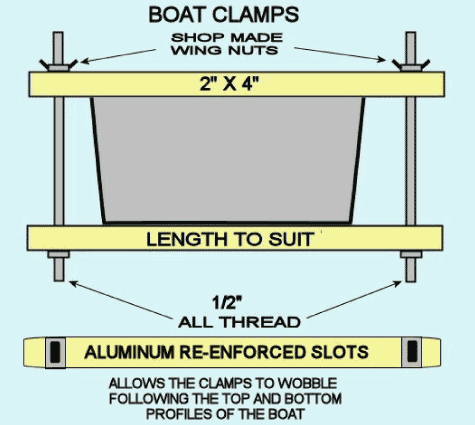
My boat is built right side up, unlike most sharpies, so I came up with a clamping system for forcing both the gunnels down and the bottom up at the same time. The idea is to move the clamps along a few inches at a time (working from the middle towards both ends) tack welding the bottom and gunnels to the sides. Then go back and continuously weld all the seams water tight. After tacking the boat can be picked up and tilted every which way for gaining optimum welding positions.
I built three of these:
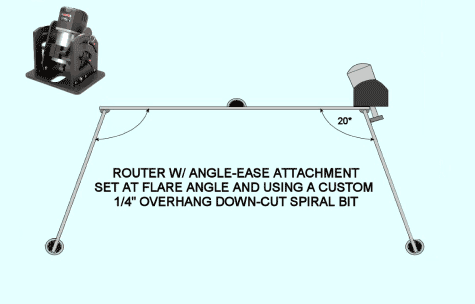
Lagniappe has a constant flare angle; so after welding and rough trimming with the plasma cutter, I will use my Angle-Ease router accessory and an oversized bearing on the bit to trim the bottom plating to ¼” from the sides.
To be continued...
Dan Roberts
Encore Tools & Equipment Inc.
Salisbury, NC
www.encoretool.com |