| To
Part One
To Part Three
Last time we looked at some basic edge tool techniques to get
started thinking about what a good edge should do. Now let’s
look at how to create that edge.
First we need to define what “sharp” is. A sharp
edge is a solid defined by two planes intersecting along a single
line. The angle varies with the type of work to be done. A fat
angle holds up to more abuse (good for an axe), and a fine angle
cuts with less resistance (like a razor).
But we can’t attain that theoretically perfect edge in
the real world. We can only approximate it. There are two elements
to this approximation, maintaining the correct angle, and working
the metal to a fine polish. If the angle is not maintained at
a constant angle, the two planes will not be planes.
The finer the polish, the less “serrated” effect
results from the grooves cut by our sharpening abrasive. The edge
also lasts longer when it’s polished finer, since it doesn’t
have those large ridges to wear off and create big dull spots.
Think of this in three dimensions. If each groove creates in effect
a raised bead next to it, sort of laying on the surface of the
blade. These beads wires will wear down. The ends of the wires
will then be round spots on the blade instead of two planes meeting.
In short, dull. So all this polishing business really does matter.
Abrasives
If you want to start an argument, just mention sharpening abrasives
in a crowd of woodworkers. It’s like mentioning adhesives
near boat builders. People will start bellowing about Arkansas
stones versus Washita stones and sorts of other pet abrasives.
All these abrasives may have good points. But we need to learn
how to get an edge first, and that’s not a function of the
abrasive so much as the technique. So for now let’s choose
something that everyone can obtain easily—wet/dry sandpaper
laid flat on glass. Spray contact cement can hold it in place
so you can use both hands for the blade.
Most hardware stores carry wet/dry sandpaper in grades down to
#600, which is plenty to get started. Auto body supply stores
carry down to #2000, which is enough to please most woodworkers.
If you really want to go the extra mile, get some crocus cloth
at the hardware store for the final pass. The finer you polish,
the longer it stays sharp.
But get the largest quantity of about #100-150. This is where
you’ll take off the bulk of the metal and spend most of
your time. As soon as you get the right shape with #150, the finer
grits only serve to remove the cutting marks of the larger grits.
This goes pretty fast in gradations of 180, 240, 330, 600, 1000,
1500, 2000, crocus cloth. It’s the #100-150 that seems to
take forever.
Some folks use oil or water to keep the sandpaper clear. I don’t
think it’s really necessary, since by the time it clogs
it’s usually dull anyhow. Sharpening dry also makes a lot
less mess. You can do it while watching TV once you’re good
at it. But when you’re starting out, practice slowly, with
full concentration.
Cutting Angles
For wood, we’ll want a cutting angle of about 25 degrees.
There’s nothing magical about that number, though. The smaller
the angle, the less cutting force is required. But a thinner edge
wears out quicker. So it’s a matter of matching the angle
to the intended use, and it’s not an exact science. Some
might prefer a smaller angle and be willing to sharpen more often.
Others would rather have more time between honings and won’t
mind pushing a little harder and risking a more tear-out.
But there is one wrinkle on angles you do have to know about.
The cutting angle is only one of the angles we grind. There’s
also a relief angle. The reason for this is obvious if you’ve
done it a couple times. Suppose you have a 1/8” thick blade.
With only one angle, you have to take metal off a bevel that runs
that entire thickness every time you sharpen. Certainly it’s
possible, but it makes for longer interruptions of the work.
A relief angle is a slightly more acute angle ground into the
blade behind the cutting angle. Its purpose is to make the blade
effectively thinner where the cutting angle is ground. This means
you re-sharpen without need for a power wheel – you just
use a fine hone and a strop and are done with it. Eventually it
will start getting thick again and you’ll need to regrind
the relief angle.
|
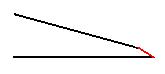
Relief angle illustration |
Above, the black lines are a side view of the blade’s
relief angle, and the red line is where this is nipped a little
blunter to make the cutting angle.
Honing Guides
Commercial honing guides are nice because they make the sharpening
go faster and with less attention. If you have them, use them.
But for this project let’s learn how to do it by hand. Not
everyone wants to invest in guides right away, but we all have
hands. At first this takes the concentration of a hungry predator
to get it right, but it gets easier.
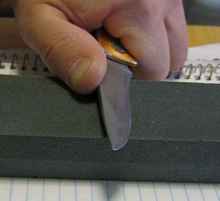
Here’s how I grip the chisel. (Here I show a plane iron.)
 |
Honing grip |
It pays to wear gloves for this. My knuckles drag along the
sandpaper and form the guide angle. The angle is controlled by
how closely to the edge I grip the blade. So after I get the relief
angle, I move my hand slightly closer to the blade to get the
cutting angle. Again, the exact angles don’t matter, so
long as they are in about the right range and you can keep them
consistent. I leave my knuckles dragging because if I don’t,
I end up honing a more acute angle when further from my body and
a fatter angle close to my body. This of course means a rounded
edge rather than a sharp one.
Consistent angle is everything, regardless of how you achieve
it.
 |
Burr |
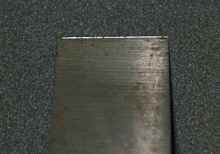
After a short eternity, we get the “burr”. This
is the final bit of steel that got so thin that it had little
stiffness. With little stiffness, it is not held against the abrasive
and cut – it just trails off the edge as a thin metal foil.
This burr tells us we are done grinding the bevel. Now flip the
blade and ensure that the back is flat. This usually takes off
most of the burr.
Then we change angle a very slightly to do the cutting edge,
and the same burr tells us when we’re done. It doesn’t
take nearly as long this time.
Don’t let go!!! You need to keep your hand in the right
position for this second angle. Switch abrasives and grind until
the abrasive marks have been reduced to the size of the current
abrasive. One way to tell is with a 30x magnifier, but most of
us just grind until a burr appears. This one will of course be
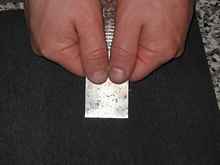
smaller. When it gets too small to see, you can feel it by sliding
your thumbnail towards the edge and off it on both sides. You’ll
feel the burr shave off a little thumbnail if it’s there.
It’s like a cabinet scraper. Otherwise your thumbnail slides
smoothly off the edge and you keep grinding.
It should not take too long on each grit as you increase smoothness.
If it takes a long time, you might have changed the angle. If
you think you messed up the angle, go back to the coarser grit.
For the knife, we use a similar technique, but with our thumb
or thumbs on the back of the blade.
 |
Thumb sharpen |
It’s a much smaller angle, but remember that most knives
have two bevels. For a single bevel knife, the angle is more like
on a chisel. If you get tired of dragging your thumbs here’s
a dirty trick. (I got this from https://gpvec.unl.edu/filesdatabase/files/feedlot/sharp1.htm#sharp_a.
The link is dead now, but someone at that vet school deserves
the credit.) Yup, that’s a binder clip.
 |
Clip sharpen |
One final touch on the chisel – dull the corners slightly.
It seems to make a smoother cut without the corners popping up
wood fibers. To be honest, I normally don't bother with this,
since I want a chisel to be able to cut into corners.
Testing
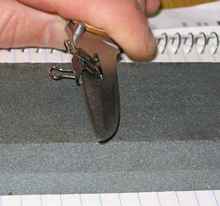
But how sharp is it? The customary test involves attempting to
shave hairs from one’s arm, but hair varies so much I doubt
this is very scientific. A better test involves a Bic “Round
Stic” ballpoint pen and a protractor. Hold the pen vertical
and apply the blade with very gentle pressure – just its
own weight. At some angle, the blade will slip. The sharper the
blade, the more acute the angle. This angle provides a relatively
concrete measure of sharpness.
 |
Sharp test |
As you can tell by my makeshift base made of a roll of paper
towels, I haven't yet come up with a good protractor jig, however.
Eyeballing it seems to get me close enough to get the job done.
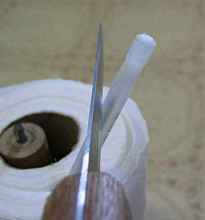
Then one can drag the pen along the blade to feel for any unevenness.
 |
Edge test |
Power Tools
You should not need to regrind the edge all that often. But when
you do, it’s slow. In one way this is good, since you can
do a lot of damage in a hurry with a high-speed shop grinding
wheel. The high speed will create heat, and that heat will draw
the temper of the steel in no time. Then you’ll have to
learn about annealing, hardening and tempering steel, which is
even more time-consuming than manual sharpening. Better to keep
the steel cool with frequent dips in water. Basically, if you
can’t see any droplets on the metal, dip it again.
Heat is not the only danger. One slip with that all that power
can make a real mess of the blade’s bevel. To use a high-speed
grinder you really need a bevel guide. Fortunately it is dirt
cheap to make one.
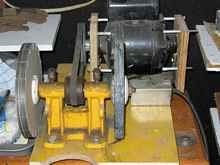
Here is the typical yard sale grinder, made from a very old appliance
motor. To work right, you need 1750 rpm – more is just asking
for trouble. I think you also need it turning toward you. Turning
away from you it tries to lift the blade and spoil the bevel.
However it may just be that my wheel is a little uneven.
Take note that this wheel would need a lot of work to dress it
flat. Usually the wheels on these cheapo grinders are way too
much work to dress back to flatness. This might be a good place
to save some effort and buy a good quality 80 grit soft white
oxide wheel. Make sure it can handle the rpm your motor runs at.
While these yard sale grinders don’t cost much, they aren’t
that useful unless we add something. Here’s the something.
This is the simplest grinder guide you can make. Make sure the
bolt pattern is wide enough that your widest plane iron can slide
all the way off the wheel in both directions, if possible. With
the grinder off, establish the bevel. You will need to get a good
view of the side of the wheel. Turn on the motor and touch the
blade to the grinder. It should make a mark right in the middle
of bevel. If not, adjust until it does. Then grind (and cool)
until you get a burr.
The same guide works for knives too. Don’t forget to adjust
the angle when you switch between knives and chisels. Chisels
will be around 25 degrees and knives around half that.
Grind only until you get the burr, then finish on your abrasive
papers on glass. Be sure to direct a light so it is obvious when
the burr starts to come up onto the wheel. With overhead light
you can be lifting a lot of burr before you even notice. Trust
me.
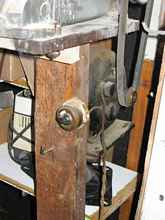
Wet Grinding
The deluxe approach is a wet grinding wheel. These can cut much
faster with no danger of overheating the steel. New ones are quite
expensive, but sometimes you get lucky at an estate sale.
By the way, get a load of the rotary switch and the thumbwheel
terminals on the ancient refrigeration motor running this thing.
I got this at an estate sale, and I sure wish I'd known the guy
who cobbled this together when he was alive. It looks like something
I would have put together if I'd been alive when such switches
were even remotely common.
Anyway, the wet grinders are really only for establishing the
main bevel. For sharpening you want something finer. I use a…
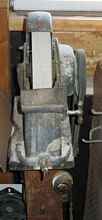
Paper Wheel System
These are around $40, not including the yard sale buffer setup
they are mounted on. Here’s the link:
https://users.ameritech.net/knives/paper.htm.
 |
Paper wheel |
This setup has saved me easily $40 woth of time. With a relatively
steady hand, it seems you don’t need a jig with this system
for putting the final edge on a good bevel. Grind a microbevel
on the abrasive wheel just enough to raise a burr, cut some scrap
cardboard to remove the burr, then polish the microbevel on the
smooth wheel. Quick and easy.
Sharpening Drills
I was going to leave this out, but it occurs to me that later
in this series we’ll want to drill some steel. Steel laughs
at a dull drill. Aluminum heats it up and breaks it off in the
hole and make a piece of scrap aluminum. So we’d better
know how to keep drills sharp. This is actually quite simple.
The jig comes from the impossibly clever Harry Bryan. (He’s
the guy who designed the pedal-powered fin drive for a small rowboat
hull he called the “Thistle”. Do a web search and
be amazed.) You can find the whole article in Woodenboat #121
with further comment in #123.
But since I don’t see this repeated anywhere online, here
are some photos of how I made mine. Actually this is my second
one, since I can't seem to find my first one after moving.
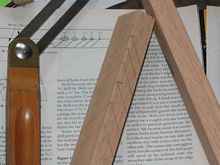
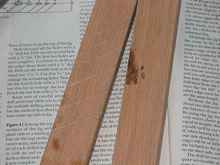
The jig is two hardwood scraps hinged together. Mine are about
.75 x 1.5 x 7”, but this is hardly critical. Draw a series
of lines on the inside of one piece at a 54 degree angle. Where
these lines emerge from the top, make a small mark. From these
marks we’ll incise lines at a 40 degree angle.
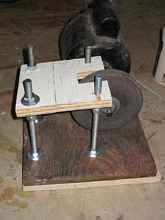
 |
Drill jig |
Saw a shallow kerf on each interior line. I used a common hacksaw.
 |
Drill jig kerf |
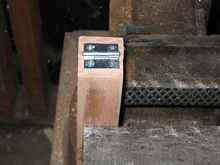
Then mount hinges. This is another thing I couldn't find after
moving. I'm sure you appreciate my horror at having to part with
$2 for a hinge when I knew that I had one just like it in a box
somewhere, waiting for this project.
 |
Drill jig hinge |
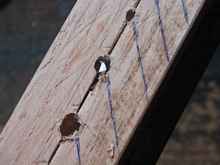
Clamp the jig closed and use the kerfs as pilot holes. Drill
all of the holes to 1/16”, then all but one to 1/8”,
then all but the first two to 3/16”, and so forth. The idea
is to have a range of sizes.
In use, clamp a drill in one of the slots. Hand pressure is enough.
Line up the edge of one of the blades with the inscribed line,
and advance the drill so only a little metal projects above the
top of the jig.
 |
Drill jig slots |
Then grind off what projects with a common double-sided whetstone.
Be sure to dip it in soapy water frequently to keep it unclogged.
I use mine with the paper wheel system, but I probably have to
re-draw my 40-degree lines more often this way. Either way, this
jig gets bits plenty sharp for steel.
References
If you get deeper into sharpening, you’ll want to do some
more reading. A web or library search by keyword “sharpening”
will turn up plenty. I think some of the clearest explanations
are from Hock Tools and Razor Edge Systems. But there are many
more.
https://www.hocktools.com/sharpen.htm
https://www.hocktools.com/sharpen2.htm
https://razoredgesystems.com
John Jurantich of Razor Edge Systems also wrote a wonderful book
on the topic, The Razor Edge Book of Sharpening. I think it has
about everything you could ever wish to know about the topic,
including specific recommendations on pocket knives, broadheads,
skinning knives, adzes, and about anything else an outdoorsman
might want to get razor sharp. And he’s not kidding about
“razor sharp” either. Jurantich is in the Guinness
Book of World Records for shaving with an axe!
Well, now that you can reliably put an edge on a tool, you’ve
lifted yourself to a different category of work. Some might even
call you a “craftsman”. I don’t know about all
that, but I do know that it is a fine thing to be able to slice
off a long paper-thin ribbon of wood.
The next step is tuning up a yard sale block plane, which we'll
look at in a future article. Until then, take your time and keep
the blade on the outside and the blood on the inside!
Rob Rohde-Szudy
Madison, Wisconsin, USA
robrohdeszudy@yahoo.com
*****

|