| To
Part One
To Part Two
Last time we looked at getting a sharp edge. Now let’s
look at reviving a dead block plane.
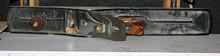
We all have one of these things kicking around the shop somewhere.
It’s probably rusting in a corner. That way we don’t
look at it so often and feel bad that we haven’t a clue
how to make the thing work. If you don’t have one, they
are often sold cheaply at farm auctions unless some antique knick-knack
seekers decide they look pretty. I’d never pay more than
$5 unless I was certain it was a real gem.
We’re starting with a block plane because most are pretty
simple. They put the bevel up and don’t bother with a chip
breaker or cap iron. Block planes aren’t meant for long
strokes on long grain, so these parts aren’t needed. Block
planes are meant for end grain – for making a butcher block.
Hence the name. Nonetheless, they see plenty of use doing jobs
better suited to larger planes because they are lighter, smaller,
handier and easier to get working. I freely admit that I often
use a block plane where a bench plane would be better suited,
since the block plane is easier to use with one hand, more likely
to be sharp because it’s easier to sharpen. And they’re
so small and cheap you can have a few of them and never lack for
a sharp one.
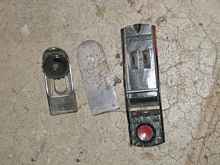
First have a look at how the thing works. Usually the only adjustment
is a lever that extends and retracts the blade. Occasionally there
is a side-to-side adjustment as well and really classy ones allow
you to move the frog back and forth to vary the mouth size. Usually
this last adjustment is reserved for larger planes. In fact our
example plane has no adjustments at all. To change the blade’s
position, one loosens the hand screw a bit and wiggles the blade
into the desired position. Here are two different planes taken
apart.
Don’t dive in on the blade first. Sharpening the blade
does little good if the sole isn’t flat. And usually they’re
not flat, since the metal in front of the blade gets worn down.
Retract the blade and set it on the glass you use for sharpening.
The sole should lay perfectly flat on the glass. If it rocks a
lot, the sole might be too warped to grind true. If it rocks only
slightly or not at all, it’s probably OK.
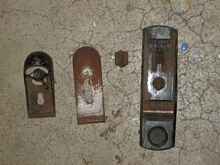
The next step is disassembly and cleaning. Be sure you can remember
how it goes back together, then clean all parts thoroughly with
mineral spirits and an old toothbrush. Brake cleaner spray is
wonderful stuff on stubborn pitch. Remove rust with #000 steel
wool. Look for cracks in the casting. Cracks are especially common
near the mouth. Unfortunately, these often mean the plane’s
frame will flex in use and make it difficult to use. If you find
a crack, save the effort and find another neglected plane to work
on. But save the iron and other parts, since they might fit another
plane you find later.
Now let’s true the sole. Set up your glass with #100 wet/dry
sandpaper or coarse emery paper, and reassemble the plane with
the blade retracted. Don’t try to do this with the plane
disassembled because the frame flexes a little when the blade
is tensioned. If you lap the sole with the blade out, it probably
won’t be true when you put it back under tension.
 |
Sole lapping |
Truing the sole is as simple and monotonous as it looks. It’s
a large area of metal to remove. There’s no problem doing
this while watching TV and you’ll need lots of coarse abrasive.
Planes are hard steel and they dull the abrasive fast. Keep grinding
until the entire sole is covered with scratches. I grind the first
pass sideways so I can distinguish these new scratches from the
longitudinal scratches the plane acquired in use. When the bottom
is evenly marked with crosswise scratches, you’re ready
to move on. Just like with the blade, continue through the smaller
and smaller grits, testing with crosswise scratches and a magnifier
to determine when each step is done. By the time you’re
done with the crocus cloth, the sole should be a dead-flat mirror
finish.
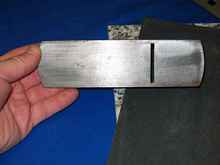
On this one I was in a hurry and stopped at #240, which is not
ideal but still a dramatic improvement. The plane is nicer to
use if you go all the way to a mirror-like finish, however. A
smooth finish will slide easily over the work, which is ideal.
If you plan to use a plane with a shooting board, you should also
lap the sides, taking care that they are square to the sole. I
made a few passes on this one just to ensure the sides were in
the right ballpark. I’ll go further if this plane winds
up seeing service with a shooting board.
Now we’ll tend to the blade. This is just like the work
we did with the chisel, but with a couple refinements. First,
be sure to keep the edge square. I think it’s best to grind
the blade completely square first, grinding as if you were trying
to dull it. Then you don’t need to worry so much about squareness
while sharpening.
The other refinement is how we hold the blade. We hold it like
the chisel, and in fact that is why I used plane iron photos when
discussing the chisel. This isn’t quite as quick and fun
as sharpening that little chisel. The hands start to cramp. So
maybe we should look at options for honing guides.
Honing Guides
The Veritas honing guide cost me about $25 when I got it and
works quite well. I think they’re up to about $40 now.
 |
Veritas |
There are cheaper ways, though. Bench plane irons have a mounting
slot that allows this cheap trick. (By the way, I’m using
“blade” and “iron” interchangeably.) A
regular carriage bolt and some nuts and washers adjusted to the
right length does fine. You do have to be more careful about keeping
things square. It also doesn’t work without a hole in the
blade.
Since I got the paper wheel system, I usually don't even bother
with a guide except for grinding the relief angle.
In use
From using the chisel, you now know about cutting in the right
direction with respect to the grain. You also know to take light
cuts so the blade doesn’t bog down. Both of these get more
important now, since a plane offers no latitude for varying the
cutting angle.
If you get chatter or grain tear-out when you’re taking
the lightest cut possible, there are a few things to try.
• Reverse direction of cut
• Apply more downward pressure – front, rear or overall
• Test your blade for sharpness
On really tricky grain you might need the more-complicated planes
that have chip breakers. But boats like straight grain, so the
only time we run into this is when laminating rather bad wood.
If you are not equipped with bench planes, you might have to resort
to a sanding block.
I use block planes in what many would consider to be the “wrong”
way.
 |
Chine planing |
Let’s face it, a lot of boat parts wouldn’t clamp
conveniently to a cabinetmaker’s bench even if I had one.
So the vice often ends up being a knee or a butt. I only found
out later that this is the accepted practicing among Japanese
woodworkers. For me it was simple necessity. It’s not easy
on the joints, but it will have to work until I get around to
making some benches better-adapted to boat work.
Bench planes
So what about bench planes? The only real difference is the chip
breaker. The bevel is flipped down rather than up, and this extra
piece of metal is screwed to the blade to make the shaving you're
cutting – the chip – peel up and away from the blade.
Obviously this needs to meet the blade exactly, or the chip will
find its way under the chip breaker and foul up the works. Making
this joint tight is the biggest pain in the butt of tuning a bench
plane, and the biggest reason I use block planes so much. Here's
one where I polished both up well enough to work, if not flawlessly.
 |
Cap iron |
There's another thing. Both the chip breaker and blade edges
need to be at exactly 90 degree angles from the centerline or
you get this:
| Chip breaker |
 |
Again, this is just one more thing between me and getting the
task at hand done. For gnarly grain in furniture you really do
need the chip breaking action to avoid tearout, but for the straight
grain we need for instant boatbuilding, it's usually more trouble
than it's worth in my opinion. I do, however, keep a long jointer
plane sharp for the times when I need a truly straight edge.
| Jointer |
 |
Rather, I've become sort of a connoisseur of anything without
a chip breaker. One of my favorites is an inexpensive Indian-made
low angle block plane.
| Low angle |
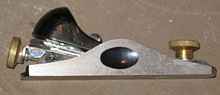 |
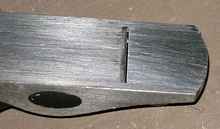
This one actually has an adjustable mouth, which is almost as
good as a chip breaker sometimes. It's hard to see in the photo,
but the front part can change distance from the blade, opening
or closing the mouth.
| Low angle |
 |
Another non-chip breaker tool I use quite a lot is a Veritas
low-angle spokeshave. I just checked the price and they are up
to $65. I use it so much, however, I think I might even pay that
in today's money.
Anyway, by the time you have it down with the block planes and
their relatives, you’ll know more than enough to seek out
sources on bench planes who know way more than I do. Until then
you know plenty to start planing off your saw marks.
Until then make sure to keep your shavings. Good tinder!
Rob Rohde-Szudy
Madison, Wisconsin, USA
robrohdeszudy@yahoo.com
*****

|