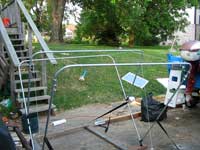
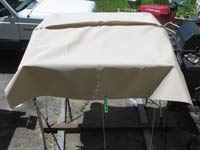
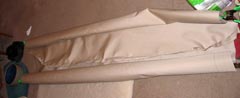
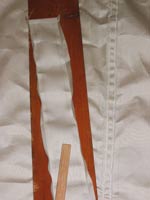
To review: in Part 1, after a few false starts, I finally got a decent frame put together for a bimini top on the AF4B. Here it is set up with Dacron line maintaining the correct dimensions, and mason’s twine marking the centerline and hems.
 click images for larger views click images for larger views
Here’s the part that reduces experienced woodbutchers to staring idiots. Fabric. The final frontier.
Hopefully the “Sewing for Manly Men” series (Part 1 and Part 2) has sunk in and you’re ready to take on some real sewing now. It really is just a matter of making some test seams and getting some practice. If you’re feeling unsure about the sewing, by all means make your first bimini in heavy duty polytarp. It is excellent practice and it might actually last quite a while if you keep in indoors. But get the silver tarp or it won’t block enough sun to be worth the effort of sewing it.
Materials
Now I know you all might think I’m going soft here—a cheap-to-the-max polytarp guy like me using expensive Sunbrella fabric. But I actually think it might make sense here. This is a small job that only needs about five yards, so the cost isn’t astronomical. I also wanted to show you guys that sewing good fabric is actually in some ways easier than even the good polytarp. There is much less stretch to account for, and the stretch is not as dependent on temperature. Furthermore, Sunbrella is not nearly as slippery as polytarp, which allows the feed dogs on the sewing machine to work properly, avoiding uneven stitch length and puckering. And obviously Sunbrella is available in really nice colors, where a rather ugly silver is the only polytarp that provides much shade.
If you want to split the difference, keep your eyes out for an old cotton canvas tent at yard sales. They can be had for next to nothing once the bottom rots out, but the remaining canvas is usually good stuff that makes fine bags and covers. You can also learn a lot from studying the construction of these things and sometimes you get good screen and zippers. But you’ll need to remember that it’s cotton and will rot if you don’t take pains to keep it dry. This is a little too fussy for me.
References
When we’re up against a job like this we wisely run for the canvas books. Unfortunately even the good books of this ilk either assume you have done a whole lot of sewing, or bury the bimini in a discussion of much more complicated dodgers and pilothouse-like constructions.
I found one book with a particularly commonsense approach—Canvas and Upholstery Projects for Boats and RVs by Jack Wiley. His treatment still mixes the discussion with dodgers, windshields and so forth. But it offers many more practical suggestions than is typical. Wiley is a handyman type who learned how to sew canvas, so he’s good at stripping away the “voodoo” and getting to the how-to.
Unfortunately this book is rather short on illustration, and most are line drawings. They’re good drawings, but in the internet age we’re pretty accustomed to color photos. So I’ll try to repeat his cogent hints here, and of course we’ll specifically address the bimini.
If you do want to build a dodger, the Wiley book will get you there, but you’ll probably have to read the section three or four times trying to form the pictures in your mind that we would have put in the book these days. Then you can write an article for the rest of us!
Patterning
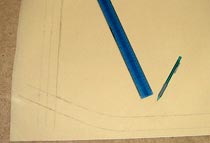
In most canvas books you’ll find some mumbo-jumbo about taking complicated measurements and doing math. Wiley correctly identifies that none of this is necessary, or even desirable. All we need to do is erect the frame, clamp the fabric in place and trace the frames! Here’s the fabric for the forward panel clamped in place on the front two bows.
 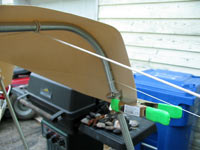
Sunbrella is quite stiff, which makes it relatively easy to clamp in place. Since it is held tautly in place, it is in exactly the position we want it in when the bimini is set up in its final form. Because of this, any markings we make now will be accurate! So we trace the center frame and centerline. Be sure to mark which edge is the front and which side is the top.
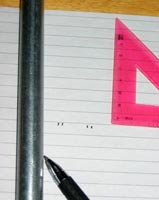
Soft pencil is best on light colored fabric, tailor’s chalk on dark. I had to make my lines heavy so you could see them in the photos, but you should make yours just dark enough to see. When you need to erase, use only a soft white eraser to get pencil off. The pink erasers will rub a lot of dirty pink stuff into the fabric.
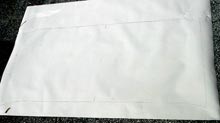
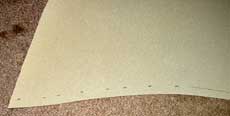
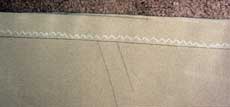
Here’s what one of the panels looks like. (The color looks wrong on some of these because I had to turn up the contrast so you could see the markings.)
Actually I should have only traced the center frame and centerline for now, since we have a built-in inaccuracy. Here’s what I mean: We can’t very well trace the center of the center frame, so we have to trace along an edge. This doesn’t account for the thickness of the frame, so our outside frame lines will be wrong after sewing. I traced them anyway because the final lines should be parallel to these. If they’re not, I know I screwed something up. This does make for more erasing than is necessary, however.
Next we add some seam allowances. There are many different styles of seam we could use but I chose the one that minimizes the number of layers we need to sew through. One side gets ½” and the other gets 1.5”.
Then we do the same for the rear panel. Be sure to label which panel is which too.
And finally we cut along the seam allowance lines we just drew. This provides us some scrap strips to calibrate the machine.
Run test seams and adjust tensions as described in your machines manual, or my article on machines. If you don’t have a lot of extra fabric, you might consider making the first seam with a sewing awl (same article) so you can be sure before you cut.
It is not a waste to buy an extra yard for calibrating machine and operator! This is like welding—you need to do test seams to truly get it right. (Hopefully that was a sufficiently macho reference to motivate you.)
Joining Panels
I found hand seaming easier for the first seam. The two pencil lines need to accurately meet and the stitching needs to run directly through them. This is a lot easier when you can look into the seam and place the needle just right. Or see both sides, if you have the seam the other way around.
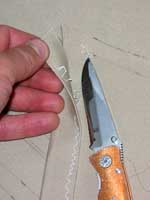
If you go this route, do yourself a favor and get some real sail needles. The triangular point of sail needles is more efficient at wiggling through this tough fabric. A palm is handy, but you can probably get through one seam without it by wiggling the needle through the fabric.
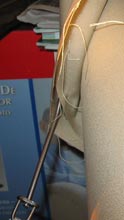
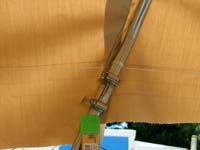
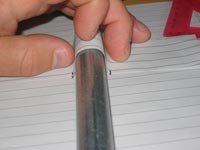
Also get or cobble together a sailmaker’s hook. This cheap and simple tool eliminated the baffling puckering problems that plagued my early attempts. Rather than piercing the cloth with the hook, I made a couple stitches and ran the hook through the stitching. Here it’s vertical because it was slack when I took the photo, but in use it is stretched horizontal.
Here’s a really important point – line up the centerlines and start there. That way any uneven tension will show up at the hem where we can fix it later. Make all transverse seams this way. Sewing toward the center is just asking for trouble. (This is one of those valuable hints from Wiley.)
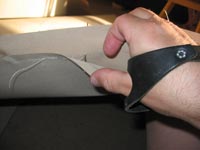
Done sewing now? It’s probably a good idea to clamp the fabric to the frames now to make sure we sewed the first seam right. A single straight stitch is a lot easier to remove than the reinforcing zigzag seams we’re about to add.
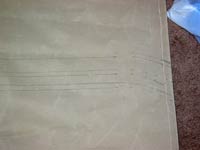
It fits, but you see how the lines changed. The outside frame lines are now parallel to the frames, but don’t coincide, and the hem lines don’t even match up! This underscores how pointless it was to trace all the lines in the first step. (Still, better to have traced and not need it.)
Flat Felled Seam
Now we turn this into a flat felled seam. Fancy term, eh? That just means that we knock down that upstanding ridge—“fell” it, like felling a tree—and sew it down flat. But we tuck the cut edge under to keep it from unraveling. There are several variations on the flat felled seam, and all have different numbers of layers we need to sew through. I chose the one with the fewest layers. This will make things easier when we need to sew yet more layers to these.
First let me diagram the steps so you get the overall idea. “RUB” is for where you “iron” a seam with a piece of wood, and vertical lines through the fabric denote sewing – one is a straight stitch, and a pair is zigzag.
Now let’s take this to the real world.
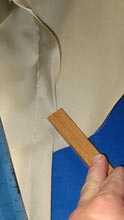
First let’s get the crease we need. Our seam allowances were ½” for one side and 1.5” for the other. We need to fold ½” of the long side back toward the other piece of cloth. An iron will melt most synthetics, so we just rub that crease down hard with a piece of hard wood. It helps if it has a sharp edge, sort of like a chisel made of wood.
Now it’s time to make some seams, but we need to get things ready to run through the machine. I rolled up the excess fabric on both sides of the seam and clamped it. Getting it through the throat of the machine is nearly impossible any other way. Even as it is, the weight of the fabric will pull things out of place quite a bit.
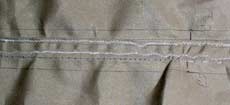
Then we make the seam nearest the fell. This is where I really noticed how much nicer it is to work with good canvas compared to polytarp. Once rubbed in, canvas lays flat and behaves itself pretty well. With polytarp you can fairly easily end up sewing a tube instead of a flat fell if the underlying layer isn’t under a little tension side-to-side. Worse, with polytarp the outer layers will drag against the sewing machine parts and create uneven stretching among the layers, which leads to puckering. If you’re using polytarp you might need to pin the layers together to get around these difficulties. With either fabric it seems to work best to sew the inside seam first to avoid making a tube.
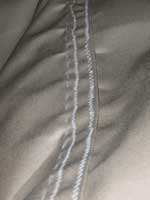
Not very nice, is it? I really should have wasted a yard of fabric and run some practice seams with rolled up excess! It is really hard to sew straight with the weight of the fabric pulling it out of place. The trick it to take up the weight of the fabric with your hands and steer the stitch, but let the machine do the feeding. This would have been much easier with the machine on the floor, but for some reason I forgot about that. Real sailmakers have machines recessed into a big sloping floor, so gravity helps feed the fabric. They also do this stuff in a huge area with nothing else in the way, which would have helped a great deal.
Still, the fell is flat, so I’m pretty happy. If the thread matched the fabric this drunken stitching would go unnoticed except to someone who was really looking for it. Puckers are dead obvious.
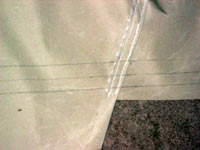
Notice those giant stitches from the very first single seam? I realized at this point that they were on the top! I was thinking they would be underneath and mostly hidden by the center frame sleeve. But I was thinking upside down! I got around it by flipping the entire project over, but this doesn’t always work. And again, it made for more erasing. Practice seams with top and bottom sides marked would have identified this problem. (I didn’t mark which side was which for my practice seam.)
Side Hems
Now that our center seam is final, it’s time to get the side hems done. Again we clamp the fabric to the frame and line up the centerlines. We also line up our flat felled seam on top of the center frame. Now that the fabric has gotten folded up a couple times, it takes some jockeying to get it in place, and some yanking and clamping to get it flat and smooth. I used eight spring clamps and a handful of large office binder clips.
Then again we trace the twine that marks the hem and remove the fabric. On a clean floor we can use a straightedge to complete the lines, and add seam allowance lines 1” and 1-7/8” outside of these lines.
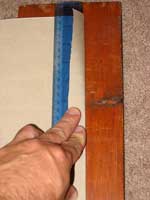
We cut along the outermost line, and need to fold and rub the other two. Since these lines are on the underside, we need to fold accurately with the line hidden on the inside. This had me stumped at first, but it turns out to be easy. Hold a ruler on the line, fold over the ruler, then remove the ruler and rub the crease. (Notice that this means I don’t need to erase the line. Handy!)
We only need one row of stitching to hold these together.
Again we test fit and find that the hems line up with the hem twine. While we’re at it we make our final tracing of the outer frames. Time to get this thing attached to the frames!
Front & Rear Frame Tubes
This part is sort of counterintuitive. You would think that we can simply sew a big hem and run the frame through that. This would be true if our lines were dead straight, but we can’t do it with any curves. Theoretically you could do it by sewing a dart, but it is impossible to avoid a pucker at the “crotch” of the dart. So we have to cut and attach a separate piece of fabric to make these frame tubes.
So far we have been able to always go back to our frame and test fit at any time. No longer. Since the frames run though the tubes we’re about to make, this is where we take a leap of faith. Be sure you have accurately traced the end frames with everything lined up. These lines are the key to this leap.
Then we need to decide whether we want (or might someday add) fasteners for side curtains or a vinyl windshield. If we do, we need to make a flat to attach the fasteners to. Since it only costs us a few inches of fabric and a couple seams, I thought it was worth the effort.
First I used a scrap of frame tubing and a scrap of fabric to figure out the dimensions of our tube. We want a slightly loose fit here, but only enough to slip the metal into place, and we want it uniformly loose. Lay the tubing flat on a piece of paper and use a small square to transfer its side measurements parallel to the paper. If you don’t have a small square, a CD case works well. Then mark 1/8” outside each of those marks. These will be the seam locations.
Then run a strip of paper over the top of the tubing, holding it down at both seam locations. Add some slack so the gap between the paper and tubing is about equal around the top. Then mark where the strip intersects the seam marks.
After measuring the results on the paper, I found that the ½” steel EMT very conveniently required 1” on the flat bimini panel, and 2” to get around it on the tube. So on the bimini panel we mark ½” inside the traced line. This new line is where we’ll line up the tube fabric while sewing it. Outside the traced line we mark at 1”, 1.5”, 3” and 3.5”. Really you don’t need all of these, but it helped me keep things straight to draw them all. The last line is the cut line.
After we cut, the leftover fabric can become the tube, but in many cases it will be too narrow, since most biminis taper a bit. Fortunately, we can rip the hem to get back some width.
Then we can trace the cut line onto our future end tube.

Once we have this outline, we can make our lines. They should be ½”, 2”, 4”, 4.5” and 5” from the traced line. Then we can make off an extra ½” on the hem ends and sew it. Then cut the traced line and the parallel line at 5”. Here it’s better to show you a diagram of the end view. Those are all zigzag stitches.

Again, remember to start all these stitches at the centerline and work outward. Sew the outermost seam first to keep the edges lined up, then work inward toward the tube, keeping the fabric flat and even. With the seams on the other side of the tube, again work from the outside seam inward.
With the end tubes sewed on, we can test fit. We now remove all the twine from the frame and take the outer bows off to install them in the canvas.
It fits! But it takes a little jockeying to get the middle frame lined up with the seam.
Only one thing left!
Middle Frame Tube
After the last tubes, this one is quick and easy. The span of the seam locations is marked on the underside of the bimini, straddling our first seam. Conveniently, both are one inch. We also add another line ½” outside these for lining up the tube fabric while sewing.
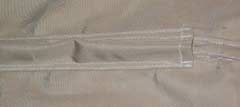
Here things are a lot simpler because we don’t need to take the tube all the way to the hems. This lets us put it only on the straight-line portion. Thus, the tube panel is a simple rectangle, 2” to encompass the frame, ½” seam allowance on each side, plus another ½” on each side to tuck under. After cutting on the outer line, we hem the ends and rub in the tuck-under.
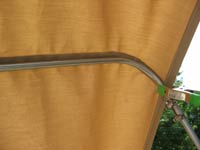
And here it is sewed down. You’ll want to remove the frames while sewing. This is the sole place I didn’t bother to sew away from the centerline, since it didn’t matter if it ended up a little bit off.
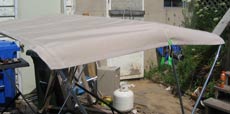
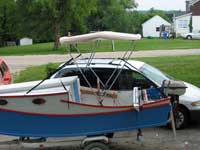
That’s it for sewing! Slip the bows into their tubes and test fit.
Setup
It only takes maybe three minutes to set up. I find it easiest to attach the uprights with the whole assembly upside down, then plug it into the fittings on the gunwales, the canvas resting on the cabintop. After attaching the forward straps, it is a simple matter to attach the aft straps to the hull and tighten.
 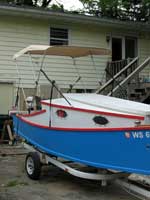
Now we have a bimini meant to duplicate the shape we originally set up. If one side of the bimini is trying to creep down at the rear or up at the front, that side is being pulled forward by the straps. Adjust the straps accordingly and it will set itself horizontally.
It takes about the same time to strike and bundle reasonably compactly.
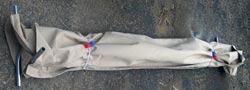
And most importantly I’m out of the sun!
Once you’ve gotten this far with canvas, you see how useful it is and you’ll probably do more. I probably will. I’m thinking on a canvas slot cover now. Maybe next month…
Rob Rohde-Szudy
Madison, Wisconsin, USA
robrohdeszudy@yahoo.com |