I’ve built quite a few boats over the years,
but most of them have been of the “Instant Boat”
variety. Like many of us, I am starting to get more
boats than I know what to do with. Not that “Instant
Boats” are Bad. But, I didn’t Need just
another Instant Boat, I needed a little more Boat
Building Challenge.
Although I used to think differently, I’m
more a Boat “Builder” than boat User.
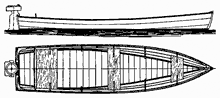
I thought a simple, lap strake skiff might be fun
to build (and maybe even Use). One of my last boats
was a multi-chined, plywood
kayak built using frames from an old
Folbot “Sporty” as patterns. From that
experience I learned a little about “Lining
Out” and “Spiling” planks. That
is, cutting and fitting planks so they Look nice.
For some time John Kohnen had been trying to get
someone in our Western
Oregon Messabouts Group of “Ol’
Coots” to build an Atkin designed boat.
John loaned me a copy of William Atkin’s “The
Small Boat Book” and suggested I build one of
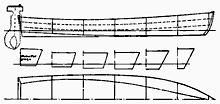
William Atkin’s designs, the 14’ 7”
X 3’ 9”, “Fast Low Powered Outboard
Skiff”, “Scandal”.
 |
John suggested
I build William Atkin’s “Scandal”.
|
John is a long time fan of Atkins’ boats and
has recently been working with Mrs. John Atkin to
better organize some of the Atkins many designs. The
Atkins, father William, and son, John designed hundreds
of boats, large and small, but unfortunately many
of their plans were lost in an unexpected New England
hurricane in 1938.
William began designing boats around 1906 and John
joined him after WW II. Even with the loss, John Kohnen
and Pat (Mrs. John Atkin) have put together a Catalogue
of more than 300 small boat designs. “Boat Designs
For Unregimented Yachtsmen” by William &
John Atkin. Better known as “The New Catalogue”.
Both “The Small Boat Book” and “The
New Catalogue” are available from Atkin
& Co. Just request the “New
Catalogue”.
“The Small Boat Book” at only $20 is
a real bargain and contains working plans for “Scandal”
and 9 other “Small Row and Outboard Engined
Boats”. Plans for other Atkin boats can be ordered
from “The New Catalogue”, also available
from the Atkinboatplans.com page. The New Catalogue,
only $15, is worth every penny even if you never order
a plan or build a boat. The New Catalogue contains
descriptions, and line drawings of row, sail and power,
boats, from the 6’, pram, “Tiny Ripple”
to the 46’ Schooner Rigger Motor Sailor, “Magpie”.
Included in the catalogue are “Rescue Minor”
(not the only “Tunnel Stern” Boat in the
catalogue) and the 32’ Colin Archer Type Double-Ended
Ketch “Eric”, “The Best Boat for
the Worst Weather”, an article on the history
of the Atkins and several other articles by and about
the Atkins. The building plans are very reasonably
priced. Plans for many of the smaller boats are only
$45 and Robb White’s Famous (Or Infamous) “Rescue
Minor” Plans are only $75.
I like the idea of “Fast, Low Power”
boats. I tried building another “Fast, Low Power”
boat a couple of years ago based on Jim Michalak’s
AF4 design. The AF4 Is a Fast,
Low Power boat, but after I added “All the comforts
of Home”, the boat I call my ‘PK-20”
is way overweight and is no longer fast, with low
power. My “PK-20” is Still a very nice
“Couple’s Cruiser”, but does Not
have the low HP performance I had hoped. Check it
out HERE
and HERE
I vowed to keep “Scandal” very light.
In fact, my “Scandal” is probably lighter
than one that would have been built in 1924, when
the plans were drawn. The plans call for 3/8”
cedar plank sides and a 1/2” cross-planked cedar
bottom. I used 4MM Luanne plywood for the side planking
and 3/8” plywood for the bottom and transom.
Unlike my usual “Instant Boats”, “Scandal”
is built over building a frame consisting of a set
of 5 forms, the transom and stem. Although the sides
are straight, they have 3 plywood lapped strakes.
Many of the Atkin’s flat bottom skiff types
can probably be planked with single plywood sheet
sides, but I wanted to try Glued Plywood Lapstrake
construction.
Some of the V bottom boats in The Catalogue are
designed for Plywood construction, including one Very
Nice 22ft Schooner, “Florence
Oakland”. Please let me know if
anybody decides to build that sweet little boat.
I think the laps add much to the looks of what would
be just another flat bottom skiff. The strakes also
strengthen and stiffen the boat. The laps are nearly
1/2” thick and amount to 1/2”, full-length
stringers.
I built the forms, and transom from full sized drawings
made from the offsets found in the “Small Boat
Book”. The plans for Scandal in the “Small
Boat Book” do not include a developed transom,
so I had to develop my own. Pretty straight forward
with this little boat. Again, kinda fun and another
Leaning experience.
 |
I built the
forms, and transom from full sized drawings
made from the offsets found in the “Small
Boat Book”. |
I got the building frames, transom and stem set
up and attached the chines. When I ripped the chines
on my table saw I also cut the bevels rough, so I
only had to clean them up to get the garboards and
bottom to fit. Many of the Atkin boats have narrow
bottoms, especially toward the bow, so the chines
went on pretty easily. The narrow bottom at the bow
helps eliminate much of the pounding associated with
many flat bottom skiffs.
But, when I tried attaching the gunwales, the flare
at the bow surprised me. The gunwales not only bend
in two dimensions, but twist as well. The 3D boat
looks quite different from what appears to be a “Simple,
Flat Bottom Skiff” in the drawings. I was able
to get the chines and gunwales on in one piece but
had to laminate the inwales to install those. The
flare to the sides and bow gives reserve buoyancy
and helps knock down waves. Even with the low freeboard,
“Scandal” is still a very dry boat and
I feel quite comfortable in moderate waves.
Although I built My Scandal as light as I possibly
could and still have it seaworthy, it turned out too
heavy to be easily loaded on top of a car, so I’ve
been using my old Hobie 16 trailer. This old trailer
has been my “Universal Small Boat Trailer”
for many years.
I estimate the weight of my Scandal to be about
125 pounds. Scandal may be Light enough, but at nearly
15 feet long and 4 feet wide, is too unwieldy for
one or even two people to lift on top of a car.
Had I built this boat the way I usually do, with
sheet plywood sides, I would have been nearly done
then. But I wanted the lap strakes, so I first had
to “Line Out” the strakes. This was challenging
but fun. Lining out strakes can make or break a boat.
I measured the strakes from the drawings in the
plans, but found the profile drawings give a foreshortened
view of the planks, so I couldn’t take measurements
from those. I spent a lot of time with long, thin,
battens, tweaking them a little here and a little
there until I felt I finally had them “Right”.
It wouldn’t be ‘till I got the boat
in the water that I would know for sure. I was building
in my shop and couldn’t stand back far enough
back to get a real, good, look. Apparently, I did
Something right and was a little lucky, because I
think the strakes look pretty good.
When I finally got the lining battens where I though
they should be I was able to use those lines to draw
and cut the shapes of the individual planks. “Spiling”
The planks are less than 16 feet long so I only
had to make one scarf joint in each. And, there is
enough difference in plank length that I was able
to stagger the scarfs slightly so they do not all
line up and weaken the boat.
I had read and tried all kinds of “Scarfing”
methods, but ended up just clamping the strakes to
my worktable and used my belt sander to sand a 2”
(8-1) scarf on each strake. It seems to have worked
well enough because I have a tough time finding the
joint on the edge of the top stake.
I now had all the planks ready to attach, but still
had to cut the “Gains” in the strakes
at the bow and transom. Having never built a lap stake
boat, “Gains” were something new to me.
I knew the theory. In order for the planks to not
overlap, double thickness at the stem and transom,
the thickness of planks, at those ends has to be reduced
so the laps join the stem and transom with the thickness
of a single plank.
There are two basic ways of cutting these “Gains”.
One is to cut a “Rabbet” or “Rebate”
the same width as the lap along the lapping portion
of the plank near the stem and transom, starting at
zero depth about 18” from the ends of the planks
and increasing in depth to half the thickness of the
plank. The planks overlap at the increasing rabbet
and end up a single thickness at the ends.
I don’t have a Rabbet Plane and have never
been very good with a plane anyway, so I decided to
use the other method.
The second method is to cut (or sand) a bevel along
the lapping parts of the planks near the ends, starting
with a Flat, bevel (?) about 18” from the end,
increasing the bevel to where the bevel makes a feather
edge at the outer edge of the plank.
Again, I used my trusty belt sander and 80 grit
sandpaper I cut that changing bevel, “Gain”,
freehand. It worked pretty well and I think this method
is a lot easier than cutting a “Rebate”.
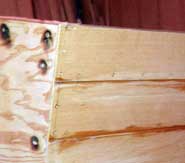 |
You can just
see the ends of the beveled gains in the transom
photo |
I’m sure some will ask, “What are those
Black Spots on the transom?" Those are the results
of my using a lighter to soften the epoxy around some
screws I needed to remove. The lighter flame did soften
the epoxy, but nearly set the transom ablaze. Another
“Learning Experience” ? I have since discovered
the Ten Dollar Harbor Freight Heat Gun for softening
and removing unwanted epoxy. One of The Best Tools
I have found for working with unwanted, hardened epoxy.
I had a Lot of epoxy globs and the heat gun and a
scraper or chisel made quick work of removing most
of “Oopses”. Far quicker and easier than
scraping cold or sanding. I just have to be careful
Not to heat the epoxy where I Do want it to stick.
For the first heat gun, I bought the whole kit, including
assorted useful scrapers, but will buy only the cheopo
heat gun when this gun burns out.
The stem has too much curve to easily get out of
a single piece, so I had to glue it up for two pieces
of Doug Fir. Using the “Lining Battens”
I was able to find and cut the bevels for the stem
and transom.
 |
The stem has
too much curve to easily get out of a single
piece, so I had to glue it up for two pieces
of Doug Fir. |
I didn’t have enough “Deep Throat”
clamps to clamp all the laps as I put the strakes
on, so used temporary sheet metal screws to hold them
in place, “‘till the epoxy set”.
I left in place most of the screws that hold the planks
to the stem and transom, but removed all those along
the laps. That meant Way too much extra work to fill
all those screw holes. I Will Make some deep plywood
clamps to hold the laps together for my for my Next
Lapstrake boat.
This boat is light enough that my wife and I were
able to easily flip it over to put on the bottom.
Attaching the bottom was unremarkable and uneventful.
Just like “Instant Boats”, with a “Payson
Joint” where the two bottom sheets of plywood
butt. After building my 20’ “PK”cruiser,
I really Do appreciate building small boats that I
can just flip around while building.
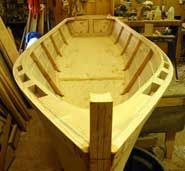
We flipped the boat back upright so I could finish
the insides. I pulled out all the building forms,
replacing each one with a simple tapered “Frame”
attached perpendicularly to the sides. Fewer bevels
to cut that way.
I cut limbers at the bottom of the new frames to
fit around the inside chines. These frames are supposed
to be cut to fit closely around each lap, but a friend
of mine built a similar size and type lapstrake boat
and didn’t cut the frames to fit tightly at
each lap, but cut them so there is a little gap between
frame and plank, above each lap. “That’s
to let water run through.”, he said, but we
both know it was to make it a lot easier to fit the
frames. Thanks, Dick. There are no frames across the
bottom of the boat. I think they are left out to save
weight and bottom is so narrow the boat really doesn’t
seem to need them. The keel and skegs give some support.
I used Dick’s method of making the Breast Hook
too. The breast hook is made of two pieces joined
with a bevel at the middle so it meets sides at more
or less 90 degrees and doesn’t require a bevel
cut on the sides of the breast hook. That made it
easier to fit the breast hook to the flared sides.
Quarter knees took a little figuring to get them to
fit between the sides and the inwalls, but not too
bad.
As I said, the inwalls needed to be laminated from
two 3/8” pieces in order to bend and twist and
fit inside the beast hook, quarter knees and frames.
Even then, they were a tight bend.
I put little spacers between the inwalls and gunwales.
I liked the looks of some spacers with coved ends
I had seen on other boats, so set up my drill press
with a 1” hole saw to cut the coved ends. That
worked pretty slick and each spacer has the exact
cove at the ends.
I attached a “False Stem” to cover the
ends of the plywood at the bow. I drilled one 5/8”
hole crossways though the stem for a strong rope attachment
point. I also drilled a second hole through the stem,
front to back. I had done the same thing on a “Bolger
Gull” I built. I found that fore and aft hole
makes a handy place to run a “Painter”
or other line. I can run a line through that hole
and attach an anchor, making it possible to carry,
raise and lower an anchor from the middle of the boat.
In order to keep the weight down, I glassed only
the bottom, transom and stem. I attached a 1-1/4”
wide x 3/4” “Keel”, laid flat, that
is blended in to the stem and runs down the middle
of the bottom, stopping about 2 feet from the transom.
I figured stopping the keel short of the transom would
allow a better flow of water to the prop.
I added two short, shallow skegs to the bottom, spaced
about 18” apart, figuring they would give good
directional control and might funnel some water to
the prop. I Did glass both “Keel” and
skegs.
Some simple clear oiled, 1x12 pine boards resting
on full-length seat risers serve as seats. They are
already darkening nicely with age. I added a strong
knee, and Oak motor board to the transom and a couple
of blocks between inwale and garboard about a foot
aft of the center seat to accommodate a set of Chuck’s
nice Bronze
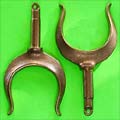
Top Mount Oarlock Sockets and Bronze Ribbed Horn Oarlocks.
Although designed for Outboard power, a pair of 6-1/2
ft. oars moves the shallow boat easily with motor
raised.
I’m very happy with the way my “Scandal”
looks. Much nicer in 3D than it looks in the drawings.
I’ve had many positive comments on the boat,
especially the curves and flare at the bow. As for
performance, I am also very happy. William Atkin said
the boat should get 9MPH with a 3 HP outboard. He
shows the boat with an old, “Ruddered Outboard”.
They were different Horses in 1924.
 |
William Atkin
said the boat should get 9MPH with a 3 HP outboard.
He shows the boat with an old, “Ruddered
Outboard”. |
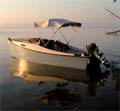
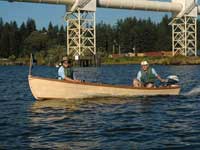
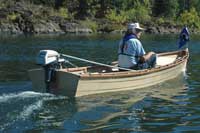
This boat was built to use with my 1969 Evinrude
4HP “Yacht Twin”. After figuring out this
boat goes fastest when trimmed flat, I was able to
get nearly 12MPH. See photo below for improper initial
trim. The second shows the boat moving better with
my weight forward. I’ve found that it does even
Better with my weight even further forward.
It seems, the Flatter the faster.
 |
improper initial
trim |
There is little if any “Hump” transition
getting “On Plane”. The little boat just
seems to Levitate and leaves very little wake at speed.
My Scandal performs even Better than “Billy’s”
promise. And the little 4 pushes “Scandal”
to over 9MPH with my wife, Kay and me Both aboard.
 |
Kay and me
Both aboard. |
Like I said, the boat likes to run flat, so Kay
sits in the furthest forward seat and I sit next to
the motor. We tried having Kay move further back but
as she did, the boat slowed down. Even with Kay sitting
far forward, the boat is still dry, those flaring
bows parting the waves. The boat is long enough to
bridge short waves and with the narrow bottom forward
and flaring bows, makes a very nice little “Cruiser”
for the two of us.
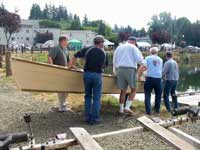
John Kohnen displayed my “Scandal” at
The Port Townsend Wooden Boat show with a 1929 Johnson
Model A Opposed Twin Outboard Motor attached. The
Old Johnson belongs to Charlie Vadar, another friend
and “Ol’ Coot”. Even that old motor
is a little newer than the “Ruddered Motor”
shown in the drawings and a couple of years newer
than the Scandal Plans, but gives an Idea of the kind
of motor Scandal was designed for. I haven’t
had a chance to actually use Charlie’s old Johnson
on Scandal yet, but will next summer. Photos, maybe
if the boat can be seen through the cloud of blue
smoke.
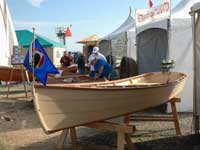 |
John Kohnen
displayed my “Scandal” at The Port
Townsend Wooden Boat show with a 1929 Johnson
Model A Opposed Twin Outboard Motor attached. |
Scandal’s fuel economy is fantastic. I can
easily get 10 MPH and the little 4 uses about 1/2
Gallon of gas per hour. That works out to 20 Miles
per Gallon. If the cost of fuel and oil are $3.00
per gallon, it costs me less that Seven Cents per
Mile, and I can run 120 miles on a 6-gallon fuel tank.
Now, That’s what a “Fast Low Powered Outboard
Skiff” is All about.
 |
I can easily
get 10 MPH and the little 4 uses about 1/2 Gallon
of gas per hour. |
Since I have to sit so far forward to properly trim
the boat I’ve added “Remote Controls”
to the motor. I added a simple wrap around rope steering
system. The rope attaches to an eyebolt in a PVC pipe
cap on the end of a short PVC tiller extension handle.
A couple of Chuck’s steering
cable springs keep the rope tight, but
allow the cap to be pulled off quickly for better
Close quarters maneuvering. The steering rope runs
though some “Dog Tie Out Pulleys” attached
along the inwalls, making it possible to steer the
boat from any place in the boat. (Sorry Chuck. Your
pulleys are a little small for the diameter of the
rope I am using.)
My little 28 pound 4HP motor has no gears, only
“Pull and go”, so quick, easy tiller steering
is important. Another piece of PVC pipe with a flexible
plastic “Universal Joint” attaches to
the upright Throttle and makes it possible to control
the speed of the motor while seated in the middle
seat of the boat. That “U-Joint” attachment
is also a “Quick Release” for better tight
quarters engine control. I’ve found for gentle
turns a simple weight shift will steer the boat nicely.
(Lean Away from the direction you want to turn.)
 |
A piece of PVC
pipe with a flexible plastic “Universal
Joint” makes it possible to control the
speed of the motor while seated in the middle
seat of the boat. |
These Atkin Boats are not “Instant Boats”,
but many are what I like to call “Simple Boats”.
They do take a little more time and skill to build
than do the Instant boat types, but now, I Am looking
for a little more Challenge when building a boat.
There is nothing too challenging for most of us, but
just enough challenge to have to Think a little and
make building Fun again. The resulting boats don’t
Look like many of the “Instant Boxes”
either. Those “Atkin Boys” sure knew what
they were doing and they have designs for any need
and skill level. For those of you also starting to
have Too Many Boats and are looking to build something
other than just another “Instant Boat”,
I would highly recommend checking out an Atkin Design.
Next time You are thinking about “Your Next
Boat”, take a look at the Atkins’ boats.
Any of their designs you choose, you Won’t be
disappointed.
Good Luck and Have Fun.
Pat Patteson
Molalla, Oregon
Many photos compliments of John Kohnen.
Thanks for Everything, John.

More articles by Pat Patteson:
|