Custom Search
 

   December Treasure Chest

January - February - March - April - May - June - July
August - September - October - November - December

Send items to chuck.leinweber@gmail.com for inclusion here next month.

The Treasure Chest is a place to put those cool sailing, cruising, motoring, boatbuilding or boating tips you have. Send us your ideas...

This time we have...


Mast

I'll tell you the secret to a perfect world class mast. Go to Home Depot and buy two sixteen foot long "white wood" 2x4's, knots and all. Get your router and make a hole down middle of each one, one inch if your machine will do it. Take your Titebond III glue and lather um up and clamp together. Cut it down to three inches on the bottom and two inches on top, make it sort of round with a power planer and hit it with the secret weapon; a rolling pin wrapped with an inner tube stuck in a drill turning an inside out belt sander belt. Takes about an hour to smooth it down. "But Dave, you can't make a freestanding 16 foot mast that holds up a 112 sq ft sail with this cheap wood." Yes you can and so far none have ever broken, well Stan did back his under a tree but he just glued it back together. Will cost you $12.

Another secret, we haven't used epoxy to glue most things together in years. After extensive testing we've determined that PL Premium equals or outperforms epoxy in all gluing situations. Epoxy's still needed for glassing and smooth fairing but for secure, waterproof bonds this stuff is great and easy. Get a tube and glue everything you can think of together. It requires some clamping pressure which we get with this old cheap Harbor Freight brad gun. Just glue it, pop it with a brad and go on.

David Lucas
Lucas Boatworks and Happy Hour Club


Tool Test: SHINTO WOOD RASP

I was looking around in Chuck Leinwebers workshop, so like mine, full of tools, dust and partly completed projects, shelves full of interesting things and machinery lurking in corners, just the place to keep me occupied for hours. While we chatted he handed me a thing that looked like the unplanned result of a late night liaison between a cheese grater and a horse hoof file and suggested I try it. Ok, into the vice with a piece of stringy yellow pine and in an instant the end was rounded! Then the corners radiused, much amazement, then a flat surface dented by an unpadded clamp was planed smooth. Effortless, I flipped it over to the fine cut side and tidied the job up. Not perfect, but a swipe with 80 grit would have seen it ready to undercoat of it were part of a boat.

This is an interesting tool, it cuts hardened epoxy with ease, smooths and planes wood, softer plastics, fillers, glues and. paint More than just a rasp, better than the surform file I sometimes use and way better than most sandpapers for rough and shaping work, this tool is a very useful addition to the plywood and epoxy boatbuilders toolkit.

I like it, one will be going home with me!

John Welsford, proud to be a quick and dirty boatbuilder.


Cutting Plywood Panels

I can't crawl around on my hands and knees very much anymore, and haven't been a fan of it for a lot longer - not since I was a rugrat. I use this handy folding cutting table set up on sawhorses. For cutting thin sheets of plywood I put a sheet of cheapo foam insulation on top of the table to evenly support the plywood.

https://groups.yahoo.com/group/dwforum/files/ToolTips/

A 6" to 7 1/4" circular saw will cut the curves at the sheer and chine just fine if the blade is set to just barely goes through the wood. I'll bet those little 3" saws will cut some pretty tight curves...

John


Iron It

If you put a scratch or dent in unpainted timber, wet the area and heat it with a household iron. The fibres will rise and the blemish should disappear. Be sure to put the iron back before your wife comes home.

Ken


Front Tiller

This madness all started when I saw a small 8-foot Puddle Duck Racer being sailed by Dave Sanborn during the 2010 Sail Oklahoma Messabout and Puddle Duck Races on Lake Eufaula in Oklahoma.

Dave was sailing along, facing forward, and sitting on a comfortable seat with a nice backrest! Perhaps the fact that my old tired back was hurting influenced me, but then and there I decided that that's the way I wanted to sail my newly built Puddle Duck sailboat "Duck Bill" in the future.

I learned that Dave was using a push-pull type of tiller that allowed him to sit facing forward, and control the rudder by pushing or pulling a tiller like extension that rested near Dave's right hand.

Dave sailing

Dave was very helpful in answering my many questions about how well his system worked. He did stress that it took a little while getting used to the push-pull tiller, but he felt that I could master the push- pull system with any major problems. Little did Dave know how dumb I really was!

However, I copied Dave's push-pull tiller arm the best that I could and ended up with this set up.

Push-pull tiller arm

Then I went sailing to try out the new tiller system. I will spare you the sad details, but people said it wasn't a pretty sight seeing a fat old man sailing in circles because he couldn't grasp the concept of when to push, and when to pull! After about 30-minutes of this nonsense I held the nub of the rudder head and returned to shore! I tip my cap to the ability of Dave Sanborn to sail with such a system!

Someone in jest suggested that I needed a tiller mounted to the front of my small Puddle Duck Racer (PDR). Other's suggested a steering wheel. but, really now, a steering wheel on an 8-foot sailboat?

However, the idea of a front tiller did appeal to me. I always sail solo so the loss of space wouldn't bother me, and with a front tiller I could have a nice easy sofa type sitting arrangement! Ah! I could envision myself sailing along with a cold drink in one hand, enjoying the nice view, as I sat on a soft cushion, leaning back on a padded backrest!

After a bit of thought and a crude drawing or two, I ordered 6 each Swivel Shackle blocks (RL-205), 6 each Stamped Stainless Pad Eyes (SD-081103) from Duckworks.

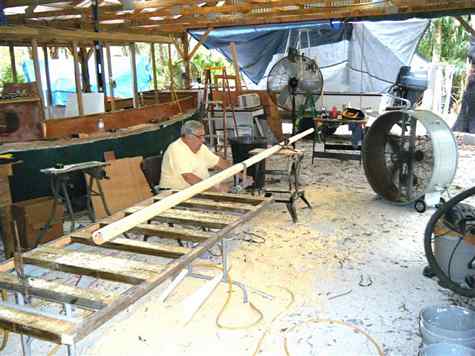
While waiting for the Duckworks order to arrive I made the wooden items I thought I would need.

1. A front tiller arm.

2. A mounting block to install on the PDR's foredeck, to which the tiller's swivel block would be mounted.

3. A tiller swivel block to which the tiller arm would be attached.

The foredeck-mounting block was made from scrap 3/4-inch plywood, and a scrap piece of maple.

Mounting block

The mounting block was attached to the PDR's foredeck with screws and epoxy.

Mounting block installed

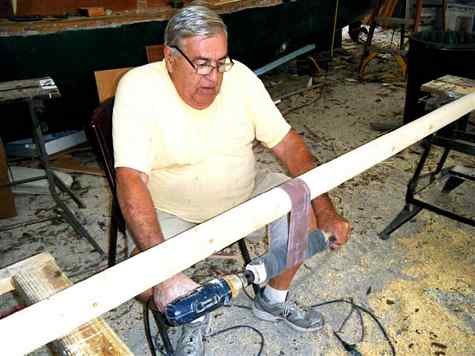
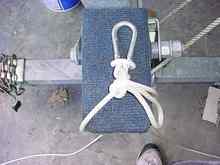
Once the mounting block was installed I attached the swivel block to the mounting block with a ½-inch bolt. This bolt allows the swivel block and the front tiller arm to turn right and left. As a bearing I used a short piece of ½-inch copper tubing epoxied into place.

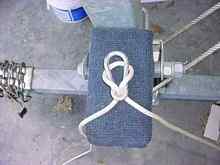
As you can see in the swivel block photo, I added two eye screws to which the tiller control lines would be attached. In addition I added a small strap across the top of the swivel block to prevent the tiller arm from falling downward onto the PDR's cockpit floor.

Swivel block
Swivel block and tiller attached to mounting block

To try out the front tiller system I elected to leave the rear tiller in place, and hook the front tiller's control lines to it. I installed a single eye screw 7-inches from the rudder's pintle's center point, which is the same distant ulitized in mounting the front tiller eye screws. Later, I will make a much shorter rear tiller attachment out of the discarded push-pull tiller!

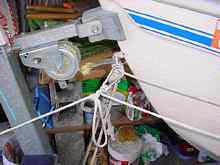
I then mounted six 1/4 -inch swivel blocks, two at each stern corner and one each on the port and starboard sides of the PDR's air compartments using the stainless pad eyes I got from Duckworks. To help maintain tension on the control lines, I used two springs at the rear tiller attachment point.

Prior to mounting the swivel blocks, I attached reinforcement plywood panels to the sides of Duck Bill's air compartments. I used sheet rock anchor screws to ensure that the pressure from the control lines wouldn't pull the fasting's from the thin side plywood.

Stern control lines-close up
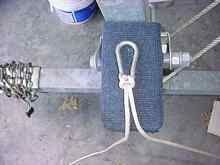
Bow control lines and block
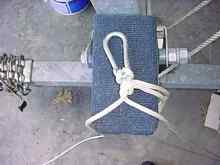
Stern control lines and blocks

I first rigged the control lines so that the front tiller's movement was such that when I pushed the tiller to port the rudder would move the boat to port. But, then I changed the rigging so that the tiller movement was similar to the tiller used on the old three-wheeled golf carts. Now, if I push the tiller to port (clockwise) the rudder will turn the boat to starboard. The tiller could more easily be rigged to do the opposite; push the tiller to port (counterclockwise) and the rudder would turn the boat to port. The counterclockwise movement seems more natural to me.

Bow front tiller
Top view

To give the control line some small measure of protection, I ran it through short pieces of ½-inch ID electrical PVC pipe.

Shortly after completing the installation I took "Duck Bill" to Lake Hefner in Oklahoma City to test the front tiller. Arriving early in the morning to beat the Oklahoma July heat, I met a sailing friend, Brad Hickman, who assisted me in getting the boat launched.

Launching from the small sailboat beach, it took only a minute or two to get used to the front tiller, and sail out into the body of Lake Hefner.

Bill Nolen sailing with front tiller, use the one you feel is best.

I'm quite pleased with the front tiller. It was quite easy to become accustomed to using it. Now, my next project is to find some soft material to pad my sliding folding seat and backrest!

Bill Nolen
Oklahoma City

https://www.wwpotterowners.com


A Simple Anchoring System

I had been trying to develop a simple way to deploy my anchor from the cockpit of my West Wight Potter 15, Piglet, yet keep the anchor rode (line) attached to the bow eye. There have been several methods employed in one form or the other that accomplished this, but I wanted something simple, easy and cheap.

In a discussion about anchoring on the Trailer Sailor Potter Forum, Lewis Baumstark, owner P-15 # 2312, told about the anchoring system he had developed and was using on his Potter. Lewis's system is very simple and requires the purchase of only one large Carabineer.

The system works like this: A short line is tied permanently to the bow eye and led to the cockpit area. If your boat has cockpit rails, tie the end of this short line rather tautly to one of the rails. If your boat doesn't have cockpit rails secure the line to a cleat, etc.

The boat's anchor should be stored in a bucket with the anchor rode placed inside the bucket first, with the anchor chain and anchor placed on top of the rode. To ensure that the Carabineer is readily available it should be attached to the bucket bail or the anchor or chain. When you are ready to anchor, remove the Carabineer from the bucket bail, drop the anchor overboard from the cockpit, and let the rode play out until you have established sufficient scope for your anchoring conditions.

At that point take up some slack in the rode and form a small loop. Pass the loop through the Carabineer and then back over the top of the Carabineer capturing the Carabineer in the loop.

After the Carabineer is captured, a large loop from the loose end of the rode is formed, and two half hitches are tied on the anchor side of the Carabineer.

The Carabineer is then clipped onto the already installed permanent bowline, and the Carabineer and anchor rode is allowed to slip forward to the bow eye.

The force of the anchor will keep the Carabineer secured to the bow eye until you are ready to retrieve the anchor. The loose or bitter end of the anchor rode should be secured in the cockpit.


Pulling on the cockpit secured bitter end of the anchor rode will bring the Carabineer sliding back on the bow eye line, and the anchor rode and anchor can be retrieved from the cockpit.

Good luck and happy anchoring!

by Bill Nolen - Photographs by Lewis Baumstark

https://www.wwpotterowners.com


Emergency flotation

Rectangular plastic milk jugs would make good floatation inside lockers, etc (cheap, stack efficiently, known buoyancy of about 8lb per gallon jug) except for one thing: they blow their tops readily as the air inside warms up. (Expansion can amount to 10% over a temperature rise of 50 degrees F.) I have had this problem even when I had squeezed out air before putting the cap on. Simple solution: make a pin-hole in the jug or cap so air can move in or out with temperature changes, then tape the cap on. The hole will affect buoyancy little or not at all over shorter periods of flooding.

Jeff Michals-Brown


About That Mast

You will find that the lights around parking lots of Banks and Malls have fiberglas poles that hold the small lights to light up the lot. They are thin but with some overlay of glass or whatever you want to use in epoxy or polyester makes very good masts. I used one that was knocked down by a car and my stepson brought it to me. I ground down to the glass and used different layers including carbon fiber to make a mast for Mary Agnes. You should tell all those guys and gals out there that there is a way to get a good mast that doesn't cost an arm and a leg.

T. Bone.

To comment on Duckworks articles, please visit our forum


  sails
  plans
  epoxy
  rope/line
  hardware
  canoe/Kayak
  sailmaking
  materials
  models
  media
  tools
  gear