
 Custom Search
|
| boat plans |
| canoe/kayak |
| electrical |
| epoxy/supplies |
| fasteners |
| gear |
| gift certificates |
| hardware |
| hatches/deckplates |
| media |
| paint/varnish |
| rope/line |
| rowing/sculling |
| sailmaking |
| sails |
| tools |
 |

| join |
| home |
| indexes |
| classifieds |
| calendar |
| archives |
| about |
| links |
| Join Duckworks Get free newsletter CLICK HERE |
|
|
| Messing with Trailer Wheel Bearings on the Highway! |
by Bill Nolen
- Oklahoma City, Oklahoma - USA |
On the Yahoo Goose Group website recently, there was some discussion about using Harbor Freight flat bed trailers as boat trailers. In the discussions there was various comments made about whether the new bearing, that came with the trailer kit, needed cleaning and repacking with new grease prior to use on the highways. These discussions reminded me of bearing problems that I have had in the past when buying used boats, and used boat trailers. In about 50% of the purchases, the wheel bearings needed attention before I started home, or shortly after I started home. So, here is what tools I have learned to take with me, and actions to take, to lessen the chance I will have trailer wheel bearing failure on the trip home:
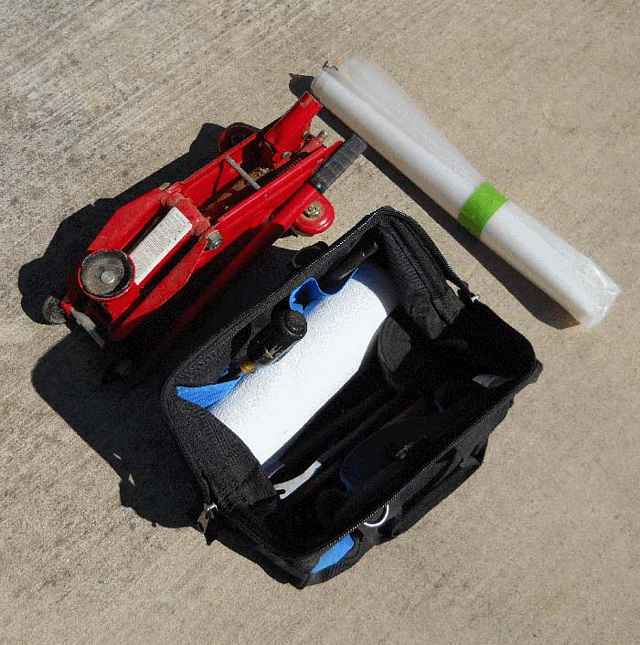
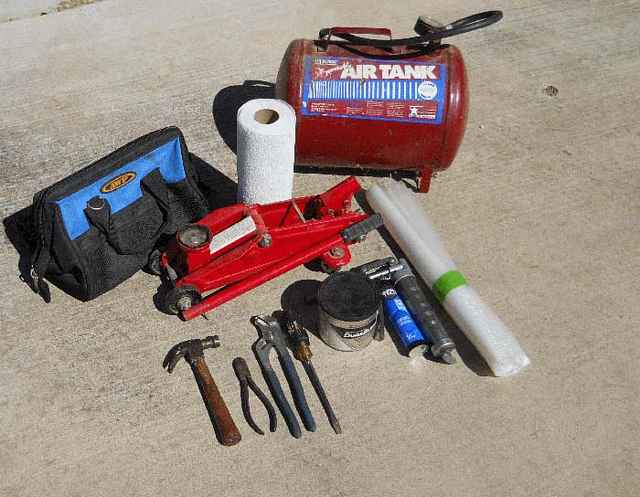
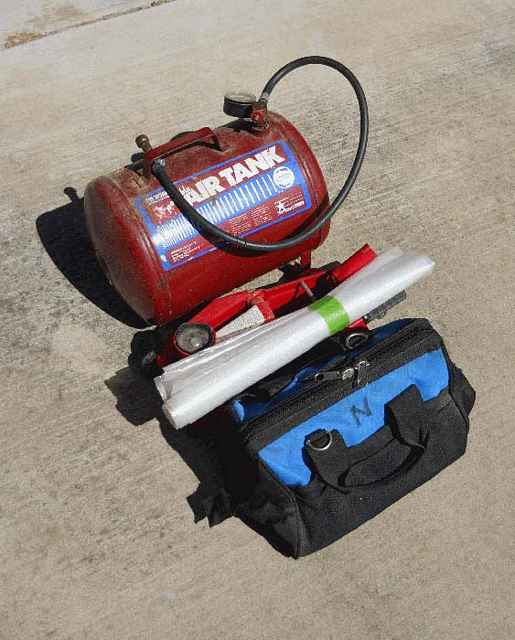
After buying the boat and/or boat trailer, this is what I do: One: Prior to leaving the sellers location, I inspect each wheel hub by using the small floor jack, to jack up each trailer wheel off the ground. I spin the raised wheel as fast as I can.
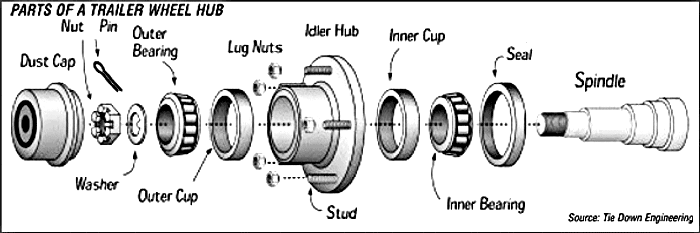
I place my ear close to the wheel hub, and listen for the slightest grinding noise. If I hear no grinding noise, and the wheel hub has grease fitting on the side of the hub, or a bearing protector such as a Bearing Buddy installed on the end of the hub, I pump several pumps of grease into the grease fitting. When the spring piston on the Bearing Buddy moves about 1/8 inch I stop adding grease. Two: I then re-spin each wheel, and if there is no grinding noise after the wheels spins for a moment or two, I'm good to start home. Three: After driving for 10 or 15 minutes I find a safe spot to pull off the highway, and feel both trailer hubs with my fingers. If the hubs are just warm, and I can hold my fingers against the hubs without any discomfort, then I continue home, stopping to repeat in about an hour. Four: If a hub is too hot to hold my fingers against it, I know that there is a bearing problem that MUST BE FIXED! I find a safe spot to park off the busy highway, and jack the wheel with the hot hub off the ground. I then lay some of the paper towels, and/or an old plastic picnic tablecloth or tarp under the wheel. I place the large screwdriver's tip at the inter edge of the dust cap or Bearing Buddy, and tap with the hammer to widen the gap and remove the dust cap/Bearing Buddy. The bent end of cotter pin is straightened, and then removed with the dikes. Then I use the channel lock pliers to remove the spindle nut. By grabbing the tire on both sides I rocking the wheel sideways, and in most cases the outer/front bearing will fall out of the hub, and wheel and hub can be removed from the spindle. Hopefully, the outer bearing will fall onto the paper towels I have placed under the wheel, and not in the dirt! Five: Using the paper towels, I clean the old grease from the loose outer bearing, and as best that I can from the inner/rear bearing and race/inter cup that is still in the backside of the hub. The rear bearing is held in the hub by the rear grease seal. Using the screwdriver and a wad of paper towels, I can remove most of the old grease inside the hub by pushing the wad of paper towels through the hub. I try very hard not to damage the grease seal! Six: Then I try my best to re-grease the inner/rear bearings by poking grease, with my fingers, around the rear bearing. I then form a roll of grease in my palm, and repack the front bearing by rolling it into the roll of grease. I make sure the balls in the bearing have lots of grease around them. I then replace the wheel and hub onto the spindle, and holding the wheel as straight as I can, I insert the front bearing into the hub. Then I install the outer washer and hub nut, and using my fingers I tighten the nut. Then using the adjustable channel pliers I tighten the hub nut snugly, and then back off one notch. The wheel should then spin freely. The cotter key is inserted into the hole in the end of the spindle and the ends bent over. The dust cap or bearing protector is placed onto the end of the spindle. Seven: Then I repeat Step Three above! After I get home I remove and replace the old bearings with new bearings, grease etc. The cost of the new bearings is well worth having peace of mind when I use the trailer. About now I'm sure real auto mechanics are rolling their eyes, thinking that's not what he or she would do! However, my method does work for me. I learned this the hard way, having had to repacked wheel bearings on a major freeway, with auto traffic whizzing by at 75/80 MPH. Also, I've tried to buy a can of wheel grease in a tiny town on a Sunday afternoon! And I have had to pay a mechanic $15.00 just to pump a few shots of grease into a Bearing Buddy fitting because I left my small grease gun at home! If you have ever tried to find an auto repair shop open on a Saturday or Sunday afternoon you will know why it's good to be prepared! I also suggest that you Google "Trailer Wheel Bearings" or check the same on Youtube for more information and details on this subject. |
To comment on Duckworks articles, please visit one of the following:
|


 |