
 Custom Search
|
| boat plans |
| canoe/kayak |
| electrical |
| epoxy/supplies |
| fasteners |
| gear |
| gift certificates |
| hardware |
| hatches/deckplates |
| media |
| paint/varnish |
| rope/line |
| rowing/sculling |
| sailmaking |
| sails |
| tools |


| join |
| home |
| indexes |
| classifieds |
| calendar |
| archives |
| about |
| links |
| Join Duckworks Get free newsletter CLICK HERE |
|
|
| April Treasure Chest |
Making Polysails
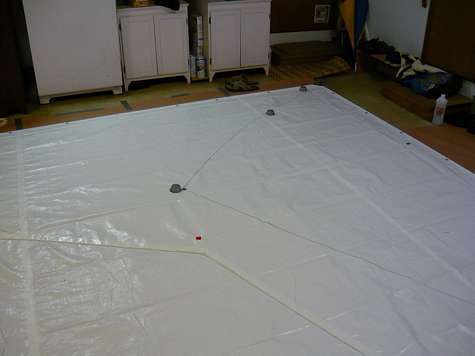
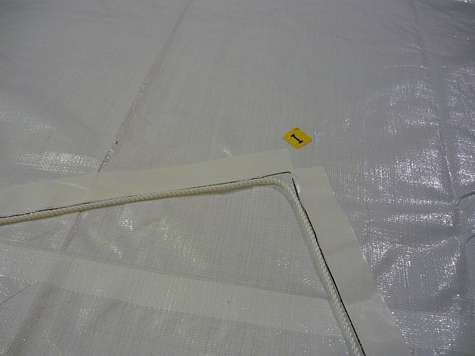
To Dave Gray and Chuck Leinweber, I finally started to make the sails using the kit I purchased from you and wanted to share some of my thoughts and and ideas on the process. 1. My daughter, son-in-law, and I all agree your concept of polytarp sails is marvelous. We managed to make cut out and tape up three sails in one day. All I have left to do is sew the edges and put in grommets. 2. I was a little concerned about folding the edges over the reinforcing rope using the method you suggested. I was afraid that I would be unable to get a good tension on the rope and polytarp at the same time to avoid wrinkles. So here is the process I used with some success. a) I first tensioned the tarp with bungee cords using the grommets at the four corners. This kept the tarp fully extended even if I managed to accidentally move it. The tarp remained nice and tight while I was attaching the double sided tape to the outside of the lines. The bungees always kept the same tension on the tarp. I was able to make the main sail and jib out the larger polytarp at the same time. b) The next step is where I deviated most from the method: I put down 3/8" seaming tape (Super Tack from Duckworks) along the inside edge of the double sided 1.5" tape before cutting the sail. I used the seaming tape to attach the reinforcing rope before I cut out the sails. I found it very easy to maintain the proper tension on the rope and the poly material this way. The two attached pictures show how the rope lies cleanly on the polytarp material. c) The seaming tape held the rope in place without moving or losing tension when I cut out the sail from the tarp material. It also let us focus on folding the polytarp over the rope without worrying about the rope tension. d) In addition to pounding the seam with a mallet, I found that running a veneer roller along the inside rope edge resulted in a cleaner edge. 3. The dry erase marker is difficult to erase, but I have tested a substitute that works well. The old-fashioned, water-based, markers we used to use on overhead projectors also work on the polytarp material. A common brand that is still available is the Vis-a-Vis pen. A wet towel is all you need to fully erase the marks. Limpets
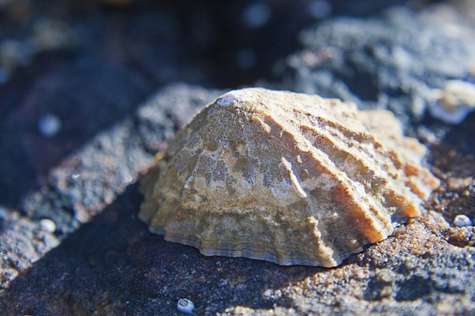
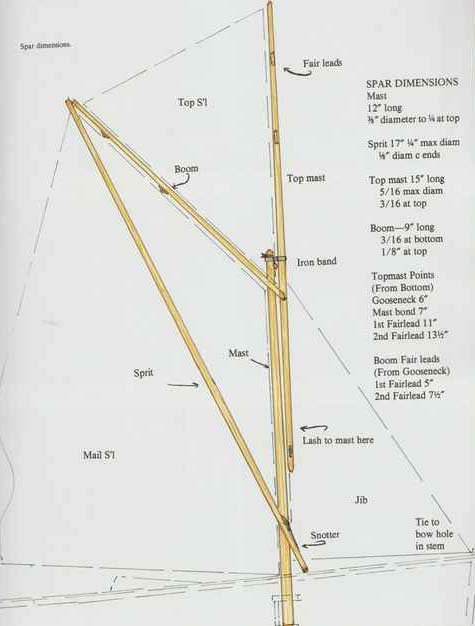
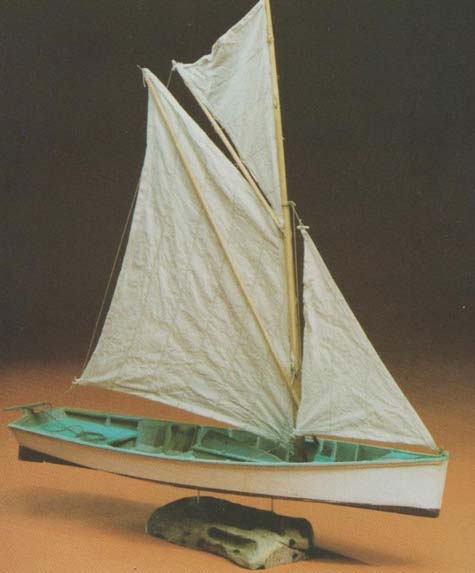
In the course of my morning reading routine, I came across this very interesting piece of information regarding a potential new material that may, one day, make its way into the boat building world. In the pursuit of renewable resource building materials, it looks like researchers have discovered that the lowly limpet has clinging teeth that rate as strong as carbon fiber. If that material can be replicated easily and affordably, it offers an alternate to the use of petro-chemically derived carbon fibers for max strength in laminates. Fantastic. Read more. Chris Ostlind Book Review by Paul Austinof the Sprit-sail Skiff - The Model and the BookBy Dan Rogers and Patricia Staby-RogersThis is the best book on building model ships I've ever seen. I counted 256 color photographs in 64 pages, plus enlarged details of the plans! The photographs are nearly all 4"x6" so you can see what you need to see. Dan Rogers has done a veteran's job of showing not just what the parts should look like but how to get them that way. The skiff was one of the working-man's boats by which people harvested crabs, clams, oysters and fish long before there were roads along the Carolina Atlantic coast. What catches the eye of someone who's never seen a coastal skiff are the two spars on the mainsail. The main has a sprit as one might expect and it also has an upper boom for the topsail. This enables the topsail to be rigged to the mast and upper spar without intricate rigging hardware or halyards. A fisherman wouldn't want that.
I wouldn't be surprised if the two spars enable this skiff to point closer to the wind than other boats, although I can't say that as fact. The drawings were taken from the lines of an actual skiff. They are clean, handsome and simple. No steam-bending, no sophisticated woodworking, just good honest work toward an American craft. The skiff has a v-bottom, a centerboard and rudder. The sides have very little flare as the emphasis is on fish carrying capacity and stability.
This book gives you more help than any book on ships I've seen. Most of the skiff is cut and shaped from two 1"x4"x6' pine boards, glue, paint and primer and muslin. You'd be surprised that the list of materials only has 12 more things to buy, such as ink, thread, toothpicks, wire, clippers, etc. Dan and Patricia give the dimensions and the thicknesses for the small parts on the skiff. When these dimensions are right, the skiff looks perfectly to scale. The sails are made of unbleached muslin, using a cardboard pattern to get them flat and sized. Most modelers think the critical part to get looking right are the sails. Certainly this is true of smaller craft where there is no complicated rigging. I don't want to include too many of the photographs - it would spoil the pleasure of seeing them as you build, but I will include this one:
If you'd like a model that looks like it could take the waves right now, this is the place to start. You could use this book to build the skiff full-sized, too. Imagine having a cool model of your own boat, sitting on the living room mantle. Paul Austin Paul is also publishing his books on Amazon. Hiding Motor Wiring
Here are the tools I use to cut custom #4 Anchor starter motor cable. The hydraulic press with its custom die really puts the cable ends on well. First I trim then end with a knife. Then I apply NO-OX grease to liberally to the end. Next the crimper sets the end and finally, glue based heat shrink tubing is applied with the heat gun. All connections are layered with NO-OX grease. Read more on my blog. Larry Shapeoko 2 CNC Router for Christmas?I decided to upgrade my CNC router. It's rather agricultural in nature or rustic like most of my stuff, but it is Alive, ALIVE! as Dr Frankenstein would rejoice. Got to love the telegraph pole. Mechanical Kit from a nice helpful Ben at: 3dtek.xyz/collections/featured/products/cnc-mill Electronics kit from Bob, another nice helpful person, at: USA buyers www.inventables.com Mike John P.S I thank them both for their time and support. CaulkingYou guys might appreciate this video. Jeff Cargo HatchWhen I was building my larsboat, I ended up using a screw-off bucket lid as my cargo hatch in the forward bulkhead. Unlike an expensive marine deck hatch the gama seal lid costs less than $10 and can be found in the paint department of Home Depot. It is large enough to stick the spare paddle inside, or just about anything else that would fit in the bow. After my folding deck hatches failed on Seafoam, the foam mouseboat, I made plywood decks, but hated how heavy they were. I also wanted flush hatches, so I modified the gama seal lids to make flush deck hatches. We use 5 gallon buckets with gama seal lids instead of dry bags when we canoe camp. I've tested them and know they are watertight. I even emailed the people who make the lids and suggested selling them as deck hatches, but got no response.
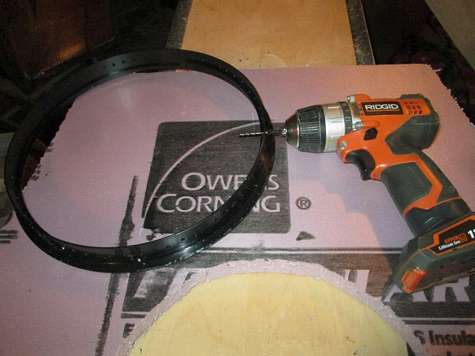
Gama seal lids are sold in more than black, just not where I shop. To make a flush deck hatch for Seafoam, I cut away the outside flare on the bucket lid adapter, this part is designed to lock onto a 5 gallon bucket and never leak or let go. Then I pulled out the adapter ring seal. (My album shows me using a razor knife, I hated this part, on the next one I used the flush cuts, a bit slower, but no risk of injury.) Some work with a pair of flush cuts, from the craft department at walmart, smoothed out the rough edge left from removing the outer flare. I used PLpremium to glue the mounting ring into the foam. For a plywood boat, I would add a foam mounting ring inside the deck. To help the adhesive stick to the plastic ring, I drilled holes though the ring all the way around, I also scuffed up the surface. While the glue is drying, keep the lid screwed in, that way it won't let the ring deform. Album with all my pictures is here on Facebook. Here is a good source for Gamma Seals. Joining Foam Panels
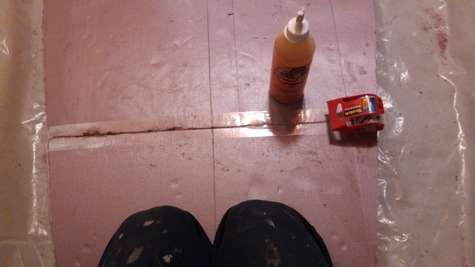
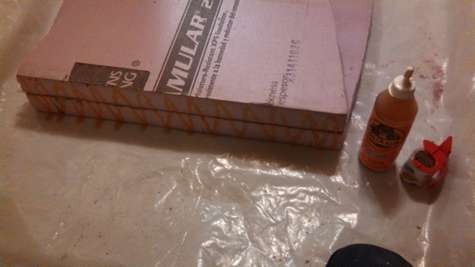
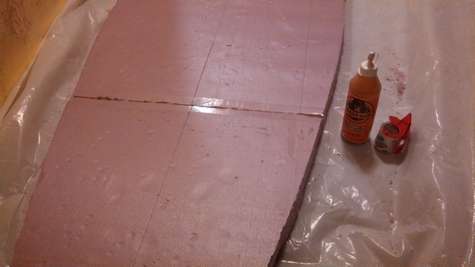
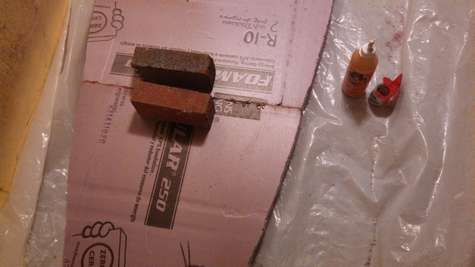
I'm currently building a foam boat using the modified Dave Lucas style (foam layer cake). In order to make a 12 foot continuous bottom for this boat I had to scarph two panels together. I came up with a simple way to join foam panels together on my foam SUP (unfinished). I call it the butterfly scarph joint. Just like a wood joint, alignment and fit are important, if you have gaps, add some water to make the glue foam up and fill it, or drip it in afterwards. Glue the panels on top of a sheet of plastic so they don't end up stuck to the table or floor forever. Align the panels, with the foam joint jammed tightly together, run 2" tape down the seam evenly. Fold the joint open with the tape as the hinge. Apply glue in a zig zag pattern top to bottom, (I use Gorrilla glue to join foam, and believe in roughing up the foam with a wallpaper scoring tool for better adhesion). Fold the joint closed, if possible flip the panel over so the tape traps the glue in the joint. I like to add weights to keep the joint shut. Josh |

To comment on Duckworks articles, please visit one of the following:
|


 |