
 Custom Search
|
| boat plans |
| canoe/kayak |
| electrical |
| epoxy/supplies |
| fasteners |
| gear |
| gift certificates |
| hardware |
| hatches/deckplates |
| media |
| paint/varnish |
| rope/line |
| rowing/sculling |
| sailmaking |
| sails |
| tools |


| join |
| home |
| indexes |
| classifieds |
| calendar |
| archives |
| about |
| links |
| Join Duckworks Get free newsletter CLICK HERE |
|
|
| Mike's Maritime Meanderings |
by Mike Machnicki
- London - England The Winch Post |

|
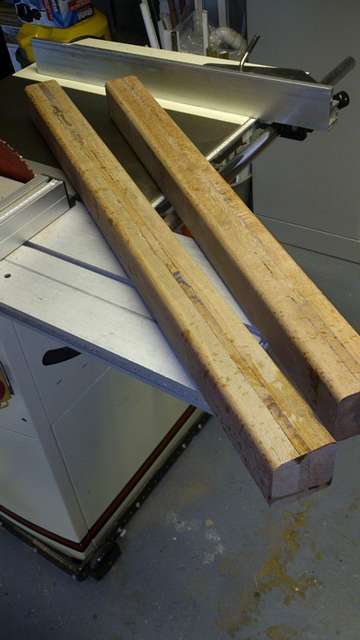
When I first started building and writing about the aluminium trailer I expected to finish the job in three articles, no such luck, it dragged on to four articles for the construction and still wasn't finished. So I decided to have a blitz on the subject and try to get the job done. The next item on the agenda was a winch post and winch, "Not much to write about" I hear you say "just buy some aluminium, bolt it together, add a winch and there you are - job done", but as usual the devil is in the detail, and getting it right is always a challenge. I thought this would be easy too, but the first problem was that I wanted to use 3" x 4" x ¼" aluminium box section and the only stockists I could find wanted to charge me for a 5 meter length when I only needed 4 foot. Enforced temporary retirement was causing some financial sensitivity, so I didn't want to buy that much - even though I could have used the remainder to make a trailer extension bar for launching in shallow water. After having had one old car dunked many years ago I always try to avoid driving too close to the sea. My next thought was somewhat unconventional and went something like this. "Suppose I made it out of wood!". I know this sounds ridiculous, but the logic was incontrovertible, the lengths involved would be short and stiff, the wood used would be hard and to prevent rot it would be encapsulated in resin and fibreglass. Obviously joints would need to be strengthened with aluminium plate and bolts to match the rest of the trailer - no screws here. The design also needs to take account of the stresses involved. The part holding the winch would need to be braced against longitudinal and latitudinal movement to prevent it being ripped out of the trailer by an unexpected side knocks. The stresses placed on it would be primarily in one plane - the direction of the boat coming on to the trailer, there would be a pulling stress of the boat being winched onto the trailer and a pushing stress of an over enthusiastic skipper hitting the buffers at hopefully no more than half throttle. If I could rig something to prevent the boat coming onto the trailer at an angle all would be well.
The first job was to find some hefty pieces of timber which I didn't have. No problem, just laminate it out of the Kerouing I used to make the skeg. Even better as it was laminated from 3 pieces to make up the width it would be more stable and less prone to warping, particularly when encapsulated in resin. That went easy, now clean it up. Kerouing is not an easy timber to work with hand tools as there is a lot of cross grain but my thicknesser gave a good smooth surface. Because I intend to glass the outside the corners need to be rounded over with the router to allow the glass to bend, I used a ¼" roundover bit which does a good job. Another added advantage is that the corner is less prone to impact damage if it is curved rather than left sharp. The glassing was done in two stages. First paint the sides with resin and allow 15 minutes for it to sink in then go over it again, now wrap the glass round and apply a good coat of resin on the surface worked in well to wet it out and remove any air bubbles, I used 6oz twill as I had lots of small bits left over from glassing the hull. When this had dried I applied three coats of resin to the ends, which had been previously cut to the correct angles and the top rounded over. The resin was applied wet on wet about 15 minutes between coats to allow time for the end grain to suck up the resin.
Marking up and drilling the reinforcing plates and angles was a simple process after all the experience building the trailer. I was intending to fasten them together with M10 stainless steel bolts again so the hole ends needed to be over drilled to M12 to take the shoulder washers.
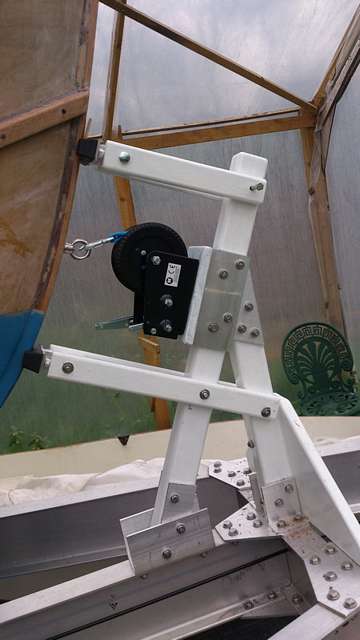
Starting to look more like the finished article now! I decided to use a generous piece of wood for the latitudinal strengthening and two bolts to hold it together, it should take a good few hundred pounds of strain when finished.
Apart from the angle aluminium, which I purchased last two at half price as offcuts, all the other bits so far were from stock, I suspect I will need to buy a few bolts of the correct size to hold it all together, or I could use threaded bar cut to size with a nut on each side. As I will need a few of various length bolts this option may work out more economical than buying 10 bolts, or using the local chandler who sells expensive packets of 2. The next problem is how to fasten the winch. I had expected to use two pieces of angle aluminium to hold an oak plate the winch would sit on, however the bolt holes on the winch are positioned wrongly for this as the nuts would sit on the aluminium flange. A little ingenuity later I decided to turn the angle aluminium inwards and allow a gap for the bolt heads - this worked well and was just as strong. All the parts were coated with resin and primed with two coats of International Primocon, which is an aluminium paint used for a base underneath antifouling - I used this because I had it available and it seemed to dry to a good finish. The top coat I am not too sure of, I used International Danbolin, which is a bilge and locker paint, it doesn't seem to dry to as hard a finish as I would like, but again it was available at no cost. If the worst comes to the worst and it proves to be unsatisfactory I can either recoat it or scrape it off and try something else. A couple of rubber bow blocks are all that are needed to complete the project.
This looks like it will do the job and give good service. I am happy with it for now, even though it has not been tested in anger - tested in frustration maybe! The next job is to design and build some supports that will jockey the boat into the correct location and attitude on the trailer - but this requires a bit more thought. ***** There is one more point I should mention, partly to correct a previous mistake and partly to act as a warning. For those of you who previously read my article 'Building an Aluminium Trailer – Part 2’. I stated my intention to use Locktite 2701 to secure the nuts and bolts on the trailer against vandalism, theft of components and coming undone due to vibration. It was my understanding from speaking with the company’s technical support that this compound would harden and be almost impossible to undo. Imagine my surprise when the four bolts I had to undo to fit the winch post came off cleanly and without any struggle – what went wrong? I called up the technical support again and got a totally different story. My tightening torque was about 45-50 ft lb, the new story was breakaway torque would be about 30% less than tightening so this would be about 30-35 ft lb without Locktite which would add a further 28 ft lb to mild steel or half of this to stainless steel i.e. 14 ft lb making 44 to 49 ft lb in total. In addition I found that the compound acted as a lubricant when prevent galling leaving my prize and joy available for theft. What to do? I could coat the exposed threads in epoxy, which makes them hard to undo, but not hard enough. There are three options here:
***** Click HERE for a list of articles by Mike Machnicki |


|

