 Custom Search
|
| sails |
| plans |
| epoxy |
| rope/line |
| hardware |
| canoe/kayak |
| sailmaking |
| materials |
| models |
| media |
| tools |
| gear |

| join |
| home |
| indexes |
| classifieds |
| calendar |
| archives |
| about |
| links |
| Join Duckworks Get free newsletter CLICK HERE |
|
|
| Cartopping a Boat |
by Seth Miller
- Richfield, Minnesota - USA |
| A discussion on the Duckworks yahoo group about tying a boat onto the roof of a car brought me to share a method for creating an attachment point. Another post brought me to comment about a method of tensioning tie down ropes. Others requested further clarification and pictures. Someone else suggested it become a Duckworks article, which you are reading now. I figured if I was going to do it, I may as well do it right. First off, an object in three dimensional space has six degrees of freedom. That is, it can move six ways. Those degrees of freedom are three rotational and three translational. An object can rotate about each of the three axes (traditionally called x, y, and z). It can slide (translate) along each of the three axes also. Our goal is to constrain each of those degrees of freedom. If we achieve that, the boat will be secure atop the vehicle. First step, throw (or gently set) the boat on the vehicle. I'm demonstrating with an old battleship of a canoe atop my small pickup. Roof racks are nice, if you don't have one and care about your paint, use foam blocks, blanket, towels, pipe insulation along the gunwales, etc. See the very end if you are curious about the construction of my roof rack.
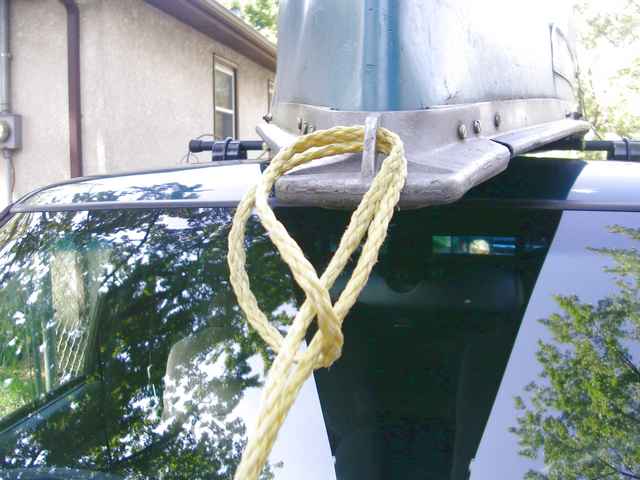
That simple act has constrained two degrees of freedom. The boat can no longer rotate around its long axis (tipping side to side). That is, provided the boat is wide enough and resting on a non-rounded surface. If you're tying down a kayak which is rounded both top and bottom, you need some blocks or something to keep it from rotating around its long axis. It also cannot rotate about its short axis (tipping forward or backward). Next, let's throw some ropes over the top and tie the canoe down to the rack. That will constrain another degree of freedom, possibly two or three depending on how it is done. I'm simply tying it to the rack. The boat might still slide side to side a bit, but it can't lift up. I start by tying a bowline in the end of the rope. Then I pass the loop around the rack crossbar and the free end through the loop to hitch the rope to the crossbar. This keeps me from having to tie/untie those knots every single time I load or unload the boat.
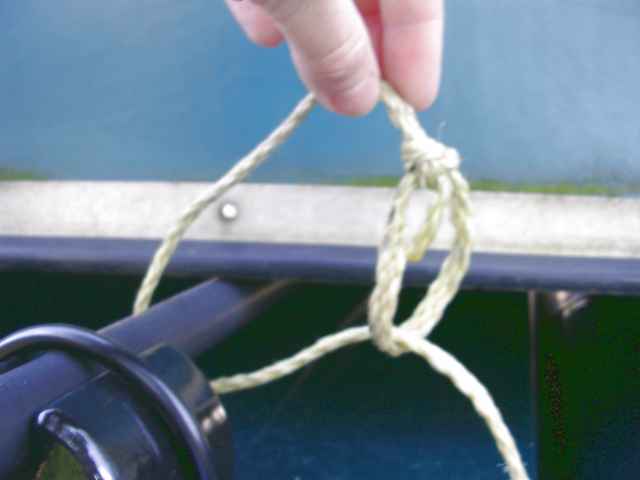
Toss the rope over the boat and walk to the other side of the truck. Now, tie another bowline some distance above the rack.
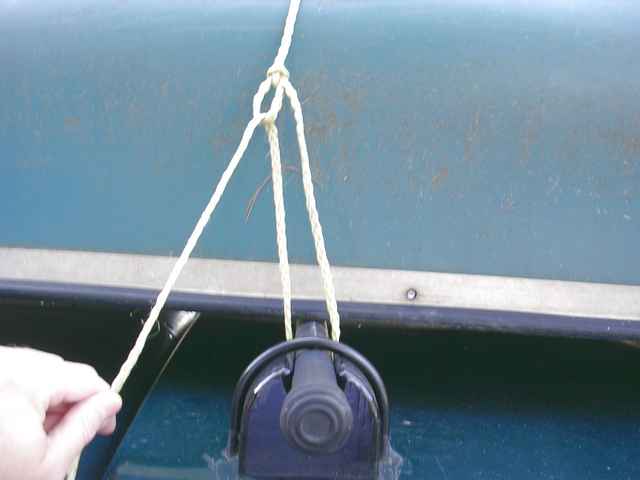
Pass the rope down around the rack crossbar, back up and through that bowline loop. Now when you pull on the rope, you have a 2:1 purchase (minus some friction) tensioning the rope. Tension is good, but be careful as you can deform or crush some boats pretty easily.
Frankly, the added tension isn't the best feature of this method. The ability to tie it off while under tension is where the method shines. Once tensioned, pinch the point where the tail passes through the loop. It is pretty easy to hold there and the friction keeps the tension allowing one to tie a knot without having to pull on the rope the entire time.
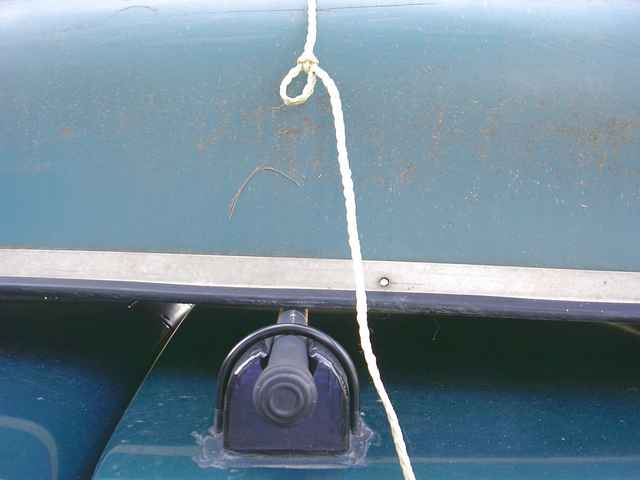
I simply tie two half hitches around the rope. Despite these half hitches being highly effective at keeping the tension they themselves are not highly stressed and as such relatively easy to untie later. One half hitch is enough to maintain the tension, but I give it two.
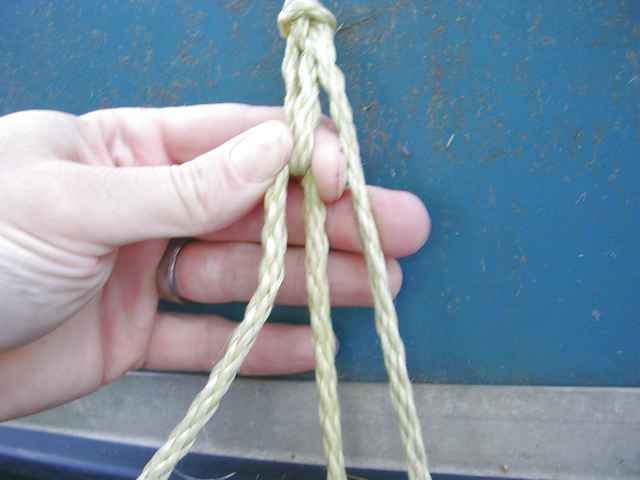
Tie off the excess (not pictured) using a couple more half hitches or a taut line hitch. If one is going to be transporting this particular boat a lot, I'd suggest cutting off the excess (take measures against fraying) leaving a few inches of tail which can be left free to flap in the wind without hitting anything. Once all the ropes are cut to length store them all in a labeled zipper bag when not in use. Rope is cheap and the convenience of having dedicated, ready to go lengths is nice. Depending on your rack and boat, tying across the top in two places might prevent the boat from rotating around the vertical axis (imagine a pin passing down from above through the boat and through the truck). It may also prevent the boat from sliding side to side and front to back. In such a case, it is tempting to decide it is tied well enough. Resist that temptation. You need at least one more rope - a bow rope. If one of those two over the top ropes were to come loose at speed, the bow could blow off to one side creating a very dangerous situation. Redundancy is your friend. I like to use two bow ropes, one to each front corner of the car. This keeps the bow from moving side to side as well as keeps the boat from moving back on the rack. Hey, that's part of another translational and part of another rotational degree of freedom constrained. To attach the rope to the bow, I fold the rope in half, pass the loop through the bow eye and pull the two tails through the loop.
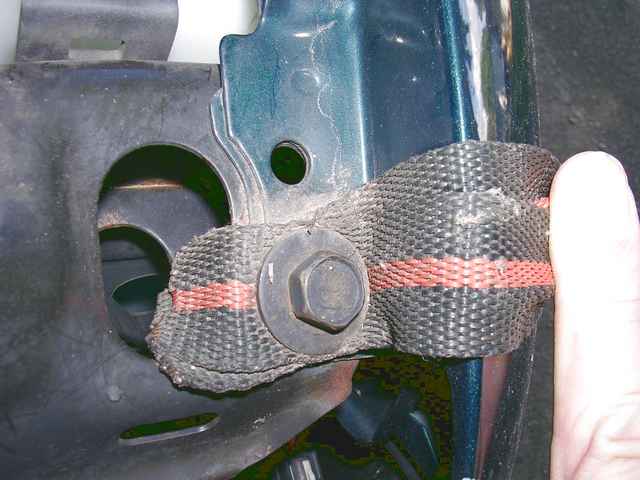
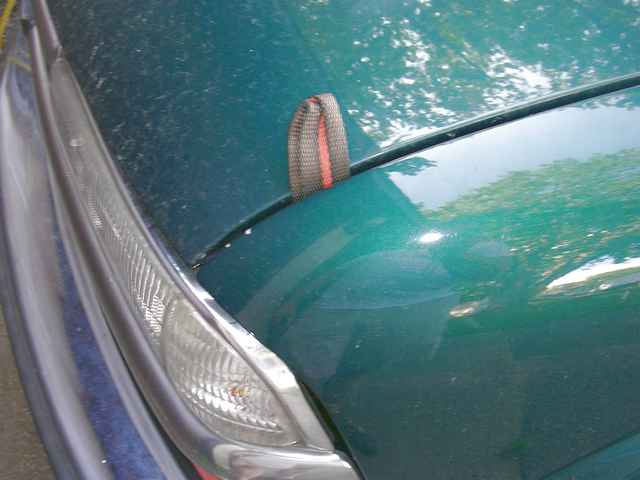
Some might be tempted to simply pass the rope once through the eye. That does nothing to keep the bow from sliding side to side. Either hitch it as shown or pass twice through the eye in the same direction. Each of the tails gets a bowline loop some distance up from the tie-down point. This is why I hitch as shown instead of passing it through the eye twice. To pass it through the eye, at least one bowline would need to be undone each and every time the boat is loaded/unloaded. Now, about those tie-down points. Some vehicles have convenient points, some don't. One can find points under the front bumper of almost any vehicle, but they are sometimes well hidden, sharp, or inconvenient to access if it is raining or muddy. Then there's the matter of the rope passing over the front of the hood and possibly scuffing it. Why not add convenient, invisible when not in use, non-marring tie-down points? First, open the hood. Locate a nice secure looking bolt near each front corner. Often the fenders are bolted along the edges to the 'frame', those are typically good points. Other good points might be where the hood hinges are bolted on, but those are too far back for my tastes. If you are dealing with a sedan or hatchback, bolts can sometimes be found under the trunk/rear hatch for stern lines as well. For safety's sake these bolts should probably be in the neighborhood of 5/16 or 3/8 inch diameter. I don't think I'd personally trust a 1/4 inch bolt. Once you've located the bolts you want to use, loosen and remove them. Make sure the bolts thread into a good, secure point and have a real, honest to goodness nut (even if it is welded in place), not a clip, not just sheet metal. Next you need some nylon strap at least an inch wide. Fold it into a loop that will be long enough to reach from the bolt and out through the gap in the hood and the fender. Give yourself a good couple inches outside the gap and at least an inch past the bolt. Cut the strap and melt the ends to prevent fraying. Use a pair of locking pliers to hold a big nail in a flame (propane torch, gas stove, camp fire, etc.) until it is hot. Use the hot nail to punch a hole through the two layers of nylon strap at least an inch from the cut ends. The nail might need to be re-heated a time or two in order to enlarge the hole enough for the bolt to pass through. Don't make the hole any larger than you need to. If you're lucky, your bolt will have a nice, thick, large diameter washer on it already (mine did). If it doesn't, acquire one. Place the bolt with the washer through the hole in the strap and reinstall it in the vehicle. While you tighten, hold the strap at approximately the angle you want it so it will feed nicely out of the hood and toward the bow of the boat.
When not in use, tuck the strap down under the hood, no one will know it is there. When needed, open the hood, fold the strap out, and close the hood. It might rub on the hood some, but it will be on the edge of the hood where it will be mostly hidden. A little strip of masking tape on the hood when it use can help. Keeping the hood and strap clean will also help keep it from scratching the paint too badly.
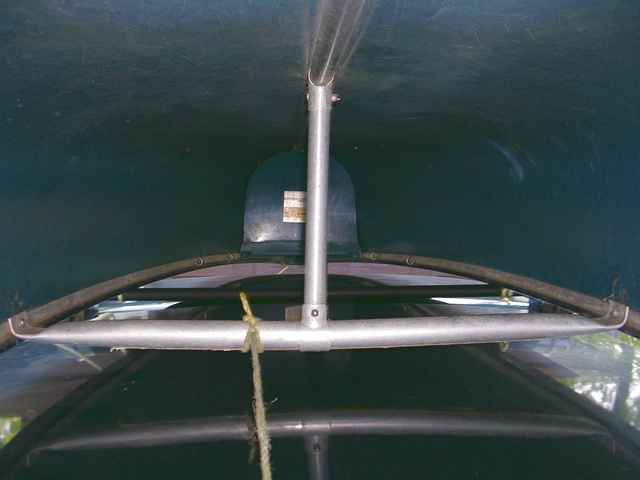
Now that we have two secure tie-down points, let's move on. Run the end of the bow ropes through the tie-down loops, back up to the bowline loops and pull out the slack. Don't try to pull them tight, you'll just slide the boat forward. We still need to constrain that. I've seen many people tie from the stern down to the rear bumper. That doesn't constrain the boat from sliding forward as that motion will loosen the ropes! I've found it works best to locate a point on the boat forward of the back of the vehicle and tie from there. For this boat, I use the center thwart.
Again, I've hitched the rope as I did for the rack crossbars so it can be removed without untying knots. The rope runs down over the back of the vehicle and down to the trailer hitch. One might be inclined to tie that to the aft roof rack crossbar. That would work so long as the rack doesn't come loose from the roof. I think it much safer to run it to the body of the truck. This is tied off with a couple of half hitches. No need to tension this one too tight as we'll add the tension from up front. Back up front, tension the bow ropes one at a time. I like to mildly tension one, mildly tension the other, go back to the first and tension it hard, and finally tension the second hard. Doing it that way helps to keep from pulling the bow to one side or the other. During the mild tensioning, I tie the half hitches so a loop is formed leaving the tail on the 'outside' of the hitch. That way a pull on the tail easily undoes the knot for further tensioning. I think we now have all degrees of freedom adequately constrained for this boat on this vehicle. We have the bow ropes and the thwart rope constraining translation along the boat's length. The bow ropes also serve to constrain rotation around the vertical axis. The rack and the over the top ropes also help constrain rotation around the vertical axis. Additionally they constrain translation from side to side on the vehicle, the bow ropes help here too. The second and third rotational degrees of freedom are constrained by the rack and the over the top ropes and of course the third translational degree of freedom, up and down, as well. Every rope is redundant. Any single rope could fail and another would perform the same function, at least temporarily and well enough to keep the boat in place while stopping. If one over the top rope fails, the other and the bow ropes take up the strain. If one bow rope fails, we still have two over the top ropes and one bow rope. If the thwart rope fails, the over the top ropes do keep it from sliding forward, just not against the tensioning of the bow ropes.
I like to check the ropes one more time to ensure they are all tight - especially that thwart rope since the over the top ropes might have prevented the bow ropes from tensioning it fully. As a final check, I like to grab the boat in various spots and try to shake it in various directions. I like it when the shaking moves the entire truck rather than just the boat on the truck. There are many different vehicles, as there are different boats as well. This method might not work for every possible combination. It is important to figure out how and where to tie onto your individual vehicle and boat. Think hard about how to securely tie on the boat so it is unlikely to come loose. Use strong ropes, bigger than you probably need, and check the ropes and their tension often. Don't just tie on and expect to drive hundreds of miles without a care. Keep an eye on it while you drive. If you notice slack in the ropes or the boat moving, stop and check it over. As someone in that discussion thread pointed out, it isn't necessarily the pain of losing the boat we're worried about, but rather the pain we could cause should the boat come loose and impact another vehicle or person. Be safe! A note about my roof rack: Yes, it is homemade. The "towers" are four layers of 3/4" plywood glued together then shaped. They are fully coated with TiteBond II glue and painted with Rustoleum water based exterior latex paint. The crossbars are 3/4" galvanized rigid electrical conduit. The thick walled stuff like steel water pipe; conduit is cheaper. The towers are shaped such that the U-bolt first contacts the conduit and pinches the tower between the conduit and the truck topper's roof. The U-bolts are 3/8 inch diameter and pass through the topper's roof. The holes through the topper and the towers are sealed to the roof with clear silicone caulk. The U-bolts have large flat washers, lock washers and nuts securing them on the inside. Still, when hauling something large and/or heavy I don't fully trust the rack and prefer to have whatever is up there attached to the truck itself in some way. |


|