
 Custom Search
|
| sails |
| plans |
| epoxy |
| rope/line |
| hardware |
| canoe/kayak |
| sailmaking |
| materials |
| models |
| media |
| tools |
| gear |

| join |
| home |
| indexes |
| classifieds |
| calendar |
| archives |
| about |
| links |
| Join Duckworks Get free newsletter CLICK HERE |
|
|
| Out Three |
by Paul Austin - Dallas, Texas - USA Lofting Today - Part Four |
 |
| Part One- Part Two - Part Three - Part Four - Part Five
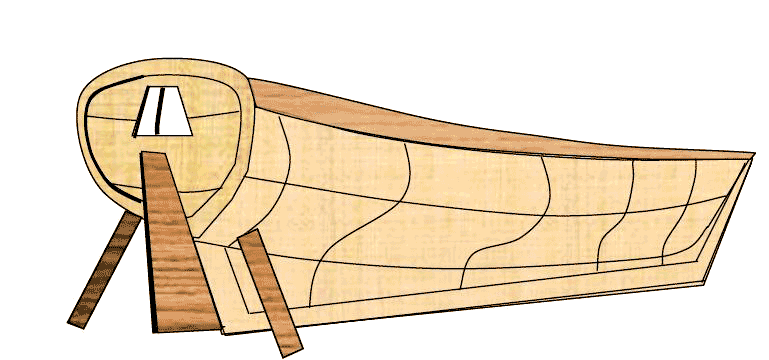
Expanded TransomThe only aspect of lofting which gives anyone trouble is the curved transom. These sterns aren't on small boats, there would be no reason. However, designers put them on larger ships. They probably descended from the great ships of the 17th and 18th century in which a shipyard would show its' skill with ornamentation. The way these transoms are lined off depended on the shipwright. There is no one way above all others. So I will describe the basic method. By the time you're through reading this, you may have thought of shortcuts. Good-tell us all about them. But for now we have a good method.
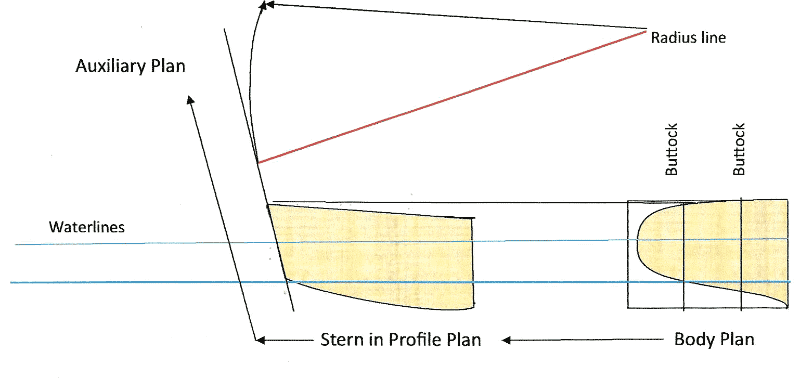
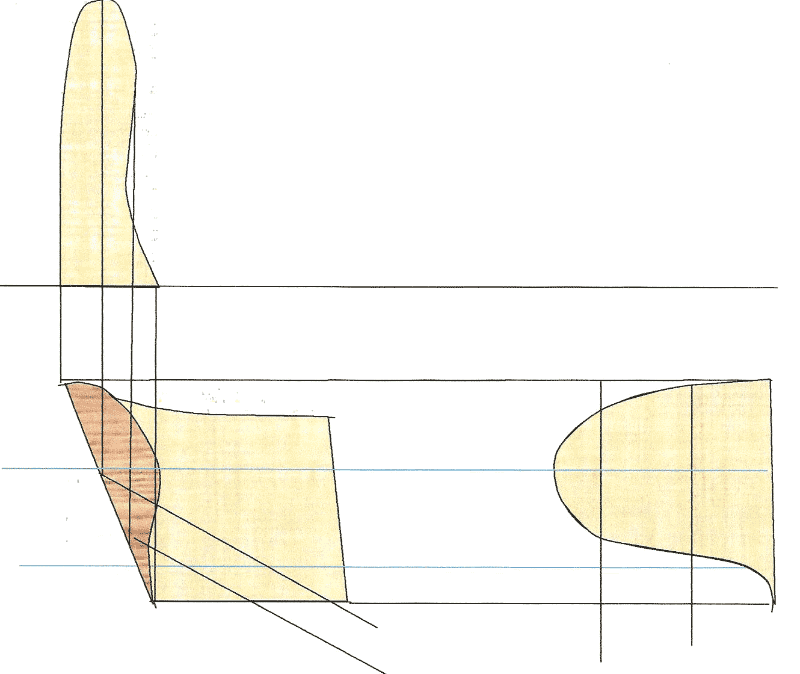
The secret to drawing lines for a curved transom is putting the profile, body plan and half-breadth of the stern close together. This enables us to draw accurate lines from one view to the other. Then we will create an additional view, called auxiliary view, and from this view we'll have our expanded measurements. All of this needs accurate lines and perfectly parallel lines. So first we get our stern lines together on the loft floor. We're doing this to (1) draw the curved transom accurately in body plan first, (2) then extend the waterlines to draw it in profile. From there we (3) extend the transom's rake to be a centerline for the auxiliary view.
What we've done so far is start with the body plan, extend lines to the profile and then run a line up as the centerline of this new auxiliary plan. Easy enough. Now we will put in the buttock lines on the auxiliary plan and then project them down, back to the profile plan from where they intersect buttocks from the plan view.
I've enlarged all of this to see it better. At this point we will do away with the raked auxiliary view to draw the stern in half-breadth above our profile view. We will hold on to the lines down the profile view which we got by projecting down from the auxiliary view, lines which I had labeled A and B. We will take the intersection of the profile waterlines and Lines A and B to send them up to the hb view where they meet the buttocks. At that intersection we connect them with the curved line.
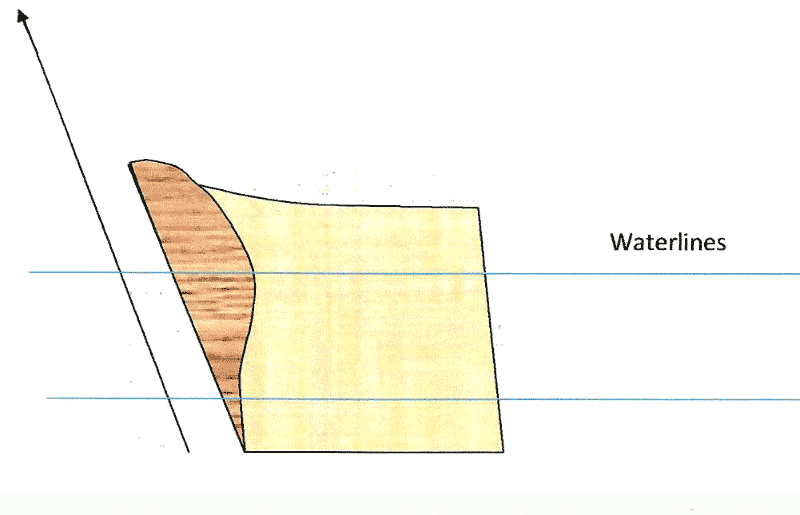
The circles are joints where the buttocks off the profile plan (from below the boat) meet the buttocks we brought down from the auxiliary plan. This is the beginning of the curvature of the stern. But we have to send the buttocks up to meet the buttocks in the hb view. We do this with the vertical lines. We're just connecting buttocks to buttocks and waterlines to waterlines in different views. But to connect them we need these vertical lines from one view directly to another. At these points we can draw a line through them to form the shape of the stern. This shape doesn't look good because I've exaggerated the location of the buttocks in the profile view to make the drawing bigger. In the real world the buttocks would be quite close to the transom surface. This is why drawing accurate, parallel lines is so critical. We're about half-done now. The reason for the auxiliary view and projecting lines was to get an accurate shape of the stern in the hb view, as we have above. We've done that. Now that we have a nice shape - with some points on the outline of it - we can project it back into the plan view. From now on, in the last three steps, we will be making the profile view as accurate as we can because the expanded transom comes from that view. With the profile view drawn with a nice curve, we need to use the body plan view to create the transom top. This is more critical in some yachts than it is with our example because some yachts have a transom top higher than the deck or sheer line.
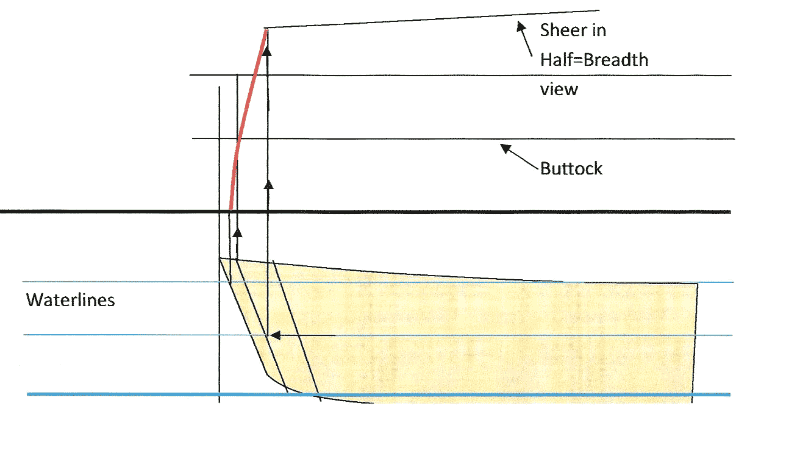
Now we have the top of the transom lines, so we can project them back up above the profile view to our first expansion view. This line is our new centerline, for the first expansion of the transom. It can be any distance from the transom, as long as it is parallel.
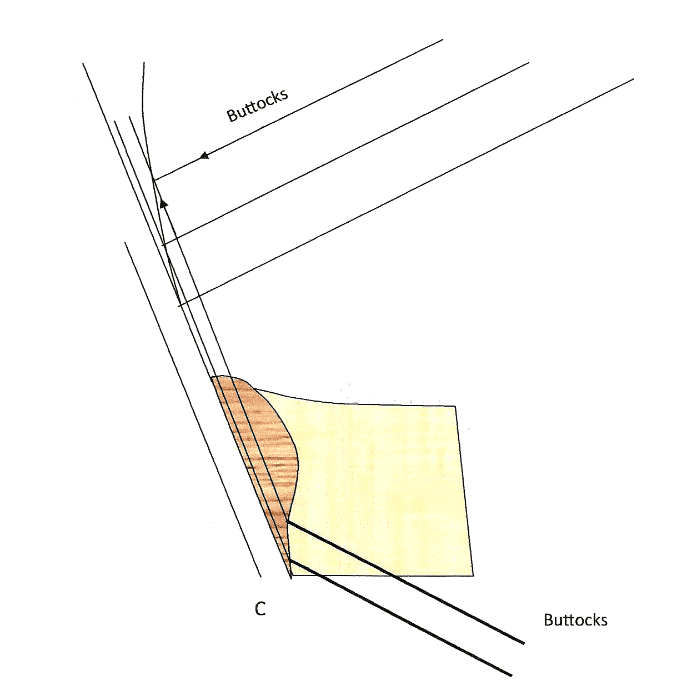
Here we have drawn line C, which will be the centerline for the expansion of the transom in the picture below. What we've done here is bring the buttocks up from the hull bottom and connect them with the buttocks and a waterline in the expanded view. We've connected lines from two different views.
When the stern rakes inward, there is another way to do this. It is a few steps simpler, although most of it is the same. The basic idea is for the buttocks coming up from the bottom of the hull to cross the stern and meet the buttocks coming down the transom. In order to know exactly where to run the buttocks across the stern, we will project the curved stern above, as in the auxiliary view before.
Now that we've drawn an accurate stern curvature in auxiliary view, we can make the centerline for the expanded view off of the profile, as we did before.
Then we put in the buttocks in distances from the centerline which we got from the curvature of the red line on the previous page. These distances are not exactly the same from one to the other since they are around a curve. When we bring the buttocks up from the hull, they intersect with the transom buttocks. Those are our points to expand this transom. I haven't put in all the buttocks from the profile view to keep the drawing simple, but when you're drawing this full scale on your hands and creaking knees, the lines will spread out enough to make the stern expansion accurate. What we're doing is using the auxiliary view to draw an accurate curve of the transom lying flat, then bringing buttocks up to cross buttocks and connect their intersections - connecting the dots. I hope all of this about transoms helps. Paul https://crossingthoughts-paul.blogspot.com.au P.S I am now writing with Mike John on: And, I am now offering books on Amazon. *****
|


|