
 Custom Search
|
|
| sails |
| plans |
| epoxy |
| rope/line |
| hardware |
| canoe/Kayak |
| sailmaking |
| materials |
| models |
| media |
| tools |
| gear |
 |
 |
| join |
| home |
| indexes |
| classifieds |
| calendar |
| archives |
| about |
| links |
| Join Duckworks Get free newsletter Comment on articles CLICK HERE |
|
|
| Building a Puddle Duck Racer |
by Bill Nolen - Oklahoma City, Oklahoma - USA |
I first became aware of the little "Puddle Duck Racer" while reading an article about the 2008 Texas 200 sailing marathon. The article told how a handful of iron-willed, and iron-bottomed sailors, sailed their tiny home-built four-foot by eight-foot sailboats for five days along 200 miles of the Texas Gulf Coast.
David "Shorty" Routh is credited with developing the Puddle Duck Racer in 2003. The boat's design is somewhat similar to Philip C. Bolger's 8-foot sailboat, the Brick. The construction is simple enough to enable a person to start building, and within a week or two be sailing with other Duck boats.
Shorty's idea quickly took flight, and soon there were dozens of the little boats being built and sailed. At present there are over 600 Ducks within the USA, and in twenty-five other countries. From Texas to Russia, and all points between, the little sailboats are providing inexpensive fun for their builders. As for the degree of difficulty in building a Duck, all you have to do is just think "sandbox"! In essence, that is what a Duck sailboat most closely resembles. A 4-foot by 8-foot sandbox! While some Ducks have been constructed using expensive marine materials, the majority of the boats are built using inexpensive lumber store materials. External plywood, pine boards, decking screws, latex house paint, and adhesives such as Titebond are the mainstay materials being used. Most Duck builders have use blue and brown tarp materials to make their sails. However, more and more builders are using a higher quality white polyethylene material sold by Dave Gray of polysail.com. Many different types of sailing rigs are used on the boats, such as the lateen, sloop, lug, sprit, and leg-of-mutton. I liked the looks of the Duck that John H. Wight sailed in the 2008 Texas 200, and decided to build one like it. I downloaded free plans from the Internet, and made a list of the materials that I would need. All materials I used in constructing my boat came from local Home Depot and Lowe's stores. Being cheap by nature, I bought the least expensive plywood that was available, four 4' by 8' sheets of 5 MM Luan plywood for the sides and bottom of my boat. I also bought several 8-foot 2" by 4" pine boards to cut into smaller strips. In addition, I bought a box each of 1-1/2-inch and 2-1/2-inch deck screws, three bottles of Titebond 111 glue, and two tubes of PL Premium Polyurethane Construction Adhesive. The construction of the Duck is so simple that I will just detail the highlights of my building efforts. If you have any questions feel free to contact me. The first thing I did was cut two sheets of the 5 mm Luan plywood into six 16-inch panels. The hull height shown on the free plans is 18-inches. However, by reduced the hull height to 16-inches, as many Duck builders have done, I was able to cut six 16-inch wide panels from two sheets of plywood. Enough panels for both hull sides, two air compartments sides, plus have two 16-inch panels left for the tops of the side air compartments.
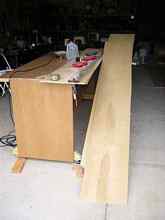
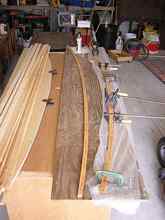
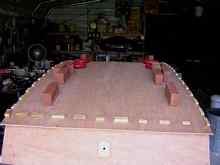
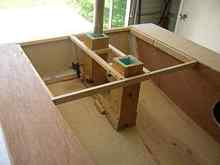
I stacked four of the 16" panels on my worktable, and marked the hull's outline on the top panel. While stacking the panels together I made sure that I had two pairs of facing panels so that when the boat was finished, the "good" sides of the plywood would be showing on the outside of both the hull and air compartments. Using a saber saw I cut the outline marked, leaving me with four identical hull panels. I used a table saw to rip two of the 2 x 4s into smaller strips to use for my boat's cleat and chine logs. (I always have to look up what to call those top and bottom wood strips!) The two 2 x 4's gave me 12 strips 3/4" x 1". Four of these strips (logs) were then cut into eight 1/2" x 3/4" strips to use for the lamination of the bottom's curved chine's. To make the chine laminations, I built a simple jig by driving nails into a piece of ¾" plywood, along the line where I had marked the bottom of the hull. I coated the inter surfaces of two ½" x ¾" strips with Titebond glue. Spring clamps were used to hold the wood strips to the nails while the glue cured. You can see the nails driven along the hull's marked outline at the top right of the photo. It took several days to laminate the four chine logs, since I had to let each strip cure for several hours before removing it from the jig.
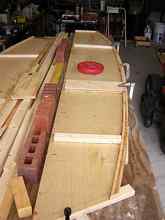
After gluing the cleats and chines to the four hull panels I gave some thought as to whether I was going to use a dagger-board, center-board, or lee-board with my boat. In the end, I decided to use a lee-board attached to the boat's hull by a method developed by John H. Wright. Wright's method uses two metal plumbing 1" floor flanges, with a 1" metal nipple between the two flanges. One flange is bolted to the side of the boat, and the other bolted to the side of the lee-board. When the lee-board is raised or lowered, the flange attached to lee-board rotates on the metal nipple. The insides of the boat's hull panel were reinforced with ¾-inch plywood to handle the stress imposed by the lee-board. I added inspection hatches to the sides of the air compartments directly across from the plywood reinforcement so the mounting bolts could be inspected.
To assist me in holding the hull panels while I attach the bow and transom, I made a simple jig to hold the hull panels upright, and attached it to my worktable. I then attached the bow and transom to the hull panels using Titebond glue and screws, checking often to ensure all components were square. After all, this is supposed to be a square boat!
Once the glue on the hull panels, bow, and transom had cured, I added reinforcing wood strips across the opening between the air compartment panels and the side hull panels. I then placed a heavy bead of PL Construction Adhesive on the bottom edge of all the hull panels. With the help of my long-suffering wife, the bottom plywood sheet was placed on the hull panels. Fifty-five screws and small blocks of wood were used to hold the bottom plywood in place while the PL cured.
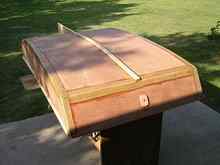
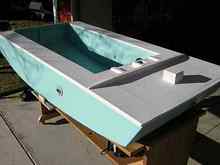
After 24-hours the block of wood and screws were removed, and the plywood trimmed flush with the bow and transom, I used short pieces of bamboo skewers and glue to fill the open screw holes. After sanding the hull I applied Titebond and fiberglass tape on the hull's seams. A cheap and effective way to reinforce the seams.
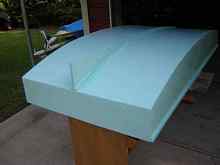
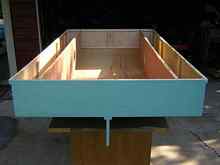
After applying a coat of latex primer, and three coats of latex deck and floor paint to the bottom and sides of the hull, I turned the boat upright so I could work on it's topside.
John G. Wight's Duck had two mast steps at the bow to aid in trimming the boat when using different sail rigs. I thought that was a good idea, so I installed two mast steps, and then attached the top plywood panels to the air compartment using PL adhesive. (I later removed the aft mast step to reduce weight since I wasn't using it.)
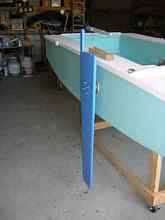
After installing a plywood bow panel, along with a splashboard and some hardware mounting blocks, I painted the upper hull using latex primer, and deck and floor paint. Some builders buy gudgeon and pintle sets to attach the rudder to their boat hulls. Many other builders use less expensive methods. I used eyebolts for gudgeons, and a brass tube for the gudgeon pin. I made the rudderstock from ¾-inch plywood and the rudder blade from ½-inch plywood. The tiller was made from an old post-hole digger handle! (After several months of use, I decided that I could now afford to buy by a "store bought" gudgeon and pintle set, so I ordered a one-piece gudgeon and pintles set from Duckworks. 358-BRG. I had an old Sunfish dagger-board on hand that I used for a lee-board. All I had to do is bolt a floor flange to the board, and add a control arm. I use a bungee cord, and a small line to control the position of the newly made lee-board in the water.
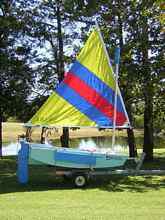
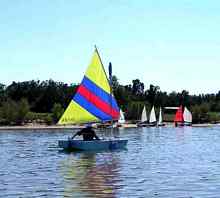
Although making a Duck sail from a tarp is easy, I elected to use a 45 square foot lateen sail from an old Super Snark sailboat. The range of sail size's being used on Ducks is amazing, ranging from 45 square feet to 105 square feet! The majority of Duck builders make masts and spars out of wood. However, I used a 2-1/4-inch 10-foot aluminum tube (Sunfish mast) for my mast, and two painters' aluminum extendable poles for my lateen sail's boom and spar.
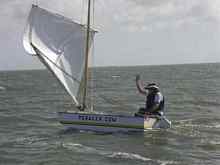
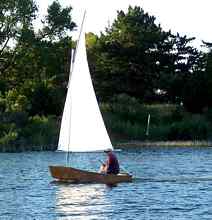
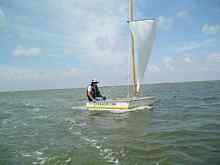
I was able to give my boat, which I had named Duck Bill, a good testing when I attended the 2010 Sail Oklahoma Messabout in October 2010, and was very pleased with the boat. It did everything that I asked of it. With a small sail, the boat is excellence for a novice sailor like myself. With a slight breeze the boat obtained speeds in the 3.0 to 4.0 MPH range. The little boat was very stable. I was able to move about the cockpit and sit on the side air compartments without the boat tipping to any degree. The Duck is just a fun boat to sail! What else could a person possibly want?
Well, sailors always want more speed! One of the fastest Duck sailboats is Brad Hickman's Oz Duck, Lucky Duck, with its 90 square foot balanced lugsail. After watching Lucky Duck race across the water, I've started thinking maybe a larger sail might be in my Duck's future!
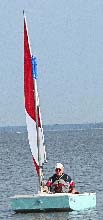
Update: For the 2011 Sail Oklahoma Messabout and Worlds Puddle Duck Races, I installed a new 55 sq ft Snark sail. The Duck sails very well with it's larger sail.
Additional Information:PDRacer.com. Website for Puddle Duck Racers. Free plans. PDGoose Yahoo Group. Forum for the PDGoose, an 12-foot Duck type sailboat. Web Site: https://groups.yahoo.com/group/pdgoose/?yguid=472415 PolySails.com. Source for Polytarp materials, sails, and sail kits. Bill Nolen
|


 |