 Custom Search
|
|
| sails |
| plans |
| epoxy |
| rope/line |
| hardware |
| canoe/Kayak |
| sailmaking |
| materials |
| models |
| media |
| tools |
| gear |
 |
 |
| join |
| home |
| indexes |
| classifieds |
| calendar |
| archives |
| about |
| links |
| Join Duckworks Get free newsletter Comment on articles CLICK HERE |
|
|
| Out There |
by Paul Austin - Dallas, Texas - USA Classic Ship Construction Notes - Part Four |
 |
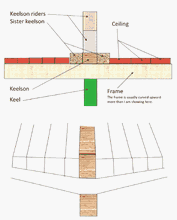
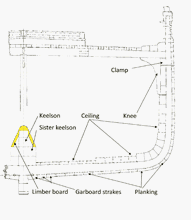
Part One - Part Two - Part Three - Part Four - Part Five- Part Six Four Interior Details Keelsons, Clamps, Ceiling, Pointers and BulkheadsSitting on top of the keel where the frames lay across, the keelson is the mysterious member of a ship's structure. No one designer has the best rule for how to design keelsons, how thick they should be or how they should sit on the keel. Each designer has his own preferences, and the purpose for which the ship is built plays a role. Some huge ships have lighter keelsons made up of several members called 'riders', and some lighter ships have heavy timbers for the keelson. There seems to be some thought of, what is the keelson being asked to do? If it is being asked to keep the keel in place, it will extend over the keel scarfs. It will be taller than it is wide to be immovable. If the keelson must hold on to frames, it might be notched and lighter. If the keelson is being asked to limit flooding, it will be taller. It's own scarfs will have tar paper in the joint. The keelson scarfs will not be over the keel scarfs, which is only common sense.
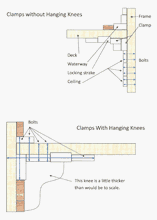
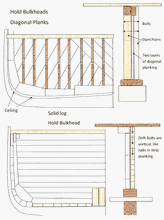
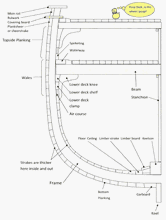
Clamps are long sections of planking which extend the interior planking, called ceiling, up to the deck beams. Clamps support the deck beam. Since on large ships the deck is a great stiffener for the hull, clamps must be strong enough. They will be bolted through to the outside of the hull. All clamp scarfs are positioned on the inside of frames, so that the outer edge of the scarf is covered. Normally the shipwright will use his longest timbers for the clamps.
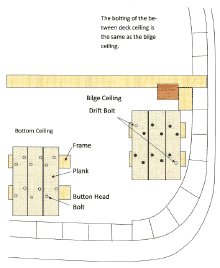
You stand on the ceiling. That's right, just like Fred Astaire in that movie when he danced upside down, that's what you do. Probably, the old boys were in the tavern, tossing rum down the palate when someone slurred, 'sealing,' into ceiling. This ship terminology is highly technical. At the turn of the bilge the ceiling is called - technical here - bilge ceiling. It is always thicker than the ceiling on the bottom - called bottom ceiling. The ceiling does seal the ship. By this inner planking flooding can be controlled, the frames are locked into place, and you can throw your empty rum bottles between the ceiling and the planking - no one will ever know. On yachts, many designers don't like to run the ceiling all the way up under the deck. They say this inhibits ventilation air getting to the frames and outside planking. However, on tall ships running the ceiling all the way up to the deck clamps is mandatory.
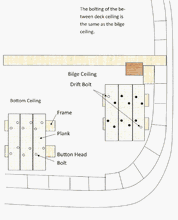
Here is the bolting arrangement for bottom ceiling, bilge ceiling and between decks ceiling.
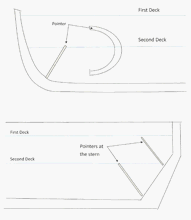
In the largest ships, pointers are used wrapping themselves around the bow and stern frames, shaped somewhat like a boomerang, as you can see in the drawing. They strengthen the ends of the ship and lock down half frames in the bow and stern. They run from a deck down to the keelson and back up to the deck on the other side of the keel.
The hold bulkheads are heavy, to prevent flooding and strengthen the ship against hogging. Bulkheads are built with diagonal planking or with butted planking, called solid log. The turn of the bilge also has a different shape to its structure. You can see the two structures butting in the turn of the bilge with a scarf much like a bow scarf.
***** Planks
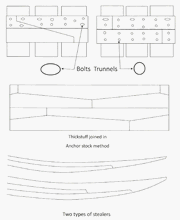
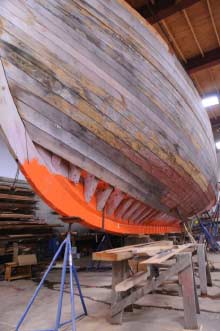
And now ladies and gentlemen (if you're a lady, you probably shouldn't read this) we come to the planks. Back in the day, some men specialized in planking since this is where the ship leaked or did not leak. Smooth planks meant a fast ship. This was so true, design compromises could be overcome by a good job of planking. Yet, the attitude of most ship owners was, if the keel, frames and strapping were in place, the planks should form themselves into place. Sure. The planks are named from the keel upwards garboard, bottom planks, floor-head planks, wales, topsides and gunwale. The garboard plank was thicker than the wales if the ship were going to be coasting in shallow water. If not, the garboard might be thinner with the first three planks called the garboard. Ships were build either way. One thing was true for every shipwright, if the garboard is good all the other planks can be; if the garboard leaks, head for the shore. Some ships had the planks just below the wales called 'thickstuff.' In smaller ships the planks just above the wale were called, 'varnish strakes,' or 'filling planks.' Some ships had planks above the wale but below the gunwale, called paint strakes. Gunwales were laid horizontally on top of the futtock heads to prevent moisture from entering. Some ships had 'anchor lining', planks designed to protect the planks around the anchor from being damaged. The bottom planks were as thick as the garboard, as they were thought of as an extension of the garboard. But the floor-head planks lay where the frames began their curve upward. The more the curvature, the more the planks were shaved narrow. In ships with a sharper bow, the bottom planks were wide and thick, the floor-head planks were numerous and narrow. On the longer ships, above the floor-heads but below the wales planks were called side planks. These usually took the greatest curvature of a ship's side.
For a 100 foot ship, a bottom plank might be 11 inches wide, 2 1/2 inches thick, and 24 feet long. The wale might be 12 inches wide, 4 1/4 inches thick and 24 feet long. From the wale upwards the planks were not as wide, not as thick but still at 24 feet long. For the garboard and bottom planks elm or beech was preferred. British man-of-war ships East County oak was used because it could be found in 30-50 foot lengths. The joints between planks were a butt joint, offset above each other. The rule was, 3 planks between frames. The joints were at least 6 feet apart on planks 24 feet long. Some shipwrights didn't like an orderly pattern of joints, fearing one joint opening up would lead to others doing the same. As the 18th century became the 19th, planks became longer and joints fewer. Wood trunnels were used to fasten planks below the water, nails or spikes were used above the waterline. The trunnels were always oak, 1 inch thick for ships up to 100 feet long, 1 1/2 inches for longer ships. Iron spikes varied in length from 1/2 inch to 3 feet. Nathaniel Herreshoff once said trunnels were never watertight.
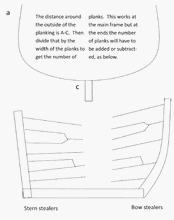
Scarfs were butted in all planks except for the thickstuff planks. These were hooked as in the drawing. The thought was that these hooks would help the ship retain its shape at sea. However, a great deal of wood had to be cut away to form the hooks, thus wasting money. It also took a great deal of time for ship's carpenters to make enough hook scarfs, exactly right, for a big ship. The hooks probably did strengthen the hull, but unless the ship was headed for the Arctic, most ship owners didn't think it was worth the expense and time. The number of rows of planks was calculated when the main frame was measured and stood up in place. It's outside dimension was divided by the width of the planks to get the number of planks. Now there was no standard width for planks; it just depended on what timber a shipwright could get. Often men would argue over who got the longest planks, and the owner or ship master would have to separate men and decide. The bow and stern outside frame measurement was always different from the main frame, so stealers were put in. They did not strengthen the planking; they simply gave the construction crew more joints with which to deal.
At this point you can get an idea that no matter how good the oak and the caulking, all wooden ships in the 17th, 18th and 19th century leaked some. Diagonal strapping helped a great deal. I'm sure many a cabin boy was grateful to God he didn't have to go down in the hold, standing in 3 feet of cold infested sea water to pump the bilge, as generations of cabin boys before strapping had.
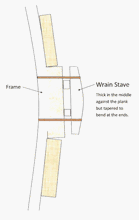
Before around 1750 planks were laid in wet sand and heated until they could bend. Then around 1768 kilns were built to steam-bend strakes. A section of thick ash tapered at the ends known as a stave was used as an outside clamp to keep the hot, bend plank in position until it could be bolted down. Kilns were wood framed, set on top of a brickwork base. The wood framed kiln would be 3 to 4 feet wide, 20 to 40 feet long. They had a door at each end. Steam from a boiler in the brickwork base circulated around the plank, one hour for every inch of thickness with an extra hour for good luck. A wale might need half a day in the kiln. Then men wearing gloves would bring the plank out of the kiln, carry it into place on the hull and clamp it down with the stave. Unfortunately, sometimes the stave would break, allowing the sprung plank to snap back - sweeping men out of its way! The good news is, once the wale and garboard were in place, the rest of the planking went easier. The frames were not going to move. Bolted to a keel, wrapped by the wale and garboard, the ship was immobile.
The oak planks were usually 4 inches thick, held in place by 1 3/4 inch trunnels or 1 inch bolts. Two gangs of men worked on the big ships. One gang spiled and scarfed from the garboard up to the wale, the other gang from the wale down and up from the wale to the sheerstrake. For most ships, the garboard plank nearest the keel was left for last so that air could circulate inside the ship. Since ships were built outside in all kinds of weather, sometimes rain or snow could trickle down out the gap where the garboard would be placed. Also, in the days when ships were built by the water, if the garboard were put in first spring tides might float the skeletal ship away. At some point in the construction of the planking, after the frames were stationary the inside ceiling was begun. This was a physically more difficult operation than planking the outside which has a convex shape. The ceiling planks had to be shoved into their concave curve by bracing each plank from the frame on the other side of the keel. When the ceiling planks were being shoved into their curving shape, the ends moved in. This meant the plank ends had to be knocked in at one end until the other end was butted perfectly against its neighbor plank. The strongest men used the heavies sledge hammers they could without damaging the plank ends. Ceiling planking was from keel upwards. Where the turn of the bilge was severe, planks called thickstuff were put in. They were 7 or 8 inches thick, 12 inches wide - big, strong planks to take the stress of the hull's turn. Up to the first deck, called the Orlop deck, the clamps and beam shelves took the greatest stress. These members made the ship stout. In some countries, orlop deck clamps were omitted to save weight. This tells us how heavy the orlop deck clamps were (orlop is the lowest deck). When a ship is fully planked, it is powerfully strong. Being sunk by enemy fire was less a threat than fire, an explosion or a dismasting. It was the boarding of a ship by pirates or a military enemy that made these great ships vulnerable.
One final note about planking. In the latter half of the 19th century, diagonal planking was used underneath the outer planking upon the frames. These diagonal planks were quite thin, maybe an inch thick. They were nailed down flat. Diagonal planking under the horizontal planks made these ships incredibly stiff at sea. Paul https://crossingthoughts-paul.blogspot.com.au *****
|