|
This piece is about storing your boat, and it applies most for canoes or light rowing boats. Caution: there is a bit of math in one paragraph down below.
Due to my work and family situation, I have not yet managed to create a sufficiently regular time budget for my first boat build. However, I am getting there - the urge is growing. Every new day of reading Duckworks Magazine waters and fertilizes this little plant within me. In fact I am planning to build a Michalak Robote this summer. Let us see where that takes me.
Due to the kind of home I live in, I have no year-round building space available - in the future, I will have to look for an empty garage or something similar.
What we just about can squeeze into our place is a year-round storage area for our family canoe. This is a national brand GRP boat just under 18ft (5.4m) in length, which weighs about 90 pounds (45kg or so). It holds four adults easily - the manufacturer states a nominal payload of 1.000 pounds (500kg). We have used it for two-week canoeing trips in Sweden with two adults and two teenagers. In addition to all of our gear and provisions, we also took on extra payload from several friends in smaller boats - and the heavier we loaded her, the better she tracked and maneuvered. But I am getting de-focused.
To fit our boat into our place, I had no spare garage, shed, workshop or comparable room available. What we decided to do was to fix her to the garage ceiling, above our family car. This is obviously not rocket science, and I have seen it done in various places. For those of you that have contemplated going there yourself, but have not done it yet, let me summarize some bits of practical experience that may be of value to you. The assembly that I currently have is certainly a good example of failed over-engineering, and I have a few hints how you could do a better job.
So, how many ways are there to permanently tie your boat to the ceiling? Well, surprisingly many. What are influence factors and design choices that you have to make? Minimum (target) headroom downwards (how tall is your car ... or whatever you want to put below?) related: available headroom upwards between boat and ceiling. What your ceiling made of? i. e. - what kind of fasteners can you or do you have to use? Where can you, and where are you willing, to put your fasteners? (In my case: can your power drill make holes the size and length of your index finger in reinforced concrete?) Do you want to be able to roll your boat over while suspended? What is the minimum manual force that you want to design your system for? Or in other words: who is the weakest person in your household that should be able to get the boat up there without help? What hardware do you have available, or how much are you willing to spend for it? (How many blocks can your system contain? Do you have any spare fasteners on stock? What kind of rope can you use?...)
Our case - general considerations
As two design examples, let me share how we fastened our boat in our previous and our current place. Both are multi-tenant basement garages with reinforced concrete ceilings, where we occupied a single parking box for our car. In both cases, I decided to have a block and tackle based setup with two separate systems - one front and one aft (just in case you were wondering - less than two will not work, as your boat will get out of balance and wildly swing. More than two will also not work, as you will not manage to distribute the pulling force well enough - in practice, exactly two supports will carry most of the load anyway). My target was to design the block and tackles such that an adult can handle one at a time without particular effort. I must admit that I never measured the required force in practice. In both systems, the working ends of the ropes were fixed to two largish belaying cleats that I built from wood. The rope is 6mm (1/4 in) braided cord purchased at a local 'home depot' equivalent. Strength aside, anything below this diameter is too thin to get a good grip at it for pulling.
We have two use cases for lowering our boat - it either goes on the roof rack of our family car = upside down; or it goes down on top of our little portage cart, as we have a canal with launching facilities within walking distance = in that case, the boat needs to be lowered right-side up. Hence, I wanted to be able to roll the boat over while still in the air.
Previous block-and-tackle
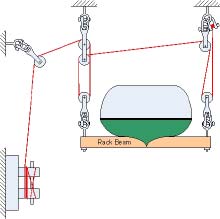
The previous garage was a structure about 40 years old. The ceiling was monstrously high - about 12'2" (3.7m) and made from reinforced concrete. The walls of our parking box were about 10' (3m) apart and made of painted brick masonry of doubtful quality - there were mineral bloomings in some spots, pushing the paint off. One side even had a horizontal crack several meters in length. Although I originally wanted to use a central vertical block-and-tackle, I did not trust myself and my power drill to handle the overhead drilling into concrete while standing on the top of a ladder high above the very hard ground. My experience is that serious power drilling in concrete (and the screeching sound that comes with it) makes me dizzy, so I try to not do it more than three steps above ground. So, I had to come up with an alternative. I decided to do a "V-split" block-and-tackle with fasteners mounted on the side walls.
|
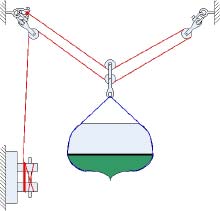
Hardware assembly of the previous boat lift. |
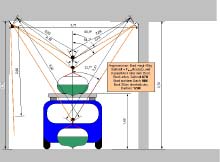
On the positive side, this meant that I could drill horizontally in brick - much easier to do than vertically in concrete. On the flip side, this setup has a major mechanical disadvantage: the higher up you pull the boat, the higher is the pulling force that you need. Once your two rope legs are at a 45° angle to the vertical, only half of your force pulls the boat up - the other half tries to pull the walls together. If you pull further up, the necessary pulling force goes towards infinity (at some point before reaching infinity, either the rope, or the side walls, or your hands will give in). As you see from a diagram I drew back then, I went so far as to calculate angles and theoretical forces. but more on that below.
| Geometry of the previous boat lift, with angles and theoretical forces. |
|
As wall fasteners, I used heavy duty galvanized steel screw bolt eyes and high quality nylon wall anchors. The screw bolts of the shackles that held the rope ends and blocks were fastened with cable ties. As they were mounted about 12' above the floor and it was quite dark up there, I wanted to make sure they did not un-screw in operation.
|
The boat itself was suspended in two slings of 2" wide webbing, so it was easy to roll over. The top of the sling ran through the eye of a double block. |
This setup worked considerably well for about three years. The geometric limitations of the V-style lift meant that you could only hoist the boat up to the point where the necessary pulling force was larger than what you could bring up. However, this point was above the necessary clearance, so there was no problem. Friction in the blocks was neglectible (or so I thought), as the "V" geometry limitation felt like being the dominating effect. Every few months, I would inspect the wall fasteners with a flashlight just to make sure that nothing had moved or started to pull itself out of the wall. However, there never was any issue here.
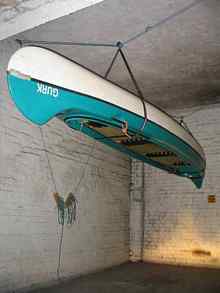
| Our boat over our family car, hoisted and firmly held by the split lift. Note the ample clearance between car and boat. |
|
Current block-and-tackle
When we moved to our current place, the boat hoisting lift gave me a bit of a headache. The new garage was more solid (newly built, and all concrete), but not as large as the previous one - especially, not as high. Here, the ceiling was only 6'10" (2.1m) high. So, there was absolutely no way to re-use the previous split block-and-tackle solution with a belt sling. Indeed, the problem was even a bit trickier: after some measurement, I figured that in order to get the required clearance for our car under the boat at all, I needed to lift it all the way up until its bottom just touched the ceiling.
So, neither could I re-use the split lift, nor was a central lift possible. A belt sling was also impossible as it implies that you either have a central fastener or a rigid load spreader above the boat - neither was possible here.
After sketching some possible setups and discarding most of these, I settled on a ceiling mounted solution with four fasteners - basically a fully split block-and-tackle with a total of four vertical ropes. There would be one wooden rack beam under the boat front and aft.
|
Hardware assembly for our current garage with fully split four-rope block-and-tackle. |
The drilling was not fun, but feasible. I drilled each of the four ceiling holes in three steps (with drill bits of 6, 8 and 10mm sequentially). Of course, I hit steel rebar in two cases and had to re-position these holes. And of course, in both these cases I hit the steel only with the final, 10mm diameter drill bit. Aarrgghhh! By the way - one little neat trick that someone pointed me to was to protect my power drill with a tennis ball cut in half. This prevents the concrete dust from entering the drill bit holder - a cheap and functional gadget for any overhead drilling, which I can recommend highly. However, what I would recommend even more highly is to go and see a tool rental shop and rent the biggest power drill that they have. Although you may have to spend a bit of money, this will make the entire operation much more pleasant. You will probably be finished in a matter of ten minutes, while I kept drilling like a madman for about an hour or so. In reality there was much more dust than I realised.
When everything was done, the eyebolts in place and the whole shebang rigged, I pulled the boat up for the first time. But what was this? One side would come up and the other side would refuse. I had to straighten the rack beams manually by pushing their low end up all the time - they would stay up then, but upon the next pull, they would either not come up, or only a little bit. More straightening. Luckily, the low side was on the same side as the working end of the rope, so I could pull the rope with one hand, and straighten the rack beam with the other. Another issue was that the boat started slipping on the rack beams, worsening the situation. Anyway - what was wrong here?
Some theory. Let us insert a bit of block-and-tackle theory at this point. In the mechanics textbook, you would assume for simplicity that blocks are frictionless (engineers call that a zero-th order approximation). Consequently, the force in each segment of rope should be equal to the pulling force at the working end of the rope in our hand. For a simple vertical block-and-tackle (with two vertical ropes), the load will be carried by two ropes - you pull with force F and the load sees the pull from two ropes = 2F - you get a 1:2 reduction gear. The trade-off is that you have to pull twice the length of rope at only half the original force. Test: under this approximation, a theoretical block-and-tackle with an infinite number of turns would allow, say, a three-year old girl to hoist a fully rigged M-1 tank, only pulling the rope between two fingers (obviously impossible in our real world).
In reality, each wheel of a block has some degree of friction. We can model that by saying that if you pull the rope with force F, the force behind the first wheel will be reduced to c*F, with c being a friction constant with a value slightly below one (engineers call that a first order approximation). The rope segment behind the second wheel will see c*(c*F)=c^2*F and so on. For our purposes, we can ignore the measurement unit of c or how exactly it comes into being. Test: If you have a block-and-tackle with an infinite number of rope segments, the force in the most remote segment of rope will be c^infinity*F. For any c below one, that always equals zero. So, no matter how hard you pull on the working end of the rope, the furthest away segment of rope will not see any force at all. Sounds a bit more like reality, huh?
You may already see where this is going. Naive as I was, I had constructed the block-and-tackle under the frictionless assumption, because the previous "V-split" model had never pointed me to any effects of friction in the blocks. In my setup now, friction suddenly became very tangible. I had a split block-and-tackle with four vertical ropes (and some additional segments, as the diagram shows).
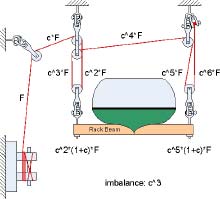
| Fully split four-rope lift with force shown for each segment of rope; F is the pulling force that you apply at the working end and c is the friction factor that each block wheel introduces. |
|
With my split setup, one side of the boat would get lifted with a force of c^2*(1+c)*F, and the other one with c^5*(1+c)*F. Reduce the term (1+c)*F and you get an asymmetry ratio of c^5/c^2 = c^3. Let us put some values in: if we assume c=0.99, then there is an asymmetry of 3%. For c=0.90, the asymmetry is 27% already. I have no clue what value of "c" I have, but it certainly leads to an observable asymmetry in lifting force.
As I do not use our boat lift every week, its performance is still acceptable (although its conception was not exactly a magical moment in engineering history). At least, it does fulfill the boundary conditions for clearance, and the required pulling force is constant until the boat hits the ceiling.
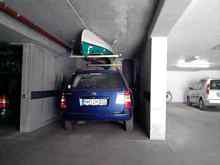
|
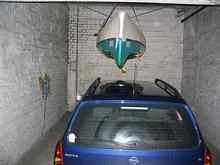
Same boat over same car, now in garage box with much lower ceiling. Ah well. took quite a way to get here [sorry for the blurred pic - taken with mobile phone camera. |
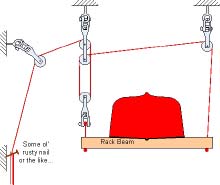
My neighbor's variant A few months after I had my new pulley setup in place, another family with a spot in the same garage bought themselves a new 15ft canoe (molded polypropylene with foam core - Coleman style). I gave my neighbor some hints about the asymmetry issue in my system. Apparently inspired by my design to some degree, he built a system that is slightly simplified and improved.
|
Fully split four-rope lift with force shown for each segment of rope; F is the pulling force that you apply at the working end and c is the friction factor that each block wheel introduces. |
|
They reduced the number of blocks and chose an asymmetrically split setup. Their boat is fixed to the rack beams by means of a belt with tightening buckles, so it can not shift around even if the rack beams should not lift in an even way - I think this is a pretty good idea. In their hardware choice, they leaned a bit towards the more economical side. They are using 6mm three-strand polypropylene rope, and they also use smaller diameter blocks. Due to their geometry, they use fewer blocks, which also reduces the cost. Their system seems to work fine - but then, their boat is a bit smaller and lighter than ours as well.
How to do a better job?
What would I do differently the next time around? Well... I had considered a completely different solution before I settled on the current rack pulley. This could be well worth trying. That solution would use no blocks at all. The idea is to take an adjustable load securing strap, cut it in half (relatively close to the buckle) and fix the loose ends to the ceiling on the left and right side of the boat.
|
Proposal for a cheap and simple boat lift |
The boat would be lifted as follows: insert the loose end of both straps into their buckles. Tighten. Lift the boat manually and tighten (if you do this alone rather than with two persons, alternate this operation at the front and back end of the boat). Repeat until you have the boat at the desired height. Disadvantage: you have to lift the full weight of the boat, and you have to hold half the weight of the boat with one hand while tightening. Advantage: no moving parts except for the buckles; cheap as dirt, boat can be pulled right up to the ceiling. Challenge: find an appropriate fastener to fix the strap to the ceiling without knotting (many knots either do not hold well in webbing material, or they weaken the belt because the knot's asymmetry overstresses some of the fibers). Optionally, you might want to add a second set of straps as a backup in case that any of the buckles or ceiling attachments fails. These would not be used for hoisting, but only to hold the boat in place once it is all the way up. Should I get fed up with my current setup and opt for this simplified one, I will make sure to let you know how it went
Of course, if you have the necessary ceiling clearance, you can always work with a normal, central block-and-tackle setup. Attachment to the boat can be either with hooks to the seats or inwales, or with belt slings like I used to have. Remember, belt slings let you easily turn the boat while suspended - this is also a nice feature for doing any kind of hull maintenance work (painting, fixing holes and scratches.).
I hope that this may be of help to some of you out there. Good luck and happy boating!
CAUTIONARY FOOTNOTE: Before fixing anything heavy to your ceiling, make sure to think twice and consider all relevant factors. First, check the carrying capacity of your ceiling. Know the material, know its structure, and know its limits. Second, check the dimensioning of your fasteners. Use heavy duty fasteners and anchors that are appropriate for your ceiling material. Make sure to err on the safe side and overdimension rather than underdimension your fasteners. Pick material and dimensioning so that they can last as long as the structure they are fixed to. Take into account that there may be visible or invisible corrosion once your assembly is in place. The same holds true for rope and belts. Check the state of your assembly regularly.
Also consider the risk of your assembly coming undone by vibration. The risk of earthquakes is the most obvious possibility - sorry for all you readers from California: your boat may just be better off on the floor. However, if you have a road with heavy traffic nearby, its low-frequency vibration may pose a risk to your assembly just as well.

|