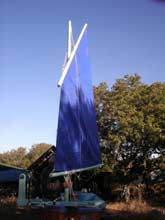
Here is a short video demonstrating how lazyjacks are supposed to work - and how I eventually got them to work on a balanced lugsail:
The first boat I ever built with a balanced lug sail was Jim Michalak's Caprice. The boat took a year to build and I was pretty impatient to get her in the water so I only did minimal rigging. This was back in the late '90's and we have put close to a thousand miles under her keel - make that leeboard - since. During that time, I have learned a few things about handling these sails. The mainsail on this boat is over 200 square feet and quite a handful without some way of taming the thing.
The first time we took her out, the sail went up just fine. Raising these sails is usually easy as they are about as simple as a sail can be. There are just three lines to think about: halyard, sheet and downhaul. There are no shrouds or stays or topping lifts or outhauls or vangs (a balanced lug is self vanging) to get tangled. Simplicity is the name of the game. I found I could drive to the water, launch and be sailing in 15 minutes while my friends with fiberglass boats (sporting race-inspired rigs) were spending an hour or more trying to get going.
But the fun all ended when it came time to strike the sail. The first thing that would happen is the yardarm would invert itself and home in on the nearest sailors head. On the Caprice, that yard is about 13 feet long and maybe 2-1/2 inches square! That is a club! So while the crew was dancing around trying to avoid serious injury, the sail always managed to go overboard into the water where it will always fill up with hundreds of gallons of heavy liquid. If you think this sounds funny, my fellow sailors with the complex rigs found it downright hilarious.
Finally, I decided to rig lazyjacks. it seemed simple enough. But my first attempt did not work at all. I rigged two lines from the masthead to either side of the boom about 2/3's of the way aft. Then I rigged another line on the opposite side of the boom, yard and sail but parallel to the mast - the mast itself controls the rig from one side. I thought I had really done something until I tried this system out. Remember what I said about the yardarm heading for the nearest noggin? that still happened. You see the halyard is attached forward of the center of the yard, so when it is loosened, the upper part of the yard feels the call of gravity and heads directly down, falling outside of the carefully placed lazyjacks and into the water.
So I put my thinking cap on and came up with a solution to this problem - one that has proven to work fantastically well, if I do say so myself. The secret is a pair of jacklines along either side of that recalcitrant yardarm. The aft lazyjacks are led between the yard and one of these jacklines, one on each side. Now the yard cannot jump out of the lazyjacks and hurt anyone. The sail generally bunches up between the yard and boom and as a bonus, the lazyjacks perform the function of a topping lift. You can see all this in the short video above.
So, assuming a picture is worth a thousand words, I am including below a step by step pictorial guide to installing lazyjacks on a balanced lug.
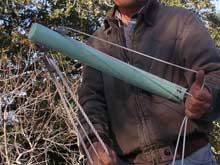
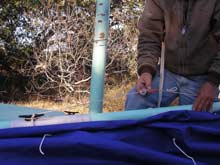
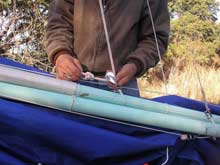
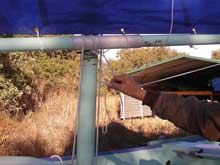
1) Here is how I rig the masthead: where the halyard block would be, I have substituted a becket block and I tie off the forward lazyjack to that. The reality is there are lots of ways to tie off this line near the masthead. On the other side of the mast is the aft lazyjack block. Later, I will explain why this needs to be a block rather than an eye.
2) So with the mast erected, I have sorted the five lines running to the masthead: the two parts of the halyard, the single, forward lazyjack and the two aft lazyjacks. Remember, you can click these pictures to see a much larger version.
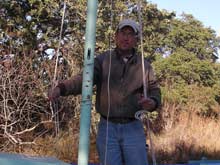
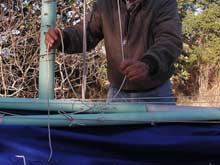
3) Here I move the aft lazyjacks forward of the mast - I will run one back each side of the mast. You could mount this block aft of the mast and just run the lines from there, but it would need to be higher or lower than the halyard block by enough to avoid fouling the other lines and block.
4) Here is the tricky part: You have to run jacklines along both sides of the yardarm. I used a continuous piece of 3/16" line. My lazyjacks are 3/16" too. This seems about right for this 75 square foot sail.
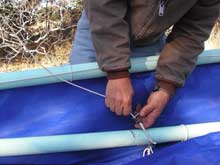
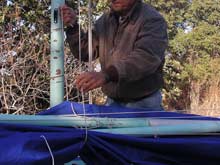
5) First run the port, aft lazyjack under the port side jackline then down around the sail to the boom.
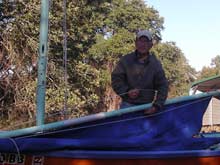
6) I have an eye on the bottom of the boom with a shackle and a block lashed to it. The outside lazyjack (in this case to port) attaches to the shackle. (when you enlarge this picture, you can see that the lazyjack is behind the jackline)
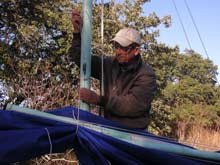
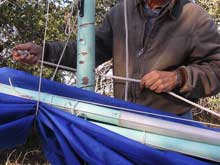
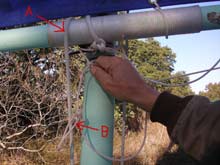
7) To keep things clear, the upper spar is the yard and the lower one is the boom. Here I am threading the starboard lazyjack through the inner jackline (the one next to the mast) - from there it will go down, around the sail and through the block that is lashed to the boom.
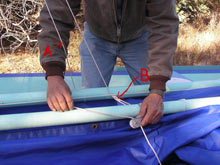
8) Here it may get kind of hard to follow since I have shifted the spars. The upper one is still the yardarm and the lower one is the boom. The line in my hand is the starboard lazyjack. It has come around the yard, sail and boom before going through the block. "A" indicates this line before it goes around the whole mess. "B" indicates the port lazyjack which is attached to the shackle - you can't see that shackle in this picture.
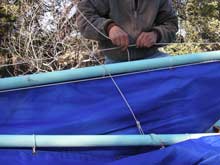
9) Here the boom and yard are close together and difficult to tell apart. The boom is toward the camera and I am bringing the end of the starboard line (after taking it through the block) to tie it off to the downhaul cleat on the boom. Here another shackle would be helpful.
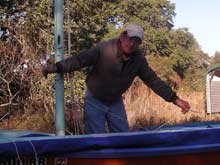
10) I have tied a couple of loops in the part of the starboard jackline between the boom block and the cleat. This allows me to tighten the aft lazyjacks by pulling the loop forward and hooking it over the cleat. This shortens the aft lazyjacks resulting in a higher boom angle, giving more headroom in the boat.
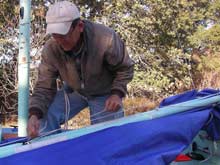
11)Now find the end of the forward lazyjack and make sure it is not fouled with any of the other lines.
12) Wow! This is getting long, isn't it? Fortunately we are almost there. If you are losing focus, go back to the top of the page and play that video again - that will remind you what we are trying to accomplish. Oh, yeah, here I have brought the forward lazyjack around outside of the sail and both spars and will attach it to the clamcleat by my right hand in the picture at left.
13) You will need to enlarge this picture to see what is going on. The forward lazyjack has made a kind of sling under the rig and has gathered the sail up in it.
14) I debated whether to include this step and won. Here is how I run the halyard on this particular boat: I have a block with a shackle running on the halyard. It connects to a loop secured by an eye about a third of the way aft on the yardarm....
15) ... Run the end of the halyard on the opposite side of the mast and forward to the forward end of the yard where it is secured - in this case with another shackle.
16) Now hoist the sail. You will see the for and aft lazyjacks when you enlarge this picture. Note that the part of the aft lazyjack between the boom block and the cleat is slack. If the aft lazyjack is too tight, it will form a crease in the sail. Remember step (10) where I talked about making loops in this part? These loops hooked over that cleat will tighten or loosen the lazyjacks.
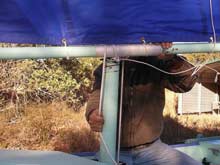
17) Oh? You thought we were through? First we have to secure the boom. An easy way to rig a downhaul on a sail like this is the way Jim Michalak taught me years ago when he first sailed my Caprice. First, tie your downhaul line to the downhaul cleat (remember that cleat?)
18) Now take the downhaul line around the mast, back over the top of the boom and down to a handy cleat on the mast, deck or partner. For larger sails, after coming over the top of the boom, go down to the cleat then back up and over the boom again. This gives a crude but effective mechanical advantage to the downhaul.
19) Here is a close up showing more detail. Notice that the downhaul ("A") is tied to the cleat, lead around the mast and over the boom before running down to another cleat. "B" shows one of the loops in the lazyjack being hooked over the cleat.
20) I did not need this last photo, but since I am a bit OCD (I know, you would never have guessed) I had to end on an even number. Besides, Sandra, my photographer liked it so much....