I'd like to look at three Francis Herreshoff Designs that I think the Backyard Duckmeisters could build. The first two were dinghies for larger Herreshoff yachts - the Neiria tender and the Marco Polo tender. The third one is simply called H-14, referring to its length. These three boats are the simplest to build of any of the famous Herreshoff designs.
The Nereia tender is 8 feet overall by 3 feet 7 1/4 inches, just the size to fit on the deck of the 35 foot yacht Nereia. When you see the shape of her, you'll see it doesn't resemble a typical pram at the sheer, but it does at the chine. In fact, I think it could be compared to the Bolger Elegant Punt in its' overall dimensions and shape. The Nereia pram bow is 2 feet wide at the sheer, 1 foot 2 inches wide at the bottom chine while the stern is 3 feet 4 inches wide at its' sheer and 2 feet 2 inches at its' bottom. This is pretty close to EP. And its' waterline length is close, also. The Nereia tender was shaped like this to fit into a space on the Nereia's deck, a slot that sits at a 45 degree angle to the keel. Unusual until you consider that Francis, like his father, believed that what is practical is beautiful. The Herreshoffs thought boats should be used, not simply admired.
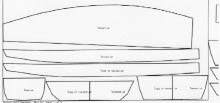
What makes this a good first boat to build is you could learn three techniques on it: (1) the concept of the pram with a curved bottom, and (2) a lapped side, and (3) traditional framing. The great thing about this lap design is the lap is entirely out of water, so if you're learning a lap for the first time, you can mess it up without leaking the boat. Not only that, but as you'll see on the plans, the overlap is wide enough to give you room to nail or screw and then glue. In fact you really don't need any glue for the lap, and you could build this tender with marine paint inside the chine, nail it or screw it down and then paint over the chine with fiberglass tape, or no tape at all if the joint is tight. I've done this with Baer paint which has primer and paint together. The primer expands to fill the wood's grain, the paint smooths it out. It takes a day to dry, so you have to plan what you want to do.
Since this pram uses a rectangular ladder with transverse frames, you'll get an idea of how boats are built in the traditional manner. You may not want to put all the frames in, if you're doing plywood. I wouldn't. However, the advantage to frames on a small boat is that they can be used as seat supports, to anchor a centerboard trunk, or even to provide a place for a mast step. They give you something solid to hold when you carry the pram and if there is a trunk leak, they can keep the leak from getting all around until the leak is fixed. They also can support a length-wise seat.
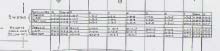
Those who have built her say she sails beautifully; it certainly looks like a pram that would tow well and motor effortlessly. In the old days a skeg would often be three feet long. This was done to help keep the pram stable as well as for rowing in a line. Now these are the original offsets, enlarged:
However, Duckmeisters, what makes the Nereia pram difficult is Francis made the waterline his baseline. I suppose there is some clever reason for this, but it has bothered me ever since I saw these plans. I have no advice on how to use the waterline as a baseline, since that means measurements below the waterline and above it on the same frame. Maybe Francis did it this way to get all his plans on one page. He's the genius, not me.
I can't work with this, so I used the Hulls program to create as close as my old eyes could get to a copy of Nereia, with offsets. I gave the bow the slenderest of deadrise, to give the pram a little help with waves. It won't speed the pram up, but in relatively quiet water a deadrise bow steadies the trim, making rowing easier with some momentum. If I had given the hull more deadrise - which you certainly can do as the builder's prerogative - it would have required a 3rd full sheet of plywood. The great thing about a pram with deadrise is that it will sit deeper in the water. When you're an adult, an 8 foot pram is like walking a tightrope with 3 IRS guys below waiting for your wallet to drop. So stability and trim in a little craft is worth the effort.
What I've drawn surely can be improved upon, and that's good. Get out the design pencil, it'll tickle your innards.
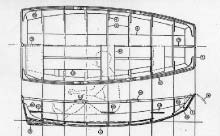
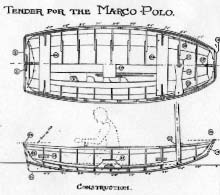
A step up from Nereia is the Marco Polo tender. The Marco Polo was a huge ship of three masts, so room was no problem. This is an 8 paneled tender with lug sail. It has a leeboard with a remarkably simple attachment technique. Just looking at the lines, I would guess this little gem could really sail. If I ever were to lose my marbles and enter the Texas 200, this would be my boat. It is 11 feet overall with plenty of rocker, a 1 1/2 foot skeg and dipping lug sail - now where did I put those marbles, anyway?
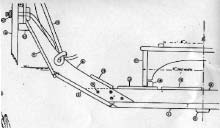
As with all Herreshoff boats, the Marco Polo tender is not light; this is not an instant boat. It has floorboards with supports athwartship. The framing is kept in the boat, which is good if you build in plywood. I think you could make the frames of 7/8x1 1/8" chine nailed to plywood and then nailed or glued to the side plywood panels. However, I believe curved panels need two frames of solid wood. I would make them frame 4 and 8, but not the center frame. You can see on the plans the overlapping frame sections (numbered as no. 5) screwed together which Francis specified; this is a good technique, and easier to put together than cutting the frames to an exact shape. It provides a good anchor for the floor planks to rest upon. You could even glue and remove the screws.
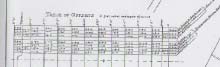
You can see on the plans, the runner (number 18) that holds the temporary seat (number 17) in place. I like this idea with the floor boards, but if you don't put the floorboards in, Dynamite Payson has a good temporary seat for one of his Instant Boats which I have used happily. These are the offsets for the Marco Polo tender:
The tiller extension will enable you to sit out of the stern. With multi-laps boats and round bottom boats the worst thing you could do is sit in the stern, ruining the trim. This style of boat has to have its' stern out of the water. One advantage of a leeboard with a rounded bottom is the turbulence the board creates is away from the boat's side. You can see on the plans page that the peak is slightly forward of the board in the water. If you're sailing to windward, drop the board straight down and forward. When the center of the board at the water's surface is under the peak, you'll be getting all you can get to windward out of this arrangement.
Those who have built this tender say she really is tender, almost tipsy. I would not have thought that, looking at the lines but possibly this tender was meant for the sailor to stay put, on the flat section of the boat's bottom. One blogger said he shortened her to 8 feet, with disastrous results in performance. I'm not surprised at that; great designers usually know what they're doing. In small boats dimensions are more important than hull style.
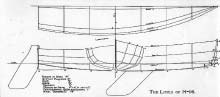
Now we come to H-14. As with the Marco Polo tender, the board and rudder are angled; this allows the daggerboard case to be forward of where the crew sits. The fact that here in a 14 footer, Francis decided against a centerboard trunk leades me to believe that getting the trunk before the seat was important. It was well-known by the older generation of seamen how important the afterrun was in allowing speed, so you see in this design the long clean, simple bottom. At this length a designer has to juggle qualities - how much lift of the stern compared to the grip of the skeg and rudder; how much afterrun without sacrificing volume at the board; how much of a cut-away bow without making the bow tipsy; how much weight before the sail area has to be expanded; and the scantlings with where the boat will be used.
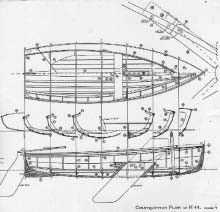
So Francis has given the H-14 a curved bottom to increase the wetted surface in order to help the slender entrance stand up. Now this curved bottom is superior to a flat bottom in waterflow but it does present its' own issues in construction. Plywood probably can't be arched that much longitudinally; however if we can use the technique of duckboats to lay our plywood from one side to the other, in sections of every other frame, then that might work. This would be three sections from frames 2-6, 6-10, 10-14, and one section for the bow to frame 2. I would make the frames of 2x4 attached to plywood, just to give both sections of plywood enough landing room. Here are the offsets, for those of you who have the skill.
And here is a page of the construction plan, showing how Herreshoff put the coaming at the mast support together. Every time I look at Herreshoff plans, I learn something. I suspect old Captain Nat and his son believed if their men worked fairly quickly, mistakes didn't creep in as much. I have found this 'work quick' method is for me, provided I do things in the right order. Neat things tend to occur to me if I'm not worrying about what I've just done. The chair is right over there, anyway.
|