| A simple beam balance
for accurately mixing epoxy reagents with a note on mixing small
amounts by volume.
The problem
This last winter, I decided to replace the two failed hatchplates
on the forward sides of the side tanks in my 1980 vintage GRP
sailboat with two nice shiny new 6 inch black quarter-turn Seadog
hatchplates from Duckworks. In checking the
fit, I noted that the GRP surface underlying the hatchplate flanges
had a “wow” of about 0.2 inches. I e-mailed Chuck
for advice. For this much unevenness, he recommended bedding the
hatchplate flanges in epoxy for a flush bearing surface rather
than relying only on silicon sealer. He advised using System Three
Silvertip Quick Fair TM. This non-sagging material has a viscosity
like that of mayonnaise.
Past experience has indicated that I am stoichiometrically-challenged
(difficulty in following a simple recipe) when it comes to accurately
mixing epoxy resins. A web search indicated that epoxy reagents
should be mixed to within 5 percent accuracy or perhaps 2.5 percent.
The prospect of wasting expensive materials and having to re-do
the job removing half-baked epoxy led to less-than-salubrious
thoughts. The question then became, how to ensure that the reagents
would be mixed in accurate enough amounts? I could have purchased
an electronic kitchen scale, but the least cost models were around
US $30.00. This did not seem congruent with small boat ownership
philosophy (avoid spending money needlessly that could be saved
for important things like beer and boat parts).
I wanted a method that met the following criteria:
- Simple to use
- Very low cost (preferably using scrap and materials on hand)
- Accurate enough (5 percent target)
- Easy to build
- Robust
Preliminary investigation
The System Three website and the containers specified mixing
resin to hardener at a ratio of 2:1 by volume or 100:44 by weight.
A search of boat building forums brought up first a hanging balance
and then a note from an Australian boat builder that referenced
a simple “diy” “teeter-totter” balance,
balancing a cup of each reagent. He noted that the concept “hinged”
(pun intended) on the relation describing equilibrium between
two rotating forces where, on a balance, the length times weight
on one side equals the length times weight on the other, or L1
* W1 = L2 * W2. A subsequent web search unearthed “The
epoxy ratio scale” by Joe Tribulato and “Measuring
Scales” by Pat O’Leary in the “Duckworks
‘how to’ index.” Their “teeter-totter”
solutions seemed robust, easy to build and very low cost.
Materials and Methods
Balance construction
I constructed a balance beam from a scrap of oak plank flooring,
with dimensions of about 4 x 22 x 3/8 inches (Figure 1).
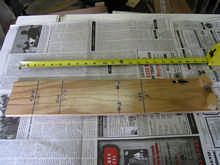 |
Figure 1. A simple balance beam for mixing epoxy
resin by weight using the “single cup” or “double
cup” methods. |
For low-friction pivot points, I installed two sheet metal screws
on a line perpendicular to the board’s length close to its
midpoint. In use, the screw points protrude about 3-4 mm. I explored
two methods of using a beam balance, here denoted as the “single
cup” and the “double cup” methods, referring
to the number of cups used in holding the reagents. For the “single
cup“ method, two small wood blocks were tacked to one end
as a cup locator. Lines were scribed on the other side of the
fulcrum at distances denoting 1.00 units (200 mm) and 1.44 units
(288 mm) for the balance distances respectively of the Quick Fair
resin (Part A) and resin plus hardener (Parts A+ B). For the “double
cup” method, a line was scribed at 0.44 distance units (88
mm) from the fulcrum on the cup holder side. The scribed lines
were widened with a permanent felt tip marker for better visibility.
The line areas were given a light coating of spray adhesive to
reduce cup slipping. For either method, the two sides of the balance
should first be made equal in weight or “zeroed in”
as closely as possible. I located a penny on the lighter side
of the balance until it closely balanced, then stuck it in place
with a bit of duct tape. The balance point was sensitive to moving
the penny about a millimeter or so. For weights in balancing the
resin and hardener, I wanted something small and uniform. I considered
sand (too messy), washers or bb’s (did not have enough),
but I did have enough pennies (Did you know that post-1982 US
pennies weigh 2.5 g each? This is convenient because, if necessary,
materials could be weighed to the nearest 2.5 grams).
Materials handling
For the small amounts needed (about 2 to 3 fl.oz. per batch),
I went to the pantry. Clear plastic beverage cups (presumably
acceptably uniform in weight) held the reagents. Cheap plastic
picnic knives were used to transfer the reagents. While not the
strongest, used carefully, they did not break. To prevent cross-contaminating
the reagent containers, I labeled the larger resin container “A”
and the hardener “B” and likewise the knives, “A”
or “B.”
For PPE, I wore eye protection, nitrile gloves, long sleeved
shirt and long trousers. For cleanliness, the work was carried
out on blue auto shop paper towels or newspaper (cheaper). More
blue towels, acetone and gelled alcohol hand sanitizer were on
hand to clean minor drips. The work space was very well ventilated
with no open flames. For initial epoxy mixing, the ambient temperature
was about 50 degrees F and the epoxy was stirred for 2 plus minutes
(as measured by counting) after uniform color was achieved. The
second time I used QuickFair, the ambient temperature was about
10 degrees F warmer. I tested each balance method a total of twice
in bedding the hatchplates and on another project.
The “single cup” method
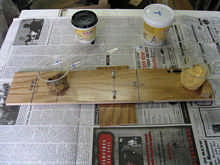
The “single cup” method (Figure 2) has both reagents
in the same cup. In use, a suitable amount of the larger reagent,
resin (Part A), is placed in a cup and located at the “cup
holder” end of the balance.
| The “single cup” method. Figure
2a shows Part A closely balanced at the 1.00 line by a cup
of pennies. |
 |
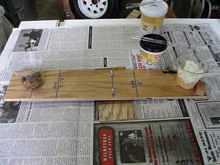 |
Figure 2B shows the addition of Part B balanced
by the cup of pennies moved to the 1.44 line. In this illustration,
the epoxy reagents were simulated by vanilla and orange yogurt. |
A “penny cup” is placed at the “1.00”
mark (200 mm) on the other side of the fulcrum. Pennies are added
until the last penny tips the balance toward it. The “penny
cup” is then placed at the “1.44” mark (288
mm) and hardener (Part B) is added until the balance tips the
other direction. An inherent source of error in this method is
some proportion of the weight of the 2.5 gram penny. Using a 5%
error threshold, this could be problematic when working with less
than 50 grams (about 1.6 oz.). I corrected for this when balancing
Part A and Parts A+B against the “penny cup” by carefully
teasing small amounts of reagent into or out of the cup with two
plastic knives until the two sides were nearly in perfect balance.
Otherwise, suitably smaller weights (bb’s, subatomic particles?)
could be used.
The “double cup” method
This method uses separate reagent cups (Figure 3).
| Figure 3. The “double cup” method,
showing a suitable amount of Part A within a cup at the 0.44
mark. The next step is to balance it with Part B added to
the cup located at the 1.00 mark on the other side of the
fulcrum. Having two containers open increases the chances
of contamination. I thus decided to open and measure only
one reagent at a time. |
 |
The cup holding the larger of the two parts, Part A, is set
at a distance of 0.44 units (88 mm) from the fulcrum. It is then
balanced against a cup holding the lesser Part B set at the distance
of 1.00 units (200 mm) from the fulcrum. By carefully using two
plastic knives, very small amounts of Part B could be teased into
or out of the cup, to achieve a degree of balance about equal
to that of sliding the penny on the unloaded balance during “zeroing
in.”
To ensure “complete enough” reagent mixing I added
Part B to the “Part A cup,” stirred for about 1 minute,
transferred about one-half of that back into the “Part B
cup” and stirred until the lighter colored Part B disappeared
from the cup’s sides, then returned that material back to
the “Part A cup” for about another minute of mixing.
This follows System Three protocol.
Results
The Quick Fair set up completely on all trials, taking longer
at the cooler ambient temperatures. After initiating mixing, leftover
material was exothermic (got hot) at about 60 minutes at the cooler
temperature and about 30 to 40 minutes at the warmer temperature.
The reaction melted the plastic cup at the warmer temperature.
After application on the boat, the epoxy could be “tooled”
up to about 20 to 30 minutes. I finger tooled some seams, wearing
nitrile gloves with the appropriate finger tip smeared with gelled
alcohol (An unsafe practice, see “Conclusions and Recommendations).
The Quick Fair was at a knife trimmable “taffy” stage
after 40 to 90 minutes, sooner with the warmer ambient temperature.
Note on mixing small amounts volumetrically: “two
spoon method”
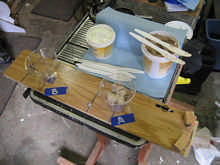
For mixing “rather small” amounts, instead of the
balance, I used a “two spoon method” with disposable
plastic spoons to achieve a 1:2 volumetric ratio (Figure 4).
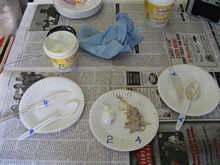 |
Figure 4. The volumetric “two spoons method.”
I noted the volume amounts on the plate to help ensure adding
the correct number of spoonfuls to achieve the prescribed
1:2 reagent ratio. |
As with the balance idea, I recalled this concept from some
web forum, but could not relocate the link. I again labeled knives
and spoons “A” or “B” to reduce chances
of container contamination. For each reagent, a separate spoon
was loaded and leveled flush at the surface with its corresponding
plastic knife maintaining the 2:1 ratio. The knives were wiped
clean and then used to transfer the reagents from the spoons to
a paper plate for mixing. Using the knives instead of dipping
the spoons into the reagents kept things tidy while reducing waste
and contamination risk. I mixed two batches; two level spoonfuls
for Part A and one level spoonful for Part B, and then double
that amount. The resin hardened both times.
Conclusions and recommendations
- The “teeter-totter” ratio balance beam met all
criteria. I used scrap oak plank flooring because it was strong
and available. Likewise, Tribulato’s and O’Leary’s
balances, made with different materials and balance point mechanisms,
worked successfully.
- The “single cup” and “double cup”
methods both gave acceptable results. The beam balance seems
sensitive to well less than 2.5 grams. It could detect about
a 1 to 2 mm movement of a 2.5 g penny. That seemed pretty good
to me. Sensitivity seemed to be increased by resting the screw
points on a hard surface to reduce friction.
- Less tipping movement seemed preferable to more. The balance
does not need to move very much to be detectable. Having the
screw points protruding only a few millimeters from the bottom
of the beam limited tipping movement.
- Some other sources of error besides the unit weight of the
pennies (or other small weights) include the materials being
slightly off-center in their respective cups or error in balance
line distances. I did not attempt calculating errors or sensitivity,
but relied on empirical results.
- Pat O’Leary demonstrated the “ratio balance method”
works with other mixing ratios. It likely can be scalable for
mixing larger amounts.
- Clear mixing cups had the advantage of allowing visual confirmation
that the reagents were mixing adequately.
- To prevent melting plastic cups, a web forum recommendation
is spreading the mixed reagents on a paper plate, allowing heat
to dissipate more quickly and buying some working time.
- The warning against using acetone on Seadog hatch plates
is apt. The material smudged quickly when wiped with a towel
only slightly damp with acetone.
- Gelled alcohol hand sanitizer works nearly as well as acetone
for cleaning small spills and is much safer.
- In thinking about tooling epoxy with a gloved finger, it
occurred to me that this is unsafe. The glove could fail.
- The balance beam is stored on a shelf with the screw points
retracted to prevent scratching of other valuable junk.
- If unsure about adding and removing reagents when using the
balance, practice with yogurt. You can eat the results. However,
do not confuse yogurt with epoxy resin when doing so.
Addendum:
A reader pointed out that for accurate mixing, one must be
careful to ensure that the the cups stay centered on the appropriate
balance lines. - Ole Helgerson
*****
|