|
Well, here it is – my first “real”
boat design. This is a product of my well-known inability to leave
well enough alone. It all started when I was obtained a Michalak
AF4B.
 |
AF4B-before |
I thought it was slightly improved by chopping off
some freeboard aft, and dramatically improved by adding a full-length
slot top and forward drop board entry. Sort of a poor man’s
Skiff America for really thin water. (See the article on this
extreme makeover HERE.)
| AF4B Modifications |
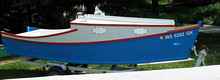 |
But still it wasn’t quite there, and I performed
a major remodeling job to get it here.
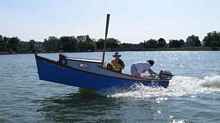
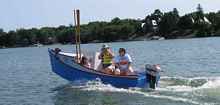
I knew I was onto something when during the test
run everyone at the ramp said “nice boat”. I actually
got cheered by a large raft-up of powerboaters on a sandbar. I
was astonished I got that much attention. I guess they must view
it as something like someone with a ’57 Chevy driving by.
At least a few assumed it was a classic boat that I had restored.
(Maybe more than a few, based on the response from the sandbar.)
But no matter how much we might like the attention from other
boaters, that wasn’t what determined the design criteria.
This brings us to a discussion of design philosophy.
Why have a boat?
One of the governing factors in Jim Michalak’s design process
is his feeling that one should always build a boat for oneself.
After all, counting on the family staying interested can get you
stuck with a big boat you can’t crew.
While this is true to some extent, I think a lot of us with young
kids are in a different…um…boat. Jim is retired, and
his kids have grown up and moved away. He truly does go boating
alone most of the time. But people like me almost never go boating
without the whole family. Even when we do all our boating together,
I stand a real chance of missing out on the kids’ childhood
while I cut plywood and mix epoxy.
Worse, in many cases people like me discover (after mixing gallons
of epoxy) that kids are bored stiff with sailing. All three versions
of this boat were a tremendous revelation for me in exactly this
way – suddenly the kids actually found boating fun! We’re
lucky if we get to sail twice a year now that the kids can lobby
for the motorboat.
So let’s look at specifics on the new design priorities.
The Cabin
Jim’s approach on accommodations is to add a cabin only
if it can be big enough to sleep in, or insist on an open cockpit
big enough for the same. Or both. I find this is never a consideration
with the family. It would require a monstrously large boat to
sleep all four of us plus the dog inside a cabin. A big tent on
land is a lot cheaper and simpler, doesn’t roll and slap
at anchor, and it gets us up and away from the dense mosquito
populations near the water. Besides, my wife flatly tells me she
won’t sleep on a boat. Well, there you have it.
Absent the need for a sleeping cabin, why have a cabin at all?
I would probably skip it in any boat under 15 feet and most boats
under 20 feet. But I think a small cuddy can be worthwhile. Most
women appreciate a cabin for the toilet facilities, when they
are needed. It is also convenient to hang the lifejackets high
enough to stay off a damp cabin sole – wet life jackets
spell an immediate end to an outing with kids who get cold easily.
I also like to have a readily-accessible “closet”
for storing things like tissues, trash, band-aids, sunscreen,
GPS, cameras and other electronics out of the rain. By “readily-accessible”,
I mean something I can reach while standing at the helm, but not
in immediate danger of soaking. (This is a good use for one of
those automotive organizers meant to hang on the back of one of
the front seats.)
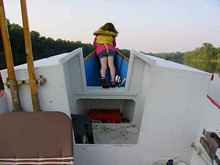
It doesn’t take much of a small cabin can allow little
kids to nap in the shade, which is a really big deal for us pasty
northerners. However this only works if you build the front bulkhead
open on the bottom like I did.
The plans show a solid bulkhead with a deck plate, which provides
around 230 lbs of emergency buoyancy. I’m hoping I can get
around that by installing a clip-on net over the opening and storing
all the inflatable water toys in there. Still, this is something
to think about if you’re going far from shore, like I don’t.
Either way, a cuddy is a playhouse—kids like to look through
the portholes in the rain, play on the “parallel bars”
of the slot top, and crawl in and out of the front drop board
when the slot cover is on. And because they think it’s a
fun place, they stay corralled more of the time.
| Cuddy with Kids |
 |
Perhaps the best feature, however, is that this little cuddy
is just enough to get the kids out of the wind and spray when
the weather turns cold, wet or scary and you need to point the
bow homeward and blast through some chop. If you provide handles
to hang onto, they might even enjoy being at their “battle
stations” looking out the portholes. Just be sure to strap
down any junk in the cuddy, or remove it to the cockpit and strap
it down. Even better, if it gets really bad there’s enough
space for the whole gang to get in there for a while and read
a story while waiting out a heavy downpour that comes with too
much wind to have the bimini up. Even without a top, a dropboard
provides noticeable protection from wind.
| SS16 from Above |
 |
There is also a design benefit of the smaller cabin as well.
The helm station moves forward, which gets the helmsman’s
weight further forward. Trim is touchy in a boat so short, and
too much weight aft can be a problem, since the motor and fuel
are already back there. Getting some adults in the middle of the
boat makes it handle much better, and makes the steering a lot
crisper. Of course it is possible to move the helm forward with
no cabin at all, but the cabin does provide a convenient wind
break and hand-hold.
Speaking of wind, the smaller cabin further forward pretty much
guarantees that the boat will point downwind when drifting. I
suppose bow to the wind might be better, but that isn’t
going to happen in any boat that it pivoting around the motor’s
lower unit. If it is really blowing, downwind is where you should
probably be headed anyway.
A smaller cuddy also gives a much better view of the bow well.
This can be important.
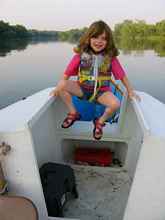
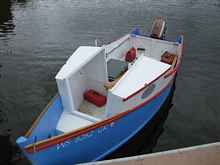
The Bow Well
After I modified AF4B, the tiny bow well immediately became the
most popular place for kids to hang out underway. They had to
take turns and I had to time them to make sure it was fair! Clearly
a larger bow well was in order. There are other benefits, of course.
A larger bow well provides easier beach access and more storage
for muddy stuff. You can actually climb in while the
anchor is in the well, which is an acrobatic feat with the small
AF4-series bow well. (Note the graceful fit of the oversized Bulwagga
pattern anchor in the photo below.) A larger bow well makes docking
and anchoring noticeable easier as well, and it provides a nice
place to pole the boat from. (I find it easier to pole this boat
backwards because the bow moves around so easily.)
The forward cabin opening and slot are wider than I would typically
make them, but this allows the bow well to serve as an adult seat
facing the cabin. This is good for keeping kids corralled while
applying sunscreen.
Maybe best of all the deeper anchor well way forward gives the
kids a place to put their legs when they are up there. This theoretically
lets them sit more securely rather than kneeling and clinging
precariously to the bulwarks, but in practice they prefer precarious.
Either way, they think this bigger bow well is the best part
about the new design.
Cockpit
The changes to bow well and cabin combine to give us a significantly
larger cockpit, which is where the grown-ups always want to be.
I found AF4B’s cockpit OK when standing, but cramped as
soon as more than one person tried to use a folding chair. A seven-foot
cockpit is immensely bigger than a five-foot cockpit.
| SS16 Profile Slow |
 |
You can actually unfold a lounge chair if you want to.
 |
SS16 7 foot Cockpit |
Like Michalak, I favor a wide-open cockpit. It is best for versatility.
If you want benches, by all means add them, but not until the
boat’s overall structure is solidified. You don’t
want to create hard spots on the panels that will keep them from
bending evenly.
I also added tie-downs in cabin and cockpit for camping totes
and gas tanks. You don’t want this stuff sliding around
if it gets rough on your way to the campsite. It gets rough fast
in a flat bottomed boat.
 |
Tie Down |
These are just nylon webbing epoxied down with some standing
loops. There are probably better ways, but it is hard to stub
your toe on webbing.
The one caveat here is the lack of buoyancy. There is enough
buoyancy under the slop well to keep the motor afloat, but not
much beyond that. I would build in bench seats along the sides
with lots of buoyancy if I were going far from shore, especially
in cold water. My inclination is to make these cavities with ventilation
so they don’t rot, but fill them with tightly-capped plastic
soda bottles. That way you don’t need to remember to remove
deck plates, and even if you get holed you still have buoyancy.
And they won’t rot the wood like foam seems to. (That it
still experimental, however, so if you try it you should definitely
do some testing and write an article!)
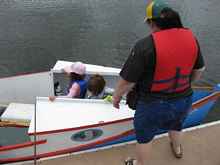
I almost forgot – the low sides have an actual use besides
looking good. Easy boarding!
| SS16 Boarding |
 |
Motor Well
The transom uses a full-width motor mounting rail, just like
Michalak usually does. This is simple to build and works well.
The downside is that it appears to invite the addition of more
motors. Resist this temptation. Two motors are far too much weight
for the back of this boat, and it affects the trim badly. Even
worse, if you got swamped, the buoyancy of the compartment under
the slop well is unlikely to float two motors.
If you really think you need to carry a spare motor, I would
carry it in the cuddy or the cockpit. Besides, a “kicker”
motor interferes with the steering cables when tilted up. I suppose
you could mount a bracket like I briefly did, but I think it’s
better to get a copy of Cheap
Outboards
by Max Wawrzyniak and follow his recommendations
on how to make your one motor as reliable as possible. Of course
you should always have set of oars, a pole and an anchor.
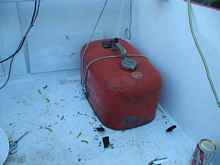
I left the motor’s “slop well” the same 16”
(fore & aft at slop well level) as the original, which does
not leave room for fuel tanks in the slop well. I think the only
real advantage of keeping tanks in the slop well is that the occasional
leakage goes overboard. Theoretically it’s easier to cause
an explosion from vapors collecting in the bottom of the cockpit,
but it would have to be a very still day for this to actually
happen. I stick with the small slop well and sniff the bilge before
starting if there’s no wind at all. I also replace seals
to get rid of leaks!
The disadvantage of the small slop well is that there is less
buoyancy underneath – around 290 lbs if you don’t
put anything in there. (Probably less with the soda bottle method,
since water can fill between the bottles.) If you aren’t
using the experimental soda bottle method, it is worth paying
for a couple of the cheap 8” deck plates for this space.
If you swamped the cockpit and cabin, the weight of the motor
could sink the whole thing if these hatches leak. For under $15
each it is awfully hard to build something from scratch that can
equal quarter-turn deck plates.
Power
Speaking of motors, I recommend a late 1950s or 1960s OMC 18
horsepower outboard, which should cost you maybe $300-500 after
putting some parts into it to make it reliable. (You may as well
include the cost of a copy of the Wawrzyniak book.) Michalak typically
used 8-10 hp in his AF4, but he was generally going out solo.
With a family and the associated junk, I think you’ll want
18 hp. These motors weigh around 100-120 lbs, and I would not
use anything that weighs more. This might well rule out many of
the modern 4-stroke motors, so check the weight before you buy
one. The heavier the motor, the less fuel you can carry in the
stern, and the more you have to insist that nobody sit aft. (And
the more buoyancy you need to build in.) Lighter is better.
Speaking of lighter, I have mixed feelings on electric start.
I can easily pull start an 18, but I guess electric start might
be handy for women and people with back problems. My wife is pretty
strong but can’t quite turn it fast enough with the struggle
string. For this reason, I do have the electric starter. Still,
I normally pull start it. This gives me immediate feedback if
the motor has for some reason gotten harder to pull. (Besides,
more than three pulls and you should be diagnosing, not pulling!)
It also saves the starter battery for when I really do need it.
Admittedly, sometimes being hot and tired qualifies as “needing”
it.
A more powerful motor will do more harm than good. First, I’m
not confident the hull will tolerate more than 18 hp without breaking
something. Even if you throttle it back, you have the weight problem
mentioned above, and you have a worse weight problem if you reinforce
the transom to use all that power. Just as bad is the fuel economy.
Using a Big Twin would cut your range in half or worse. You might
gain some top end speed, but less than you might think, because
of problems with weight and trim. Worse, it is seldom safe and
never comfortable to use that speed. The only reason I could conceive
of wanting that much power is to pull a heavy skier. Even then
the 18 might do fine with the right prop and skis.
I should also mention your wooden motors – oars and a pushpole.
A good 18 does most of what you need on this boat, but you always
need backup. You could carry another motor, but it is a pain to
store, and would have to be very light if you hope to lift it
into place. It also wouldn’t help you if your problem was
lack of fuel! A trolling motor might do some good there, but their
range is pretty limited. You need a good set of oars.
I like the Michalak-Culler pattern and I think 8 feet is about
right for this boat. Read Michalak’s chapter on rowing setup,
and put the oarlocks where you can brace your feet against the
motor well bulkhead. Then all you need is something to sit on
at the right height. For me it comes out about right with my cooler
plus a flotation cushion. If this doesn’t fit you, you could
build a box of the right size and add tie-downs to fasten it to
the floor when needed.
Also be sure to have a pushpole. This boat can float in 4-6”
of water, and you can’t run the motor in such shallow water.
You really can’t get the most out of the boat unless you
can control your progress in such thin water. A pushpole is ideal.
Mark the pole every foot and you can poke around in murky shallows
to figure out when the motor is about to touch bottom.
Stick Steering
I provide drawings for stick steering with these plans, as I
believe this system is well worth the relatively small effort
and expense involved. It gets you far enough from the motor that
you can have a nearly-normal conversation underway. I already
mentioned the benefits of getting some adult weight further forward.
It also gets you much closer to the bow. This is a huge advantage
on rivers where you need to spot the narrow, winding channel deep
enough to keep your lower unit from dragging. Here’s the
view standing at the stick.
 |
SS16 from Stick |
From the motor you mostly see bulkhead, and strain to see over
the cabintop.
| SS16 from Tiller |
 |
If you’re really cheap you can get close to this with a
tiller extension (see Michalak’s book). But this gets in
the way if you are bringing a lot of people along, since the tiller
sweeps the cockpit. And of course it also doesn’t help you
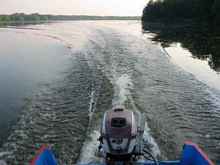
shift gears. An additional benefit of the stick steering system
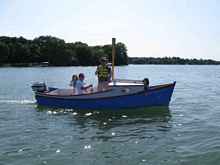
is its stiffness. It takes more effort to steer the boat, but
if you leave the stick it will hold its setting. See how in some
photos I’m taking a photo and letting the boat steer itself
for a few seconds? I can let it go like that for a long time,
steering by shifting my weight. Nice!
 |
SS16 Quarter Planing |
The added cost should be under $100 (probably under $70), including
a used remote control box and adapter from your local AOMCI member.
Speaking of which, the dimensions in the plans are for a 1950s
OMC remote control, the kind with the rounded box that you see
on my boat. If you have the later, boxier kind, or another make
you might need to modify the distance between the two horizontal
rails of the upper stick guide, since these are what the remote
control fastens to.
Swim Platform
Here is one thing I view as a key element in any family boat
– reboarding after a swim. Not only is this a vital safety
feature, but also you will never need to contend with a crowded
beach again. But the system needs to work for all sizes and shapes
of people, at many levels of athletic inability. And it can’t
interfere with steering cables.
Given this boat’s stability and external chine, I don’t
have much trouble with simply climbing over the side. But this
is admittedly a bit acrobatic. If you’re at all cold or
tired, or if there are any waves, this maneuver probably won’t
be reliable.
In my opinion, the best ladder system around is the one Kilburn
Adams designed for the Skiff America 20. But it requires a taller
transom to fold up properly. One of my upcoming projects will
be a version of Kilburn’s ladder with the platform part
permanent, and only the steps folding up. Perhaps less elegant,
but it should work. If you really want Kilburn’s ladder,
you could build a notched transom, since you should only mount
one motor anyway. It might even look nicer that way.
Construction
Plans are now available in the Duckworks
store!
This boat is designed for simple nail and glue jigless “Instant
Boat” construction, and it goes together fast and easy that
way. However, I am sort of falling out of love with nail &
gle because it seems you always end up doing some seam taping
anyway to protect the chines. Worse, Michalak recommends filleting
inside seams as well to keep the water from finding its way in
and rotting the plywood. Those two measures put you halfway to
stitch and tape anyway. If you go the rest of the distance and
build it stitch & tape, you can skip some ripping and planing
and you don’t need to buy nearly as many fasteners. If you
wanted to have chines to protect the plywood, with stitch and
tape you could make them purely sacrificial and thinner. I won’t
belabor the point further except to say that the design should
work fine either way.
In either case I highly recommend you use Payson-style fiberglass
butt joints rather than butt straps or blocks for the plywood
joints.
To build this boat, you’ll need four sheets ¼”
plywood (sides, bulkheads, cabin top), one sheet of 3/8”
plywood (bow well deck, slop well deck, ladder platform), and
three sheets of ½” plywood (bottom, transom).
Plans
Plans comprise four sheets of drawings, one sheet of flat panel
offsets (to keep the drawings tidier) and 10 pages instructions.
The drawings are provided on 11x17” paper so you can cheaply
and easily make copies to write on in the shop. This will come
in very handy, believe me.
If you have access to a printer that can handle 11x17”
paper, you can save some time and money by ordering plans in pdf
format. You also get the photos in color rather than black &
white. If you prefer paper plans it will take a bit longer and
cost a little more, but it is available.
Besides the above, I include a few more features.
Bill of Materials – most designers
shy away from this, since everyone seems to want to change something,
which screws up this list. I provide it nonetheless because I
really wish I’d had one for my very first boat project.
If you don’t intend to change anything, this will at least
get you pretty close. Perhaps just as useful, I include a separate
sublist for the necessary safety accessories that are easy to
forget, such as a fire extinguisher, horn and lights.
Ripping List – This is not such
a big deal for the builder with the well-appointed shop. But some
folks need to borrow access to a tablesaw and do all their ripping
at one time. Others like me need to move their saw outside to
keep the dust outdoors. Still others simply don’t want to
get covered with sawdust more often than necessary. In any case,
the ripping list lets you easily get all the sticks down to size
at one time without digging through the plans and still ending
up one stick short.
Full Size Templates for Portholes –
Figuring out the shape of the ports is a pain, so I include an
actual size paper pattern. Glue it to an old file folder and cut
to the lines with a utility knife and/or scissors. Then you have
a template to trace onto the hull and onto the plexiglass. I do
the same with the Sandy
Shoal 16 logo.
Impressions in Use
First, let’s be frank. A flat-bottomed boat of this size
is strictly a fair weather vessel, optimized for exploring places
too shallow for other types. SS16 will pound and wallow in moderate
waves that an 18-footer will span more gracefully. If you want
a flattie and can make space for a longer boat, longer is probably
better.
The SS16 is loaded to capacity with two adults and two kids,
plus a big dog and a cooler. I have used it with four adults and
two kids, however, and it handled better than I expected. But
it soaked up a lot of power and would not plane, as it was loaded
past where the stem gets immersed. An 18 foot boat of the same
type should carry that extra couple of adults before the stem
goes under.
Still, I think I’m keeping this one. This design gets enough
value out of the smaller hull that maybe I don’t really
need the bigger one anymore. Staying under 2 sheets of plywood
for the side panels doesn’t save a whole lot of lumber or
effort, but it does ease the licensing requirements in some states
and makes storage a little easier. Perhaps more importantly, is
has everything needed for a family outing, and right where it’s
needed.
| SS16 Wake |
 |
Rob Rohde-Szudy
Mazomanie, Wisconsin, USA
robrohdeszudy@yahoo.com
Plans are now available in the Duckworks
store!
*****

|