Since we’re on a roll with metalworking topics, let’s look at welding. You can blame Shorty for this. The authorities call him Dave Routh, but you probably know Shorty as the fellow behind the PDRacer. This guy has raised and salvaged sunken fiberglass boats, among other cool things. By all means check out his articles at www.shortypen.com.
Anyway, Shorty recently emailed me for some welding advice. He was starting to get into more critical welds on trailers and getting appropriately worried about whether they would hold. By the time I got done talking him through it, he said I should write an article. He even paid me what I consider to be a huge compliment.
“The way you write isn't like book writing, it is more like a couple of rednecks goofing around in a garage, which is very easy to read by us other rednecks.”
That’s a lot to live up (or down) to. Here’s the problem: welding really is not something you can learn by reading a book, article, or anything else. You need to learn by doing it. So I think you should consider…
Gittin’ Edjumacated
A welding class from your local technical school is a worthwhile investment. If you only put together one boat trailer, I think you will more than regain the time and money spent in rework avoided. It is fast to weld something together wrong but slow to cut it apart to try again! A class gains you an expert eye to look at your welds and guide you what to do to remedy the problems.
But whether you can obtain the benefit of an instructor or not, what you need to learn is how to visually identify defects. You get a feel for this by making lots of test welds and breaking ‘em. You’ll need to make even more if you don’t have an instructor.
But first we’d better talk safety.
Safety
First and foremost, this is hot! Remember the comment in the aluminum casting article? This is hotter – the arc is around 6,500 degrees F. Safety is the same drill. The palms of our hands often can’t feel the heat until it’s too late, and you can get a third-degree burn before you feel it. Never touch anything in a metal shop bare-handed until you hold the back of your hand near it to feel if it’s hot. Better yet, always use thick, insulated welding gloves. Even better yet, always use pliers and gloves. This is why some clever blacksmith invented vice grips! Be especially careful welding in awkward positions. Lying on your back it is easy to put your arm down on a blob of yellow-hot slag. I should wear that sweatshirt to messabouts to show people.
The sparks are hot too. Because I weld in the winter in Wisconsin, I am on my second old parka that is mostly burn holes. Whatever you wear (and anything else nearby) will suffer the same fate. Synthetics melt, which can be bad if they melt to you. Leather is ideal. Cotton is probably the second choice. Wool tends to smolder. But above all make sure you wear long sleeves. Don’t go thinking, “Well, it’s just one bead…”

And of course heat can do other bad things. Don’t even think about welding near any kind of fuel tank. Professional welders get special training and certifications to weld tanks, and every so often one of them gets incinerated. If you need a tank welded, pay one of those guys!
If you live in an arid area, remember that these sparks will act no differently from any other sparks when they get blown into the dry grass past your driveway.
The light is a hazard too. I’m sure you probably know not to look directly at an arc, since it really can damage your vision permanently and painfully. Besides this, the intense light can give you an impressive sunburn if you’re not covered.
Another safety issue that is commonly overlooked is fumes and dust. I don’t think the smoke from the welding flux is particularly good for you. Even worse is the smoke from any paint you happen to overheat. A fan keeps both of these out of your face. Harder to deal with is the abrasive powder when using cutoff wheels. A fan helps somewhat, but it is worth wearing a dust mask. I usually don’t because it steams up the face shield, and I’m always amazed by the junk I blow out of my nose when I’m done cutting. Maybe a stronger fan…
Equipment
If you poke around on the internet you will read a lot of nonsense about how you “need” some accessory or another. Nonsense. I once saw a picture of an African fellow in the middle of nowhere welding with three car batteries, some wire, a pair of pliers, a clamp and a welding rod. Now that is industrious! This is an extreme example, but suffice it to say that any old arc welding machine on mains power is a quantum leap forward from what our African friend made do with.
Look for a machine with wires that aren’t cracked, or be ready to add some better wire. Be sure to price this heavy wire and other accessories before looking at old welders, too. Knowing this can tell you how much you might be saving by paying a little more for a machine that comes with more accessories and better wire.
Continuously adjustable amperage is nicer than discreet steps, and fortunately most of the old cheap machines are continuously adjustable. As you turn the dial, you are physically moving one of the coils in the large step-down transformer that is the heart of an arc welder. The associated magnetism makes it much harder to make this adjustment when the machine is on than when it is off. With a machine that switches in discreet steps, there is normally a number of coils and the switch shorts some of them. This makes for a quieter welder because there are no loose parts to vibrate, but your technique needs to be better to adapt to a less-than-perfect amperage.
You do not need an auto darkening helmet . I don’t have one and I don’t feel any need to get one. If you are coordinated enough to weld at all, you are more than coordinated enough to nod a normal helmet into place before striking an arc. Trust me. It might be a worthwhile investment for someone who welds all day, every day. For those guys, the extra second spent with the helmet for every strike adds up to something meaningful over a year of work. For weekend use it is not even close to economical. Save your money for steel and electrodes. . I don’t have one and I don’t feel any need to get one. If you are coordinated enough to weld at all, you are more than coordinated enough to nod a normal helmet into place before striking an arc. Trust me. It might be a worthwhile investment for someone who welds all day, every day. For those guys, the extra second spent with the helmet for every strike adds up to something meaningful over a year of work. For weekend use it is not even close to economical. Save your money for steel and electrodes.
You might also need to wire an outlet with enough guts to power a welder. Mine runs on a 240-volt 60-amp circuit. That means thick, expensive wire. I made a 30-foot extension cord and paid over $1 per foot for the wire, plus around $10 each for the plug and receptacle. If you don’t know how to wire this sort of thing, get some books from the library or find someone who does. It isn’t hard, but it is critical that you know what you’re doing.
You will need to cut steel to do any real welding. A cutting torch is nice, but you’ll get much more use out of a 4” angle grinder and a fistful of thin cutoff wheels. While a cheap, ancient welder often works fine, don’t skimp on the grinder or cutoff wheels. A grinder built without sealed bearings will not last long in the presence of abrasive dust. I have a Makita and a DeWalt grinder, and these are about the cheapest I would consider. Don’t even bother with the ultra-cheap Chinese imports. If you get a weekend of heavy use out of one of these you will be fortunate indeed. You’d be better off searching for better tools at farm auctions and yard sales if you need to economize.
The same goes for the wheels. I love DeWalt’s ultra-thin .045” wheels. It takes a lot less time and energy and makes a lot less heat to cut a narrow kerf. These are the same reasons we all like those ultra-thin Masushita circular saw blades, except you notice the difference even more with steel. The thin wheels make a lot less heat! (Remember to pick it up with pliers!) I grab a big handful of these DeWalt wheels when they’re around, because availability is sporadic at my local Farm & Fleet. I have tried a few other wheels too. Forney wheels seem OK, but I haven’t seen them as thin as .045”. Vermont American wheels are available in thin sizes, but they do not hold up half as long as the DeWalt wheels.
OK, let’s get to how to use all this stuff.
Basic Technique
First you need to prepare the metal for welding. Grind the metal down to nice, shiny steel. Grind bevels on thick material to get the welding heat and filler all the way down into the joint. And grind a shiny spot a little ways away from the weld to clamp on the ground.
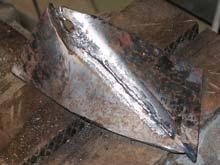
Before you even turn the machine on, do a dry run. Get your work into a reasonably comfortable position and get the ground clamped on. If you’re right-handed, you will want to weld left to right – the welding rod should point straight down into the joint, but point maybe 45 degrees backward into the joint you’ve already heated. This helps pile up a bit more filler and keeps the shielding gas coming as the joint cools. It is also easier than trying to point forward and having the rod constantly stub its toe, so to speak.
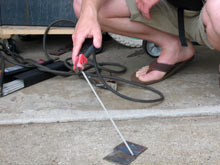
(I'm not actually welding in sandals there, just showing you the angle. Getting those little burns on your feet and then having to wear shoes to work isn't any fun.)
Now do a dry run of striking the arc. It’s like striking a really long match, except you sometimes need to move slower, depending on amperage. The draw the rod slowly down the joint. There are back-and-forth and figure-eight patterns, but you only need those to fill big fillets on heavy stock. Most of what we need for small boats is under 1/4”, so this doesn’t come into play.
Did your metal try to move when you did your arc striking dry run? That’s bad. Clamp it down. For small pieces, clamp them to a plate of steel or welding table, then clamp the ground to that. This avoids the ground wire pulling on the work. Just be sure to grind a clean contact surface on the table.
Now practice nodding the helmet down and dry-striking the arc. If you have trouble controlling the tip, you can practice by taking the dark glass out of your helmet. Close your eyes when you nod it down, strike, then open your eyes to see where your tip ended up. Just remember it doesn’t need to be perfect. Once the arc is struck you’ll have light to find the joint. Striking wide of the line normally causes no harm except spreading more spatter than necessary.
Time to strike some real arcs!
Striking your first arc
First make your check of gloves, helmet, sleeves, etc. Make sure your work cable is plugged into the machine and clamped to the work. Make sure your electrode holder is plugged in too. Make sure the machine’s selector dial (if equipped) is tightened down on its setting. (Maybe 110-120 amps to use 1/8” rod on 3/16 steel.) Keep your electrode clear of the work and flip the switch. If all is well the only sound will be the fan turning on and some buzzing from the transformer coils. If anything seems wrong, switch it off. Everything running OK?
Make sure you have your thumb on the release lever. If you strike too slowly, the rod will stick, the machine will make an angry buzzing noise, and if you don’t let go of the rod it will turn into a fuse and melt. Make sure your leg isn’t under it!
Now hold it just like you practiced and nod the helmet down. Strike an arc. Just try to keep one going for now. Once the arc is struck you have some light to see where the joint is.
Now that we have the practical necessities in place, let’s look at how it works.
Testing…1….2…3…
Welding is like sewing. You are using a machine with some settings, and these settings partly govern the outcome. There is simply no way to know whether those machine settings are right for that day without testing them. Yes, for that day! If everyone on the grid is running their air conditioning, you can bet your welder isn’t going to put out as much power at the same setting. On the other hand, on a colder day the metal will be radiating more of your welding heat, so you might need to turn the machine up a little.
Worse, different electrodes have different properties! I get around this by using 6013 for almost everything because the slag chips off easily. I use 3/32” rods for 1/8” steel (around 80 amps) and 1/8” rods for 1/4” and thicker (100-120 amps). For 3/16” steel it can go either way and depends on what I’m welding (around 90-100 amps). Something small will usually overheat too easily with 1/8”, but a large piece would take too long with 3/32”. But these are just starting points and you will have to adjust based on what the test welds tell you.
You guys with wire feed welders are probably wondering where your set of recommendations are. Well, I really can’t tell you. I have a wire feed welder, but I had a misfeed that arced and ruined the feed motor not long after I got it. Frankly I haven’t gotten around to fixing it because stick welding does nearly everything I need it to. Eventually I’ll get around to fixing it because it can do thinner metal than stick welding. Anyway, my understanding is that the welds are assessed about the same, however, except wire feed is more spattery and ugly because you can’t directly control the feed rate in real time.
When possible, try to make your tests on scraps cut from the exact metal you’re using. If you’re cheap like me, you’re probably using scrap steel. Scrap comes with no guarantee of the exact alloy, and this can affect how it welds. Fortunately most mild steel seems to be in the same ballpark. Be especially careful when if you try to weld to any part of a car or truck. Many of these steels are higher in carbon and can get brittle when heated unless the temperature control is perfect. Many of them require stitch welding or spot welding, because some of the metal needs to be left unheated. (And obviously be careful that there are no fuel fumes around, and stay clear of the gas tank!)
Welding Theory
Most welding books seem to gloss over this part. They give you a table of recommended amperage and rod diameter combinations and tell you to go at it. Unfortunately, this doesn’t give you any way to interpret any problems that surface.
The basic idea is that we are heating steel to a temperature where it will fuse, then physically connecting it so it stays stuck. They used to do this by heating to yellow in forges, then hammering the metal together. Bladesmiths still do this for fancy “Damascus” steel knives, but it doesn’t work so well on a trailer frame because squishing the metal together changes the shape. In modern welding methods we instead add metal to fill between the pieces we’re joining.
The two main things you can control are heat and amount filler metal. But they overlap. The amperage setting combines with how long you linger in an area to control heat. The amount of filler is controlled by the rod thickness and…um…how long you linger in an area. So the speed you move down the weld affects two separate things.
I think you will start to understand this better by making some test blobs. But first let’s talk slag.
Slag
Slag is the glassy black stuff that forms on top of the weld and needs to be chipped off before painting. When you look at a welding rod it doesn’t look like metal at all – there’s a porous coating. When this stuff burns it creates smoke and slag. The smoke is intended as a shielding gas to keep oxygen away from the hot metal. Metal rusts really fast when it is that hot. The slag floats to the surface and does the same thing while the metal cools. Try to wait until the metal is good and cool before chipping. The slag chips off much easier when it is cool, and chipping when it’s too hot defeats the purpose.
Slag can also serve as an indicator of weld quality. A good weld made with 6013 rod will have an even coating of slag all on the surface. This chips off easily. Sometimes it doesn’t chip off so easily because it’s down in little cracks and holes. This means that you probably underheated the weld, and the slag didn’t have time to float to the top before the metal froze. Or the weld may have been uneven.
Test Blobs
I have never seen anyone else write about this technique, but it is hard to believe I’m the only one who has ever thought of it. Either way, I think it is handy for gaining a feel for the relative rates of heat accumulation and metal accumulation (or erosion). We get a better picture of this by removing a variable – the rate we move down a seam. To do this you keep the electrode in one spot and try to build up as tall a blob of metal as you can. (You have to move it a little bit to keep the arc going.) At some point it will heat up enough that it is burning away faster than you can add metal, or it can’t hold itself up and starts spreading out. That’s where you stop. If you go too far, make another blob at the same amperage. Then adjust the amperage and do another.
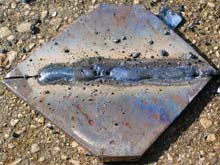
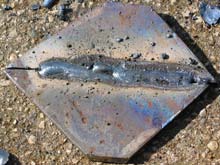
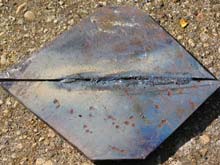
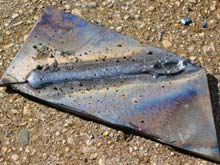
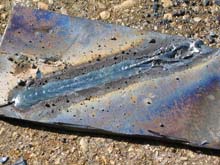
Here’s a series I did, first with the slag still on, then with it chipped off, then the bottom side.


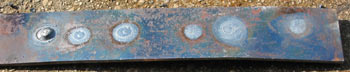
The first one on the left was at around 180 amps and I went too far. The metal started to melt away and sink through the bottom. The second blob was at the same amperage and I stopped sooner.
The third blob is at around 130 amps. The heat marks on the back are almost as strong as the ones with higher amperage, but the metal didn’t melt away. The filler has clearly sunken into the plate and melded with it. This one is a good bet for a starting amperage.
The fourth & fifth blobs are around 100 amps. One is more spread out than the other, but on the bottom we can see that the heat didn’t spread far beyond the actual puddle. Accordingly the filler metal sort of sat on top of the plate, rather than sinking into it. The attachment is probably still pretty strong, but probably not as strong as blob #3.
The sixth blob is about 75 amps. At such a low setting it is hard to keep an arc going at all, but obviously we can pile up a lot of metal. It is interesting how the slag formed a ring around the tower of metal in the middle. I’m assuming that this is because the metal stayed near the path the electricity followed, and the slag had to fall out to the side. On the bottom we can see that there is not a lot of heat spread at all. We can also see where slag did not chip away cleanly. This often means underheating, because the puddle didn’t stay liquid long enough for all the slag to make it to the surface. In fact, while welding I could see slag making the molten metal look marbled, which made me wonder if it was getting to surface.
Based on this information, we can see that the lower settings pile up more metal because the rod is melting a lot faster than the work can heat up and melt away. This would be even more true with thinner rod. But the lower settings suffer in penetration. Less heating of the work means the weld might not be as thoroughly stuck to it, and it might be contaminated with slag that didn’t completely float to the surface.
At the other end of the scale, we are heating the work much more. We are also heating the rod much more, but we don’t notice this because we are feeding rod into the puddle continuously. We just burn through rods faster. Here heat builds so quickly that the work starts to melt away before any metal can build up. In fact, if you jab the rod through the puddle you can cut steel this way, but it is very messy and makes an ugly cut.
Somewhere in between the extremes we find a nice solid weld with a reasonable amount of buildup and no burnout.
Armed with this knowledge, our first beads are much more likely to be good. A novice tends to rush, which results in small, weak beads. Having done some blobs this is less of a problem.
Test Beads
Next are some beads on flat metal. This is just to practice making an even bead. While you’re at it, make a few of those beads really wide by making a “C” shaped zigzag. This is handy for when you have a lot of space to fill with metal. (Just keep in mind that all that metal cooling in one spot causes strong warping forces.)
OK, time to join some metal.
Test Joints
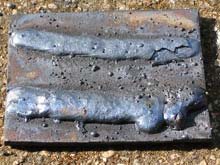
I suppose I should show you some pictures of bad joints. Here is what a typical novice weld looks like.
I didn’t take the time to let heat and filler metal build up, which is a common beginner’s mistake. Those first arcs are so exciting we don’t think about what they’re supposed to be doing for us. You can see how the filler didn’t make it to the bottom of the gap, and there isn’t even much heat discoloration surrounding the seam.
Let’s put it in a vice and hammer on it. It wouldn’t even bend to 90 degrees before breaking at the weld, and we can see porous metal in the weld. Here it is still clamped in the vice.
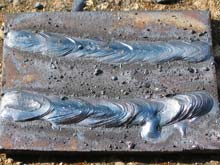
But I don’t think you’ll go racing down the bead after having done the test blobs. Here’s a better one.
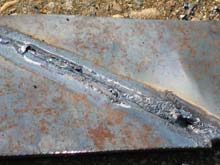
It is still not perfect. You can see where it started out a little thin. (In my defense I was trying to avoid welding the ground clamp to it!) It ended a little hot, too, with a slight burnout at the end.
Let’s try to break this one. It bent like it was one piece of metal. That is a decent weld.
Now let’s look at some faults in actual real-world joints on various projects I’ve done.
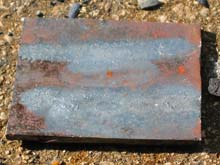
Insufficient penetration
No, it’s not what you were thinking. This means that the metal didn’t get hot enough to truly fuse, like the beginner’s weld.
You can see that it’s weak just by looking at it. It looked solid at first, but chipping off the slag revealed pits.
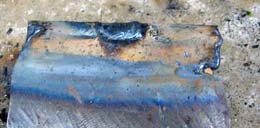
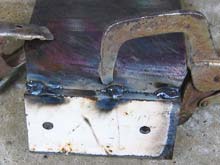
If you can see the backside, you should see metal discolored from the heat, like this.
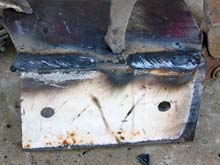
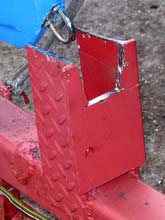
Or burned paint, like this. (If you forgot to take the paint off the backside…)
PHOTO: winch post burned paint.JPG
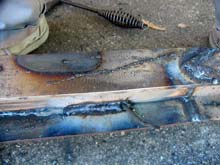
In either case, these signs of heat on the backside do not guarantee a good weld. But if you don’t see them, you are probably underheating. The remedy is moving slower to let more heat and metal accumulate. Like this:
Kind of sloppy, as my vertical welds often are, but basically solid.
But what if you slow down and the metal just piles up instead of penetrating more? Then you need more amperage, as you might guess from the test blobs.
Burn-Outs: Thin metal, small work, and corners
“Burn-outs” are what I call it when I overheat the metal and melt away some of what I wanted to keep. The less metal there is to dissipate the welding heat, the easier this is to do. So thinner metal, smaller pieces and corners are most susceptible.
This one went right through.
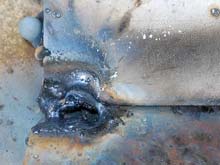
This one just hollowed out a spot.
In either case, you can tell this is happening when the metal burns off faster than you can feed more in. Sometimes it seems like the weld puddle is sinking into the joint, and you can’t add enough rod to fill it. As soon as you see that you can’t pile up any kind of bead, STOP! Then let the piece cool, turn the amperage down a bit and try again. On a small piece that is already hot, you will probably burn a hole before you have a chance to react. (Test pieces, remember?)
On small work, the only way to avoid burn-outs is welding in stages. You need to give the steel time to get rid of that heat. There is no way around this. Unfortunately you can’t cool it with water—sudden cooling can make the metal brittle, which never leads to anything good.
Here’s an example on a large piece, but the principle is the same. Think of this as lots of tack welding. I tack weld the piece together.
Then wait. Then add more tacks between the first tacks.
Then wait. Then…you get the idea. It tries one’s patience, but it’s the only way. You’ll notice it a lot on really small work, like when you need hand screws on a Sunday evening when the hardware store is closed.
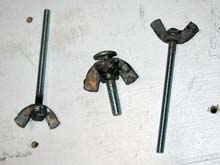
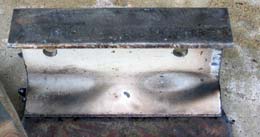
OK, I’d better explain this, since I know some of you will email me wondering why I didn’t just order hand screws from Chuck. Normally I would, but I was in a hurry to finish a box joint jig to build an instrument case. The screws didn’t need to be pretty. Here is the jig shown with my cobbled router table and part of one of the cases it was used to build. I cobbled the router table myself, but I got the plans for the jig here: https://www.shopnotes.com/plans/box-joint-jig/.

OK, back to the main story.
Sometimes you can cheat by leaving extra metal and grinding it away later. An outside corner will always try to melt, but if you can leave a flange that makes a T joint, the welding is a lot easier. Notice how I used that technique on this piece to avoid outside corners.
Aiming
I should also mention it matters what direction you point the stick into the joint. The welding electrode is sort of like a metal sprayer – most of the heat and metal are projected in-line. For a T joint, you normally want the rod bisecting the joint’s angle, and pointing a little bit backward, so it fills in the hot joint it is leaving behind.
But this changes when you have unlike thickness, or otherwise unlike abilities to dissipate heat. You’ll need to point your rod a little more into the piece that needs more heat. You don’t want one piece ready to melt away while the other one it barely hot enough for the weld to stick!
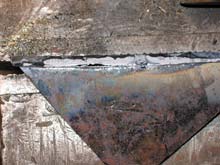
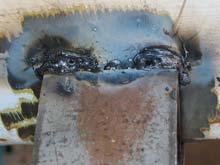
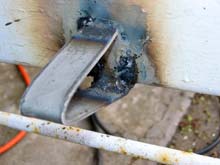
Here’s an example where I overcompensated.
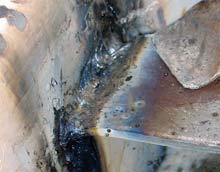
I knew the thick channel would need more heat than the thin bracket, so I pointed more toward the channel. But I overdid it. Can you see how the seam has a bit of a furrow where it joins the bracket? The bracket was probably hot enough, but it didn’t get enough filler. I might have gotten away with that angle if I had turned the amperage down a bit and gone a little slower. But probably I should have been making little Vs or Cs with the tip of the electrode to spread the filler out to the edges a little more. I was saved by the fact that 6013 slag chips off easily to run another bead to fill a gap.
Speaking of which…
Filling Burn-Outs
When you do have a burn-out, there’s nothing to do but fill it. To do this we need an extreme setting – as little heat as possible, so we can pile up as much metal as possible with little penetration. Remember that from above?
So we try to strike an arc. This is like lighting damp matches, and keeping the arc lit is a chore. It is small to avoid too much heat, so if you move too far from the metal it dies. Then you need to knock the excess coating off the rod and try again. But then it tries to stick! Be sure to keep your thumb on the electrode release lever! If you keep the current flowing you’ll melt the whole rod like blowing a giant fuse.
When you finally get a layer of metal added, you have to let it cool again, chip slag, and add more metal until you have enough to grind it back to where you wanted it to begin with.
After you’ve done this a few times you start to see the value in taking your time with the first weld and striving to avoid this nonsense. This is also why my welding instructor says that you’re pretty good at this stuff when you can reliably arc weld 1/8” steel.
When you have a big hole, it is really hard to add to the edges of it without burning them away more. I generally find it easier to weld in a filler piece, often a corner of some convenient scrap. This new piece then can soak up some of the heat and join to the original metal, vastly reducing the “outside corner effect”.
Warping
Another thing you should be aware of is how heat warps metal. To make the weld you are heating metal to its melting point, or close to it. As metal cools it contracts. Now what are the chances it will contract evenly?
We get around this in two ways. First, clamp your parts in place before welding. Second, tack weld everything first, then finish seams a bit at a time. When building a boat trailer it is hard to clamp everything at once. So I tacked all of the main structure. Then I turned the tacks into stitch welds, which are long tacks. This is because since warping forces from a full seam might break tack welds. Finally, I filled in the gaps. This prevented warping because most of the warping forces cancelled out.
That should be enough to get you started with your welding practice. Next month we’ll put it to work widening a boat trailer!
Rob Rohde-Szudy
Madison, Wisconsin, USA
robrohdeszudy@yahoo.com
|