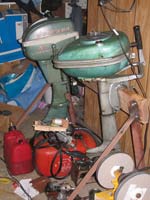
It is not uncommon to find a good deal on a really old outboard. Often people can’t make any sense of older systems, or run into trouble when they can’t get parts. Here we’re looking at a 1947 Gale 5 hp motor. These are marvels of simplicity, so it was a little surprising that the fellow couldn’t get it running. It would run for around five seconds then die. I guessed this was a fuel problem, since it probably wouldn’t run even that long with a spark or compression problem.
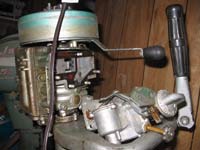
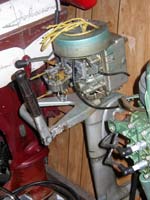
Let’s look at the vital signs. The motor turns freely and compression feels reasonable by hand. This is good. Both wires give nice blue sparks as well—this is very good since ignition coils for a motor this old can only be hard from a “parts motor”. The prop turns without any grinding when the powerhead turns. Indeed it must be a fuel problem. He was asking $25, but I point out that it is missing the recoil and he’d have it running if it were a simple problem. I buy it for $10. Here it is next to my 1954 5.5.
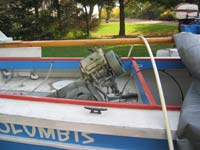
I am not one to mess with an old motor just for the fun of it, but this one has some winning features. It is very light at 37 lbs with the cowl off. This is a bit over half the weight of my 1954 5.5! Removing the cowl tank makes it quite compact as well. This might be an improvement for the schooner, where the 5.5 is rather bulky. It might also be a good backup for the AF4B, since I could keep its weight out of the stern and easily lift it into place when needed.
Of course it has to run reliably for any of these things to happen. Let’s look at the fuel system.
A little history
This old carb is pretty foreign to me, which is interesting because it is only seven years older than my 5.5, which uses the familiar late 1950s style.
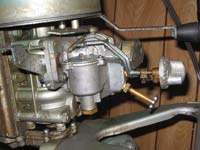
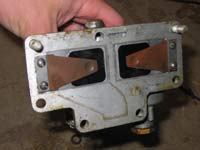
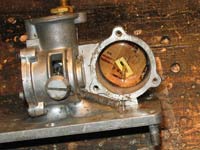
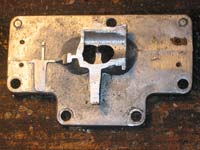
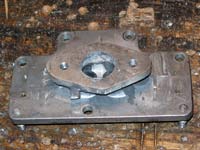
As it turns out, there’s an interesting story behind this transitional period at OMC. Have a look at the naked powerhead.
Notice that there is no cylinder head—the spark plug hole goes through the main cylinder casting. The flat side panels unbolt to reveal the water cooling jacket. To get pistons in and out, the crankcase must be split. Since this needs to happen anyway, this design saves the complication and weight (and cussing) of cylinder head bolts. The screws that hold on the cooling jacket panels can be made to much less critical specs. The only disadvantage is that the cylinder casting must be cast in a relatively complicated mold. Similar economy can be found in every part of this motor, from the simple “wobbler” water pump to the carburetor casting with integrated reed plate.
The responsible party is none other than Ole Evinrude. (I think I read this in Peter Hunn’s The Old Outboard Book, but don’t quote me on that.) These flat-sided motors are direct descendents of Ole’s ELTO designs. You might not have heard of these. Well, Ole and his wife ran the rowboat motor business with great success from 1909 to 1911. Then they sold out to their partner to tend to Bess’ health.
Ole couldn’t stay away, though. It nagged at him that outboards were heavy, unhandy cast iron monsters. In 1912 he started developing the now-familiar flywheel magneto. By 1919 he had drawings for a new kind of lightweight aluminum motors. In one of the worst business decisions ever, his former partner declined to pursue the design. So in 1921 Ole formed ELTO – Evinrude Light Twin Outboard. The benefits of a lighter motor were readily apparent to everyone else, and they sold very well.
Evinrude’s old company foundered for a few years and went through some changes in ownership, regaining some market share by 1928. At this point Evinrude was acquired by Briggs & Stratton. Stratton decided he didn’t want to diversify, but Briggs did. So Briggs bought Evinrude and Lockwood, then talked Ole into joining the new company – Outboard Motors Corporation, or OMC – along with ELTO. Ole had no business reason to sell, but Briggs talked him into it based on the chance to see his name on his motors again.
Well, we all know what happened in 1929. And 1941. These national crises left little time to redesign small motors, which is why these ELTO designs were still being built for smaller motors in the late 1940s. About that time the newer designs were being phased in for the flagship Johnson and Evinrude models, but the Gale motors were still ELTOs. What I find interesting is that this motor from 1947 provides a window into the methods of the original outboard guy, circa 1928. When you look at other motors from 1928 it is easy to see how far ahead of his time he was.
But we still need to make a carburetor work in the 21st century. All carburetors do the same job, so we can figure this out. Let’s get it off the motor.
The Carburetor
First we take it off by removing a bunch of nuts. Impressively, I managed to get it off with the gasket in tact! Cutting a new gasket wouldn’t be such a big deal, but it is nice not to need to.
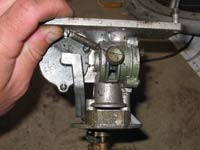
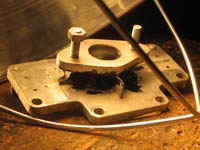
As I mentioned above, this one is odd in that the reed plate is integral to the carb casting. I bet that saved some money on fasteners and assembly labor, and probably some weight too.
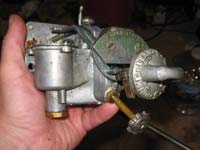
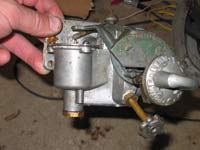
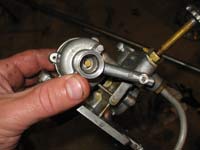
This carb also has a strange-looking primer system and throttle. May as well dig in and figure out what’s what. With the fuel line off we can see that the lower needle valve isn’t a needle valve at all. It’s a fuel shut off, which I guess makes sense with a gravity tank. It doesn’t work, but I guess I don’t care.
Next the fuel goes to the big cylinder, which is obviously the float bowl. Taking the bottom off I find one of the problems—crud in the filter screen. This is easily cleaned with a liberal squirt of carb cleaner.
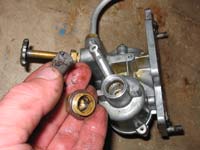
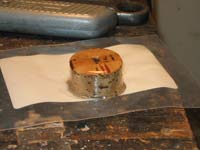
Then I take off the top of the float bowl. Here we can see the primary culprit. This motor has a sunken float.
If the float doesn’t’ float, it can’t close the float valve to shut off the fuel flow. Too much fuel wells up into the carb throat and chokes the motor out – too rich of a mixture to burn. Remember the symptom the seller described? The motor runs fine for 5 seconds because the extra fuel acts like a choke, which a cold motor needs to get started. But it wants that choke shut off as soon as it starts running. In this case the float is the choke. A little arm holds the float down when you turn the single mixture screw to the “prime” position. This lets extra fuel enter. So rather than restricting air like we’re used to, this motor adds fuel.
Float Repair
So what do we do about the float? We can’t just order a part for a 1947 motor, so we have to make one. This is easily cut out of cork from the hardware store. I use a fine bandsaw blade or sharp knife to get it close, then sandpaper.
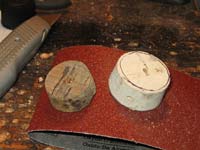
Then I do the same for the height, drill the center hole and vacuum the dust off. Don’t let go while vacuuming! Then I coat it with a thin coat of epoxy to make it fuel-tight. “Hot fuel-proof dope” from a hobby store should also work, perhaps better. The old ones used varnish, but varnish is broken down by the ethanol in modern fuel. Epoxy isn’t perfect either, however, so it is probably best to drain the float bowl after each use. You should do this anyway if the motor will sit for a long time.
And installed.
Adjustment
So how do we set this float? We have no service data, and worse, we have no idea if this float weighs the same as the original. Weighing the original might not even tell us, if it has deteriorated. The answer lies in the function of a float valve. It sets a level beyond which a fluid is not allowed to rise. Why? Well, we don’t want fuel running unchecked into the motor, as happens with a sunken float. If we go too far the other way, we starve the motor because it can’t suck enough fuel out of the jet. So we want the fuel level in the jet to be below the level where it floods out. But we want it just below so it’s easy for the carb’s venturi to suck fuel out. This also helps us understand the mixture needle. It is just a restriction in the fuel supply to the jet that slows down the flow to fine tune how much fuel the venturi can draw with a given amount of suction. The float alone isn’t a fine enough adjustment.
So we set the float to where it is slowly flooding, then lower it just enough to stop the flooding. If the needle can’t get it lean enough, we lower the float a bit more.
This also explains why we prime a carburetor, actually. When you’re pulling the starter rope, you can turn the motor at maybe 120 rpm at best, and probably less. This means the engine isn’t sucking much air through the venture. Without air speed, there is not enough of a pressure differential to suck draw fuel out. So we prime the carb with some raw fuel. Or we close a choke plate that has a hole in it, forcing all the air to blow right over the jet, increasing the local vacuum. So that’s why there’s a little slot in the choke plate! Clever, eh?
No plates in this carb, however. Rather than supercharging the airstream over the jet, this carb simply allows excess fuel to well up into the carb’s throat. It’s one of those things where you need to get the hand of not overdoing it.
Throttle
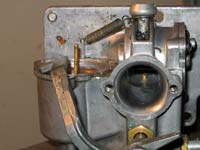
Since we’re looking at restrictor plates, there’s no throttle plate either. This one uses a rotating drum in place of a plate. Here is a side view open…

…and closed.

I’m not really sure why they went with this style of throttle. Maybe plastic was cheaper than a metal plate.
One needle?
So how does this carb get away with only one needle, where we are used to seeing two on later motors? Well, the added needle on later motors is the slow speed (idle) needle. This controls flow to a small port right behind a slot in the throttle plate, which works on local vacuum just like the choke we talked about above. It’s just a lot smaller to provide more accurate regulation of smaller amounts of fuel. This is good, because at idle the main throttle will barely draw any gas, and if it does it is likely to be in spurts. So the later plate throttle are designed to shut off the local vacuum at the main jet and concentrate it at the idle jet when the plate is closed.
So the idle valve smooths out low rpm operation, particularly with no load. That is irrelevant in this motor, since it cannot be operated without load. It’s direct drive! The designers didn’t care too much whether low speed operation was all that smooth. They figured you’d be sitting right by the motor (no remote controls) and could easily adjust the mixture to suit whatever speed you were running at. Besides, most buyers of these motors were expected to be operating wide open to get to the fishing spot, then sitting there with the motor off. If you really wanted to go that slow, you’d be using your oars anyway. (You did bring oars, didn’t you?)
Leaking valves
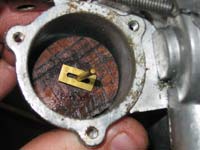
A simple old carb can certainly teach a lot about how motors work, can’t it? Alas, it failed the all-important test on the water. The old needle and seat of the float’s valve were too worn to fully shut off the fuel even when the float rose properly. This became really obvious as I lifted the fuel supply, increasing the pressure—fuel ran out the top of the float bowl unchecked. Here’s what the valve looks like after I cleaned it up with crocus cloth.
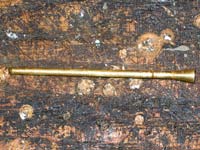
And here is what it looks like in situ, from the bottom.
Basically a fat reversed needle valve. Well, if I can’t make this work, the carb is scrap. Let’s try lapping it. I used one of those wax emery sticks used to add grit to cloth buffing wheels. Fine valve grinding compound might be better, but this did cut it. In fact this is just like valve lapping – add abrasive and twist the valve in place to make both parts mate better. Obviously you’ll want to clean up the grinding compound with lots of carb cleaner.
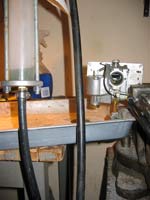
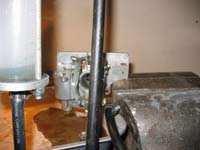
Time for testing. I used my fuel consumption gauge to create pressure with elevation.
We can easily calculate the fluid pressure knowing the height. Water weighs about 62.4 lbs per cubic foot, This equals .036 lbs per square inch for every inch of height. So three feet high should be 1.3 psi and 6 feet high should be 2.6 psi. Gasoline weight a little less, but either way these are tiny pressures. But this valve is only designed to tolerate the pressure of a gravity tank just above the motor – maybe 0.2 psi.
No good. With even 2” of head, the fuel floods past the float valve like it’s not even there. This is less than half of the (tiny) fuel pressure the original set had. Well, I guess the carb is scrap for want of a decent float needle.
On the other hand, the rest of the motor seems usable.
Paging Dr. Frankenstein…
Carburetor Transplant
Our parts problem evaporates if we can adapt this motor to take a late 1950s 5.5 horse carb. Normally swapping carbs is a simple matter, but here it is greatly complicated by the reed plate being incorporated in the carburetor casting. We have a few options here.
- We could cast a new aluminum part with the reed plate and a flange appropriate to the newer carb. This is probably the best way, but I doubt most of us would go to the trouble. (Besides, I feel a little self-conscious putting my castings next to the artwork OMC put in their motors.)
- We could cut off the old carb, cut up a late 50s intake plate and JBWeld the parts we need together. This might work fine, particularly with some screws to back up the JBWeld. But we do need to cut up the original parts. Lacking a late 50s intake plate it would be easy to make one from aluminum or steel plate.
- We could cut as above, but graft the new carb directly to the reed plate. I wouldn’t recommend this unless you really can’t figure out how to make a flange. I think it is well worth being able to unscrew the carb with the reeds still in place.
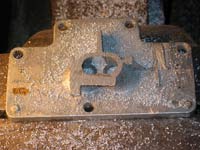
I went with option 2, building my own flange. Here is the old casting cut apart. (Before anyone gets upset with me about the historical interest of this motor, Motor Max assures me there are zillions of examples of this model still out there.)
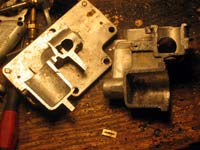
Since I had to cut straight through the float bowl and all, it took another cut to clean it up. Easy work on aluminum with a sharp hacksaw. Don’t try using an angle grinder unless you get a special aluminum cutoff wheel. The common steel-cutting wheels tend to melt aluminum as much as the cut it, and the wheel clogs badly. Rather like cutting plastic. Worse, it tends to grab the material and fling it or the tool! This isn’t safe at all. Use a hacksaw.
And here it is filed down to a more glueable surface.
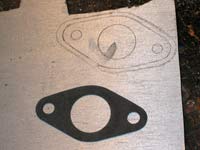
Here is the tracing of the late 50s carb on the aluminum plate. 3/16 plate probably would have been enough, but all I had on hand was 1/8” or 1/4”.
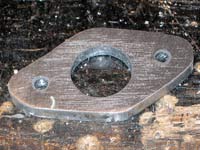
Here is the same piece with the holes bored and tapped to ¼-28 for the studs. The studs are just cut-off bolts in this case.
Then I lapped the mating surface to be sure it was completely flat. Fine emery on a piece of plate glass does a fine job. I have a marble tile for jobs like this.
It probably would have been smart to use a couple small screws to back up the JBWeld. But I wanted it done so I just gooped on a lot of glue. I did this in two steps – one to attach the main parts, and a second to glue in the studs and fair the intake hole. If you try to do it all in one shot you will certainly end up with adhesive dripping into places it doesn’t belong. In any case remember to clean all gluing surfaces with acetone, and rough them up where possible. A Dremel is very handy.
In this case there would be no cowl, so the JBWeld needed some paint to protect it from the sun.
Well, it looks solid and I know that 5.5 carb works. But I’m afraid final results will need to wait until the lakes in Wisconsin become liquid again. I would bucket test it, but this direct drive machine throws the water out of my trash can too fast to know whether it’s running right!
In memoriam
Maybe you folks remember Dale Olson, my local outboard buddy and AOMCI contact. He’s the one who helped me test some navigation lights in a prior article. Well, Dale recently died unexpectedly. I guess his aorta had a ridiculous amount of plaque in it, which he dislodged while lifting…you guessed it…an outboard motor. He was only in his 50s and deserved a lot better.
If I can derive any good from the situation, it is a wake up call to take better care of my own health. Like making time to prepare something better than convenience food and getting the good kind of exercise. So if my articles get a bit less thorough, or maybe I miss a month here and there, it is only because I am making time to maintain something more important than a motor.
Actually, I bet a lot of you folks reading are like me—probably borderline obsessive-compulsive and highly goal-oriented. These are good things that get boats built. But we are particularly vulnerable to putting our own health last. So let’s all try to strive for balance. Maybe we’ll add a few months to a project, but maybe we’ll add years for another one.
Rob Rohde-Szudy
Madison, Wisconsin, USA
robrohdeszudy@yahoo.com |