Until recently, most small one design sailboats (Sunfish, Lasers, etc.) sported wood daggerboards and the occasional ding, split or gouge could be repaired with wood filler and a varnish touch up. However, in the mid-1990’s, manufacturers began to replace the wood boards with molded synthetic boards. In the case of the Laser and the Sunfish, it was easier to maintain good quality control and the boards did not warp or split or require annual painting or varnishing. The Sunfish class went so far as to redesign the board essentially making all the existing wood boards obsolete for racing and making the class more one-design in the process; the Laser board was simply a clone of the wood board.
Most owners welcomed their new “plastic” daggerboards, but soon discovered one shortcoming. If the tip of the board hit a rock, stump or other submerged object, the bottom two or three inches of the board often broke off leaving a jagged edge and missing tip. It turned out that the problem was that the boards were made with steel rods that extended the length of the board but ended about 3” short of the tip. Without this “re-bar” extending the full length of the board, the tips were vulnerable to breakage. There was no obvious way to repair the damage, and many owners simply discarded their damaged boards and purchased new ones to the tune of $250+.
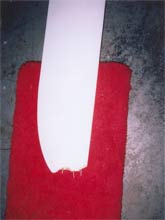
I ended up with one of these Sunfish discards that looked like a Great White had taken a bite out of the tip. True to form, the break occurred just down from where the reinforcing rods ended. I considered simply glopping on layer after layer of epoxy putty and then sanding it back to shape, but came up with the following method instead that sounds complex but is actually very easy and fast.
Step 1. Find an undamaged board and cover the bottom 6 or 7inches of the board with plastic kitchen wrap (Saran wrap works fine – just don’t use a textured wrap as you want a perfectly smooth surface.) Stretch the plastic wrap tightly around the tip and tape the back side to hold the other smooth side in place.
Step 2. Place the board on its side with the smooth side up and coat the plastic wrapped area with a generous coat of unthickened epoxy resin. Be careful not to get any resin on the bare board as it will adhere. Immediately cover with a layer of fiberglass cloth (drape the excess cloth over the tip) and wet out the cloth with more resin. Let the resin cure in a warm environment.
Step 3. When fully cured, untape the plastic wrap on the ‘bad’ side of the board and carefully peel off the epoxy half mold from the board taking care to let the plastic wrap stick on the inside of the mold.
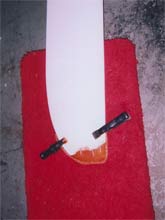
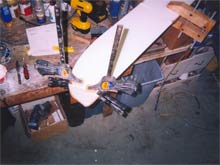
Step 4. Drill pilot holes up into the damaged tip taking care to avoid the tips of the steel reinforcing rods. Wet the holes with epoxy resin and screw in three stainless steel wood screws Let the resin cure and carefully hack saw off the screw heads. These screws will serve as reinforcing rods and will add strength to the repair. (See Figure 1.)
Figure 1
(click images for larger views) |
 |
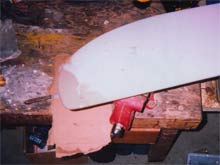
Step 5. Paste wax one side of the damaged board taking care not to get wax in the jagged damaged area. The paste wax will serve as a parting agent in the event any resin seeps out of the half mold. Clamp your half mold to the damaged tip (see Figure 2.) Mix up a batch of epoxy resin thickened to about peanut butter consistency and over fill the half mold with the thickened epoxy. (See Figure 3.) Let cure in a warm environment.
Figure 2 |
 |
Step 6. When fully cured, remove the clamps and carefully peel off the half mold. What you now have is a repaired tip with one side complete and the other side rough and oversized.
Figure 3 |
 |
Step 7. Using a disk sander, rough sand the oversized side to shape by eye and then finish with a palm sander on both sides down to 120 grit. (See Figure 4)
Figure 4 |
 |
Step 8. Sand the entire board to at least 150 grit sand paper. Either remove or mask up the plastic stop blocks at the top of the board, tack rag the board, hang it up outside and spray paint with several coats of flat white enamel paint. I have found that flat white Rust-Oleum brand works well.
Step 9. When the paint is completely dry, wet sand the entire board down to 360 grit. Leave it dull and do not wax. Your repaired board will now be as good as new and ready for use. In fact with the stainless screw reinforcement rods, the repaired board may actually be better/stronger than new.
Despite all nine steps, this repair can be made in less than two hours, not counting resin curing times. If you are very careful, you might actually get more than one use out of the half-mold but if the plastic wrap comes unattached from the half-mold, you will need to give the inside of the mold a heavy coat of paste wax or other suitable parting agent to prevent the resin mix from sticking to the inside of the mold (this happened to me once…back to Step 1!)
So far I have performed six of these repairs and have a little cottage industry going. I charge $65 for the repair and my customers have been pleased with the results and not having to shell out over $200 for a new daggerboard. There may be ways to improve this technique, and I am open to reader comments.
***** |