| To me that means using material and methods at
hand, and not delaying on the water fun for "yachty"
looks. For me, my smile while aboard her is more important
to me than seeing my smile in a perfect paint job.
I'm a backyard boat builder, and knowing myself, unless
I use a fast track process, the boat would never get
done!
The classic glass boat (Glassic)
First, this boat is a 1956 Skagit Tyee 20, an early
fiberglass boat built in La Conner WA north of Seattle.
She's 19'6" LOA, and 7'6" beam. She's pretty
flat bottomed, as most boats were back in 1954 when
the plug for the mold was made. Also, the biggest
outboards were about 25hp back then, so with twin
25's that's a lot of weight to push, a flat bottom
helps her to plane with lower hp. Her weight is about
2000lbs ready to cruise.
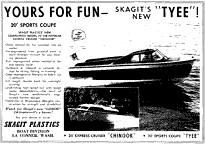 |
Figure 1: Feb
1956 ad in Sea Magazine for new Skagit Tyee
(click images
to enlarge) |
These boats were built with heavy hand layup, fiberglass
U-section stringers (no wood!), and real automotive
safety glass windscreens. All of the bulkheads, deck
(cockpit sole) and transom core are fir plywood, and
various pieces are mahogany or fir lumber. But most
wood is plywood in these old gals, and just like Jim
Anderson says in Runabout Renovation, there’s
a surprising amount of wood in early glass boats.
Speaking of books, I refer to that book often.
We had a club for these Skagit boats from 1999 to
2003 that grew to over 50 members, which became FiberGlassics
Northwest. We have a hugely active website at www.fiberglassics.com/fgnw.
Many of us are just like you Duckworkers, always putzing
about with our small boats. We just start with a pre-made
boat, that's all. Our boats are often termed "blackberry
boats", as they're literally rescued from beneath
foliage!
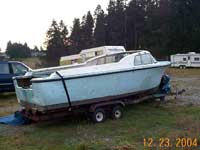
Back to this particular boat, she was custom built
for a Seattle attorney in 1956, then sold to another
attorney in 1961, which sold her to me in 2000.
| Figure 2: Initial
purchase 6-00, note elderly owner of 40yrs! |
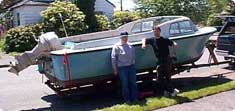
|
I sold the boat twice myself since then, and purchased
her for the third and final time in Oct 2004! No kidding,
I finally figured that we were meant for each other.
There's just something about this early handmade glass
boat that has led to my affair with her. And I could
not build a boat for anywhere near what I paid for
her the last time, $600.00 on the trailer.
She was last launched long ago in 1975; I graduated
from high school in 1976.
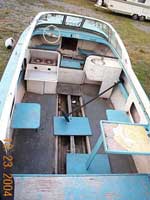 |
Figure 3: Bad
plywood deck, see stringers |
| Figure 4: She looks
like a forlorn puppy |
|
Looking her over it's easy to see that she needed
the basics, a new plywood deck, and paint job, motor
and steering.
Please read along my tale of replacing her deck,
painting her, re-powering, and launching her for the
first time in 30years.....
Deck replacement ala Home Depot
I purchased a Costco shelter to keep the boat dry,
the cheapest solution to boat storage I know of. Cost
was about $160.00 for a 10' x 20' shelter.
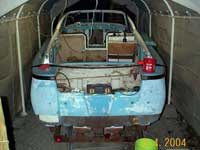 |
Figure 5: Costco
shelter boat shop! |
Then I ordered some 2-sided MDO fir plywood in 1/2"
thickness to replace her decks, 3 sheets.
You can see from the pics that her decks were gone,
yet this deck replacement was really just a simple
methodical process.
First, brace the boat on the trailer so she's level
and confirm the planing surface is straight fore and
aft. Now rather than crawling under that low trailer,
I bought a cheap laser at Home Depot. You simply aim
the flat beam down the bottom of hull, and if it illuminates
a line you know you’re not concave or convex.
This is important since she’s going to plane
at 40+mph in her future. These boats had channels
in their bottoms so I shot the laser down a corner
of a channel, visible in pic.
| Figure 6: Cheap
laser checking hull bottom for straightness |

|
Next, remove all the cabinetry and the bad plywood
decks. This plywood was 3/8” fir, 3ply, and
was original as evidenced by some spatter coat over
spray found on the panels during removal. I also fussed
to clean the bilges out with acetone and Scotch Brite
pads, and wire brushes to a clean exposed woven roving
layup. To me this is one of the most important steps,
as the bonding operations that come later depend on
a thoroughly clean and sanded substrate.
Once the entire bilges are clean enough to eat off
of, then it’s time to start planning our new
deck pieces.
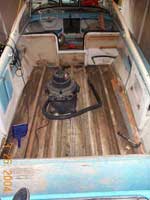 |
Figure 7: Bare
stringers ready for scrubbing |
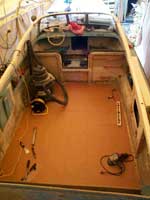
That means taking measurements off the boat to transfer
to the new deck pieces. I laid out a centerline on
the center stringer, then I drew a grid of athwart
ships lines every 6" along that CL, then measured
each direction port and starboard to the hull, writing
down all the measurements in a notebook. My grid looks
much like Jeff Gilbert's grid in the Hot Chili plans.
Then I transferred those measurements to the MDO plywood
panels, and cut them to shape.
Trial fits revealed a little shaping, which goes
fast with a saber saw or 7" grinder. This is
not cabinet making!
| Figure 8: New deck
fastened, note gridlines |
|
A few words about my choice of plywood. Recall that
the original plywood was 3/8” 3 ply fir. Well,
my local lumberyard has ½” 2 sided MDO
5 ply readily available. Right next to the MDO units
they have marine grade fir, AB Marine. I can tell
you that in these units the MDO had fewer hull voids
than the marine grade. Plus, I personally like the
bonded surfaces, which are fantastic for secondary
bonds with epoxy or vinylester resin. So the MDO remains
my choice for deck replacement.
Now, once the panels were fit to the boat, they
were removed to prepare for bonding operations. Having
done deck replacements before with System Three epoxy,
and 5200, this time I chose to use PL Premium Polyurethane
from Home Depot. I paid about $2.60 for each tube
and I used about 16 of them, I was very liberal with
the stuff. Each stringer had 2ea 3/8" beads along
the entire length, upon which the MDO panels were
placed. Then, I drove screws through the MDO into
the glass stringers. In the end this new deck is glued,
screwed, foamed, sheathed.
Wow, at this point the deck becomes very stiff,
this stiffens the entire boat.
Foaming the bilges
Next step was to foam all the bilge cavities.
I realize this is a controversial subject, at least
over in the Fiberglassics.com world. However, up here
in the Fiberglassics Northwest area, we are self-proclaimed
foamers!
I purchased my foam from US Composites, see the back
of Michalak's book (which everyone should have...)
or Google them.
It is closed cell polyurethane foam, and resists
water absorption. Now, all foam can absorb water.
We tested it, Marty and Island Boat Shop took a large
piece, put it in a 5 gallon bucket of water, leaves
it out to freeze and heat for a couple years up here.
Guess what, it weighs the same as when he poured it!
Plus.... we Duckworks/Fiberglassics fans don't treat
our boats like freakin' flower pots in the yard either,
at least mine gets the "de rigueur" Costco
shelter.
So, holes were cut along each of the separate stringer
bilges of 2" diameter to allow pouring into each
bilge and relieve pressure.
You have to work fast with the foam, and use gloves,
eye protection, and a respirator.
Remember how I wrote about cleaning the substrate?
Well, this foam adheres the cleaned/sanded fiberglass
like an adhesive; you literally have to chisel it
out.
I used nearly a 10-gallon kit for this 20' boat.
Once the foam was poured and cured, I had to replace
all the hole cutouts; PL glued them back in place
just fine.
Now, the deck is REALLY stiff!
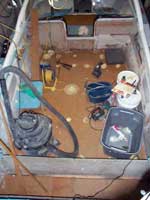 |
Figure 9: See
foam erupted through 2" holes |
Covering with glass cloth and resin
For the sheathing operation, I’d ordered some
Knytex and vinylester resin from US Composites, who
are recommended in the appendix of Michalak's book.
(Did I mention all of us should have that book)?
I filleted the sides of the boat to the new MDO
decks by gluing triangle section wood strips purchased
at HD, along that edge with PL adhesive. For me this
is faster than fillets.
Then I sanded and vacuumed and wiped the prepped
new deck with acetone. MDO surfaces make a great substrate
for covering with vinylester or epoxy resins.
I laid the cloth out and cut it to shape, running
up the hull side a bit.
Once that was done I setup an area to mix the vinylester
resin with catalyst, and had my squeegees and cheap
brushes out. I also keep water and vinegar on hand
in case I splash resin or catalyst on myself. And
lots of cheap latex gloves from Wal-Mart.
I did two layers of the biaxial.
Wow, you can now drop a hammer on the deck from
chest level and it goes "ting". It's as
solid as walking across the street to my mailbox.
This deck will outlive me, the boat already has.
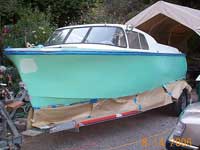
New Paint
Another sometimes-controversial subject. Look at
the pics of the boat. I haven't got to finish her
bottom yet, but she looks great right? As Renn Tolman
says, a five-yard finish! Well, I have a Woolsey marine
paint card from 1956, so my friendly Home Depot gals
mixed me some Pacific Green in Behr Satin Porch and
Floor Enamel. That's in acrylic latex enamel.
| Figure 10: Half
green, painted right where you see her |
|
You have to forego a glossy finish, but I have painted
a couple boats with this paint and it goes on well,
covers nicely, and won't kill you. It is forgiving
of non-perfect surfaces. It does stain more easily
than yacht finishes, but I enjoy the smell of the
acrylic latex in the summertime as I paint a boat.
Hey, I'm lazy and like to get results quick!
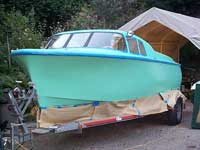 |
Figure 11: All
green, nice paint booth huh?! |
Plus, I painted another 1956 Skagit 20 with this
same paint in May 2000, and she was moored in saltwater
in the open at a dock and pics taken in June 04 show
she looks respectable!
Launch Day
So, I rigged my 1985 Mercury XR2 150hp V6 on her.
I'd made the decision to launch her without her
bottom paint done or her interior finished.
She's seaworthy, and she looks respectable, and
she was first launched 50 (fifty!) years ago!
So, on September 8th we took the pic you see off
Snakelum Point, and I beach moored her in front of
my place. First time I’ve ever seen a boat that
big come into my lagoon inlet.
| Figure 12: in the
water at last |

|
So what do I think of the work I did while underway?
She's noticeably quieter in chop compared to my non-foamed
boat with identical hull, feels like the street underfoot.
She draws smiles from all onlookers, while 200 yards
out on the water we heard people yelling and honking
at the old boat. For many older folks here, a Skagit
was the first fiberglass boat they'd ever seen, remember
this was "miracle material" back in the
day...
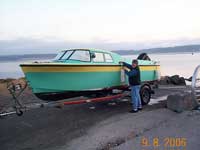 |
Figure 13: Hauling
out day after launch, compare to pic at beginning
of article |
So, like with any boat, I'm still not done. I have
to finish painting her bottom, finish the interior.
She has her original cable over pulley steering which
works great, see the super
article here on DW by Max which de-mystifies
the old reliable cable over pulley steering systems.
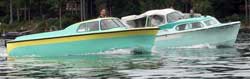
| Figure 14: Underway
with my other 1956 Skagit cabin cruiser |
|
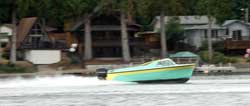 |
Figure 15: REALLY
underway at 40+! Note level ride |
All the above represents how I, a fellow Duckworks
reader, went about re-launching an old boat in disrepair.
The methods used were what seemed right to me at the
time. I respect the fact that there are other methods
and materials, and that others proceed with their
projects to a much higher level of finish than I'm
capable of. So if you have a suggestion for an alternative
method or material, please chime in and share with
the rest of us.
Thanks for reading.
So what's next?
Now that I have my powerboat collection done (under
control), I've decided I want a sailboat. I have lots
of Bolger plans, Michalak plans, and some McNaughton
plans, Glen-L and more.
But Michalak's great book really got me thinking
of a simple boat. I like boxy boats!! However I don't
really like heeling under sail, so thinking about
a catamaran.
Now, I want a small project, so the Hot Chili plans
by DW designer Jeff Gilbert were just ordered from
Duckworks. They just arrived today and now I'm Really
Excited....
Stay tuned, thanks for reading, and see you on the
Duckworks newsgroups or over on www.fiberglassics.com/fgnw.
And please, if you are from the Pacific Northwest
then contact us as we’d be happy to hold joint
messabouts.
We float our boats year round!
BillR
vakashun@yahoo.com
Whidbey Island (near Seattle) |