| In the last column
I described making a loop in a line by seizing the
working end to the standing part of the rope. Now,
if you know where the working end and the standing
part of the rope are you’re in good shape but
if not, that description wasn’t much help.
So, I thought this might be a good place to give
a few definitions…. If you service your deadeyes
and drink pine tar instead of morning coffee then
you can skip on down to the part about the bend but
the rest of you can take a look at Figure 1. Just
remember that even those who have spent a lifetime
before the mast weren’t born knowing their bight
from their standing part. They had to start at one
end and work their way to the other end.
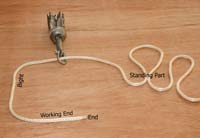
Figure 1 |
The END of the rope is fairly self-explanatory but
if you were wondering about the BITTER END of the
rope, you’ll find that at the opposite end.
In an anchor line it’s the BITTER END that should
be secured to the boat so you don’t watch it
disappear under the water after you have thrown the
anchor over board…. it can happen, believe me,
it can happen. On boats that don’t have a dedicated
anchor locker, a canvas storage bag makes a tidy way
to store an anchor and the rode. If you use an anchor
bag it’s a good idea to have the BITTER END
exit the bag at or near the bottom so it can be fastened
to a cleat.
The WORKING END is just that part that is actively
being tied into a knot.
The BIGHT of the line is the part between the END
and the STANDING PART and the STANDING PART is the
part of the line not in use. That’s all there
is to it…. So, we’ve worked our way from
one end to the bitter end and now let’s talk
about the anchor bend.
The particular anchor bend in Figure 2 (there are
a number of them) is considered by some to be the
best and strongest of all anchor bends. It is certainly
overkill for the tiny grappling hook that I use on
Flyfisher but for small and medium size anchors that
use a ring you’d be hard pressed to find a better
bend.

Figure 2a |
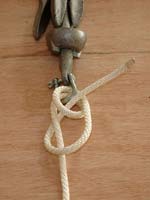
Figure 2b
|
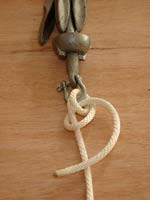
Figure 2c |
To tie this knot you’ll want to take the WORKING
END and make two round turns through the ring (Figure
2a) and then pass the WORKING END through the loop
made by the two rounding turns (Figure 2b) and then
take a half hitch to finish the knot (Figure 2c and
2d). This will make a very secure knot but I like
to seize the WORKING END to the STANDING PART for
a basically bullet proof anchor bend (Figures 2e and
2f).
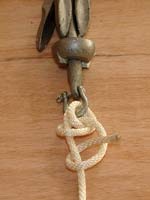
Figure 2d |
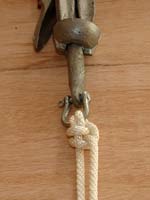
Figure 2e
|
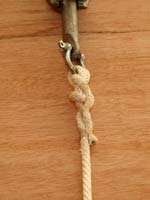
Figure 2f |
I like this knot because it’s easy to tie
and it’s hard to find better bend for attaching
the rope directly to the anchor. With large anchors
that use a shackle or have chain between the anchor
and the rode you will want to use a rope with an eye
splice and bronze thimble but for the lunch hook or
a stern hook it’s hard to beat this particular
anchor bend. Just remember to secure the bitter end.

More columns by David Nichols
|