 Custom Search
|
|
| sails |
| plans |
| epoxy |
| rope/line |
| hardware |
| canoe/Kayak |
| sailmaking |
| materials |
| models |
| media |
| tools |
| gear |
 |
 |
| join |
| home |
| indexes |
| classifieds |
| calendar |
| archives |
| about |
| links |
| Join Duckworks Get free newsletter Comment on articles CLICK HERE |
|
|
| Out There |
by Paul Austin - Dallas, Texas - USA Reading Plans - Part One |
 |
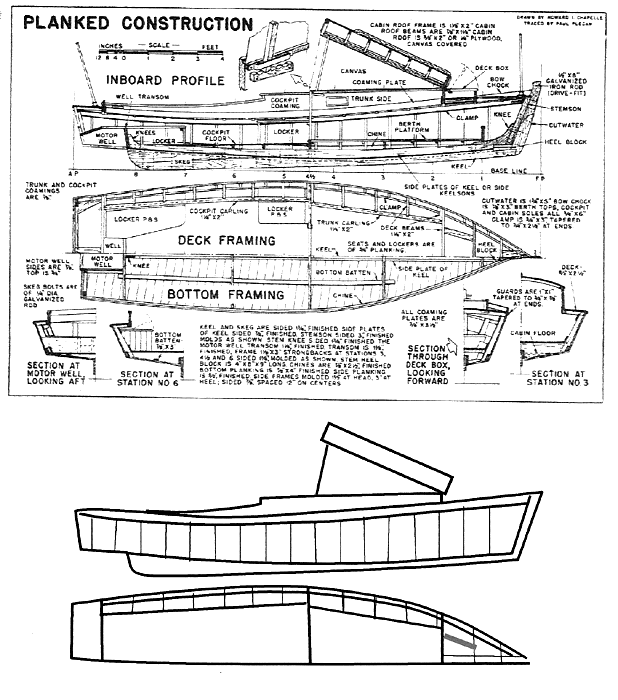
Part One - Part Two - Part Three - Part Four To follow up on lofting, let's look at some plans to see how to read them for details and methods. Our first boat is by the venerable old H. I. Chapelle, from an article in Popular Mechanix. Sometimes his own designs get criticized for being slow, especially his larger sailing craft, but this is a 19 foot outboard mini-cruiser based on Chesapeake sharpies. And it is sharp. This is what we have to work with - real DIY plans. Four sheets, but with plenty of instructions and tips. The famous writer P. G. Wodehouse would work on a chapter of his novels by pinning each page on his wall around his writing desk. He'd take a page down, work on it till he liked it, put it back up to work on the next page until he'd worked his way through the entire chapter.
Now we can do something like this. With these old DIY (it means, 'Do it and yell') plans we have more in the way of building instructions than we do of plans. So it might be helpful to lay out the 4 sheets of plans and the building instructions on a table or on a shelf nearby. These boats have two parts to the plans - the construction plan and the offset plan.
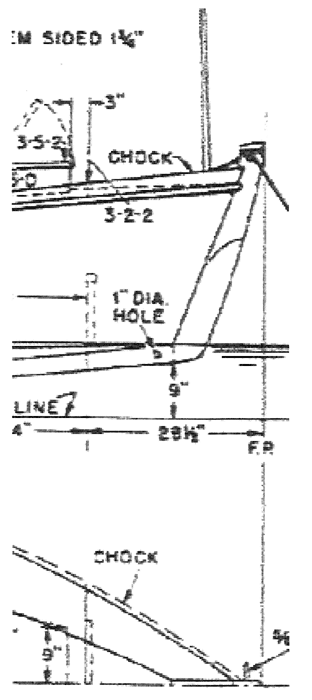
First, the construction plan. Traditionally these craft were built upside down, with the keel laid first. So we have three issues right off. First, the rocker of the keel which is related to the keel's thickness and the type of wood. Then, the forefoot construction and the stern construction. When you see the first plans page, I've put below what your mind's eye should be seeing first and foremost - the basic framing. The rocker is not great but it is there. Now with this long gradually curved skeg, you should be thinking, 'the keel needs to be wide and thick enough to make that skeg strong.' Keels not only have rocker up and down but they usually curve, with the wides part in the midsection of the ship. You'll be thinking about the length and width and weight of this hull. On this page, surrounding the framing are the wood thicknesses. The materials page should be handy, to make sure you have enough wood at each of these dimensions. Designers in those days used scantlings not only for strength but to control the weight of the boat in performance. The thought was, the heavier and stronger the longer the boat would last. It would take care of you in stormy weather and would have momentum at slower speeds. You'll want to be thinking about how the framing is joined. Any time solid wood can be let into solid wood, it's better than bolting or screwing for the simple reason that metal fastenings rust and deteriorate sooner or later. However, nearly all designs before 1960 use some bolts or some screws. Bolts were thought to be more secure than anything before epoxy, but they have exposed heads and they need thicker wood to work. Nowadays, with plywood being stable and epoxy as strong as it is, so much of what was considered skill and knowledge is unnecessary. Still, with longer boats using solid wood, some knowledge of how wood expands and contracts and how fasteners affect wood comes into play. The stem and stern have their own detail, here:
With an upside down method, the frame upon which the keel, bow and stern sit will have to be big enough and strong enough for the weight of the hull. With a space big enough for the boat, our electrical tools, fasteners and extra room so we don't feel rushed and cramped, we can begin. The construction page gives us the layout of the four bow pieces - cutwater, stemson, heel block and knee. The bill of materials gives us the sizes of each piece and the wood used, but it's the stem and stern detail which shows us how they're shaped. Notice there are no angles given, only dimensions off a base line. This will be done on the loft floor. What's a bit deceptive is the keel is made of three pieces. The construction page doesn't really show the shape of the keel, since the two pieces on either side of it are staggered to create the rabbet angle. So we have to go to the bill of materials to get the right size. It turns out we have some shaving and sanding to do on the 1x6 pine, birch or fir keel. The keel is in sections, which must be noted.
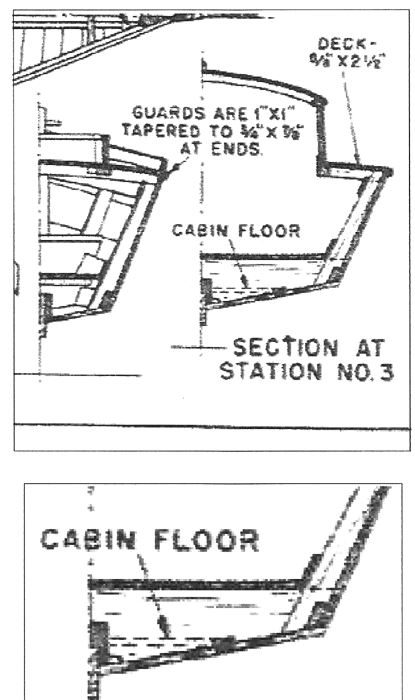
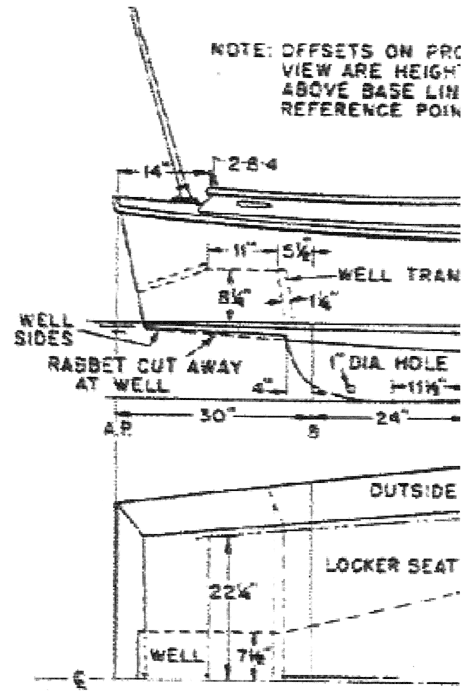
The hull is a modified sharpie. This means a sharpie bow with deadrise in the mid sections. I've shown a red line for the chine to make the slight deadrise obvious. A full v-bottom boat would be hard to form at the bow. You'd have to bend plywood sections toward a rabbeted cutwater, which is some work. Here the bow is flat bottomed so pulling the topside plywood sheets or planks in is not such a job for Clark Kent. What this means is if you exceed the hull speed, the bow is going to bounce. The bow needs to be kept low to the waterline. And aft, the stern knee must be of good stock, with the motor putting its' weight there. Notice the dotted line aft of the frame closest to the stern. This is the motor well. At this point, you should be reading the small print, the details and measurements Chappelle has put in around the lines drawings. You will begin to use them. Many of the terms on this page are a repeat from the construction page, more of a nuisance than anything else. The keel-planking joint is a bit different. The main keel or strongback has side sections which form the angle in which the planks lay. The rabbet is the angle of the keel sections and main keel, so tightness is formed flush against the side keel pieces, called plates. This is how it looks close up:
What is the exact angle of the frames to the keel and plates? Since this boat is lofted full sized, that angle can be taken off the body plan lines or simply the angle of the frame bottom compared to horizontal. A good job of lofting makes the angle unnecessary to know. Making the keel in three sections (keel and two side pieces) used to have great advantages. The vertical turn of the forefoot can be cut without steaming, when the keel hogs it doesn't swell and twist as much, and the skeg doesn't pull away from the keel as it once did, years ago. However, today with plywood, these advantages are already in the plywood. The three-piece keel is a technique from big ships brought to a 19 footer, even including a heel block.
The bow construction is traditional, quite strong for a 19 footer with a cutwater, stemson and knee. I like to see the joint between the lower cutwater and its' upper partner well above the waterline. The scarf line is curved, which might make it somewhat stronger and less susceptible to the swelling and shrinking that plagues solid wood. It is some extra work, but it might give the cutwater a long and happy life.
Now for the stern with the motor well, it's really the essence of simplicity. Squared framing inside the topsides and stern. The motorwell sides are every bit of 7/8", and can be thicker. The stern is of two layers, one being 1 1/4" from chine to chine. These numbers come from the instructions and materials list. All of this is from the Construction Profile. The type of wood specified and the dimensions of the stempost and knee will be on another sheet. This profile gives us an idea of the wood, the sizes, the way the pieces must be cut and the location of bolt holes to snap the bow together.
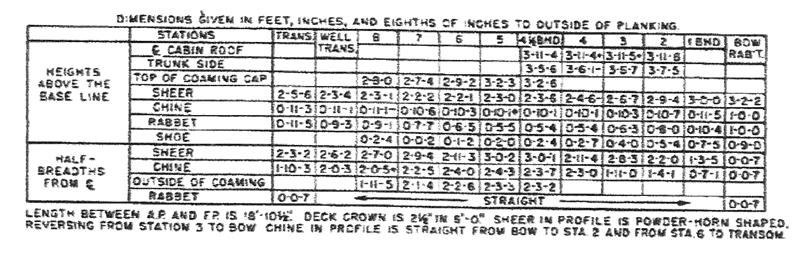
Now for the Offset plan sheet. When the keel, stem and stern are set up, most builders will want to get to the stern transom next. With the transom in, the main frame can be cut and built in. The advantage of building the main frame now is so that the sheer chine can be run from stem to stern, strengthening the boat. A sheer chine is like a stiffener. Then the frames can be pressed inside the chines. When the frames are in and braced the rest of the chines can be put in place. The lines and offsets will give us the planking, whether it is solid wood carvel style or plywood. If the degree of deadrise is the same from stem to stern, a deadrise pattern can be made out of plywood or any wood. That would simplify the chine bevels, but this isn't always the case. An accurate job of lofting can give you the angle of the chine at each station. However, you will have to consult the Construction plan again for the cockpit carlins, deck carlins and some of the forward deck beams. The distance between stations and the deck crown will be on the offset plan. The cabin is just a floor. The berth platform rests on the sole, for sleeping bags or something like that. Any cooking would be done in a portable stove, probably in the cockpit. This is no-frills living on a camping trip, a fishing trip, or just getting away. Most builders have some theory as to whether the offset numbers are more accurate than the lines. In the old days, the material upon which the lines were made might swell or shrink. You would think, then, the lines can't be trusted entirely. Yet many designers look at the lines to say, 'Now that's what it should look like.' Do whatever you do. Just begin with whether the numbers are to the inside of the planking or the outside. The rest of the hull is traditional for the Chesapeake sharpie. The bottom is cross-planked at an angle to the centerline of about 15 degrees, the topsides have a decent flare. Part of the plans shows planking for plywood, another sheet for traditional planking. The materials sheet was more important then than it is today with plywood. The reason for so many different kinds of wood specified for certain parts of the boat was to control the distribution of weight -strength where it was needed, lightness where it was necessary. Today the materials sheet won't be so extensive. Different plywood thicknesses will be used, different means of fastening, and a lumber list with the amount of glue is the usual list today. Some bolts would be specified today, but not as many as in times past. Bolts usually don't dance well with plywood. The structure of the chine is simpler today, although not necessarily stronger or better. A man usually took 2 or 3 boats to really master the details of a wood craft like this one; today with stitch and glue first-time builders can put a good boat together. Let's put this together, now. In essence we are working with instructions, offsets, and details. What we are working with today as then are first, 4 areas of the boat: Keel Stem joint Stern joint Chine(s) in the water The instructions will have warnings and tips, especially if the designer is also a builder. For instance, in this Waterman instruction sheet, Chappelle has written about the keel that: 'the scarf show may be shifted to suit stock.' Chapelle understands that this boat will be lofted full size, and that the builder will have a few volumes of boatbuilding (from the Duckworks website) on hand to help him out. This is real wood working, not just reading. Then second, with the Offset sheet the planking goes around the frames in most deadrise boats, from the chine to the sheer. Whether the bottom goes on first or the topsides depends on how the chine is beveled. These plans say topsides first. On most crossplanked boats a layer of muslin came in between layers of crossplanking. The instructions will specify this. To put all of this together, let's look at it from our chair. Do you have the space for this? Can you afford 1 1/2 the wood needed for the boat itself? I say this because of the wood needed to support and solidify the frames, breakage, replacing a part later which was not quite perfect, and changes in the plans which often comes later. Do you have the tools for the bevels, stem pieces and knees and plates and slots in the carlins? Can you work year round? Can you get help? Will noise bother the neighbors? Are you serious about this? There are more details to learn than I can mention here. Each set of plans can be a work to be learned in itself, if the boat is more than a skiff. Traditional boatbuilding was as much about reading a designer's way of arranging things as it was the boat, itself. Today, with glue simplifying things, you don't need a collection of specialized skills for boats newly designed. Paul is also publishing his books on Amazon. *****
|