 Custom Search
|
|
| sails |
| plans |
| epoxy |
| rope/line |
| hardware |
| canoe/Kayak |
| sailmaking |
| materials |
| models |
| media |
| tools |
| gear |
 |
 |
| join |
| home |
| indexes |
| classifieds |
| calendar |
| archives |
| about |
| links |
| Join Duckworks Get free newsletter Comment on articles CLICK HERE |
|
|
| Die Foldermaus - Part Three |
By Ian Titulaer - Canberra, ACT - Australia |
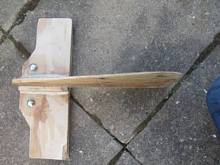
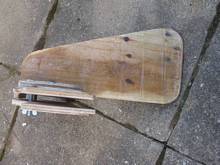
A roll your own mouse Part One - Part Two - Part Three Painting At this point I went to my local hardware store and was seduced by the lair of the siren at my local big box hardware store. The miss-tint trolley, where a thousand delights (slight exaggeration) are laid out at ridiculous prices because the store made a mistake tinting a colour or after tinting it looked too hideous to use. If I had thought ahead I could have bought the matching grey Sikaflex but bought the paint after building the boat and I thought to myself - what the hey at one third the price I can live with the white showing between the cracks in the grey paint (I was tempted by the fluorescent green though). To ensure the craft was reasonably sealed I went round it one more time painting the seams with the remainder of my supply of sikaflex and when I ran out I reached for a tube of Bostic Seal-n-Flex 1 (the sealant not the sealant/adhesive) This turns out to have been a bit of a mistake as it is not as solid as the sealant/adhesive and when a bit of pressure is applied to it, like when I strap the boat to the top of my car it has Mastic properties, which is to say it just gets a little sticky and stays a little fluid and stuck a bit to the strap when I strapped Die Foldermaus to my roof rack. Still seems to work well as a sealant though. Adding a fin. My main problem in adding a fin was not working out how to do it. It was working out which of the million and twenty ways I could think of doing it that I was NOT going to use. There are two basic ways to add a fin that are relatively easy - attach it to the side or attach it to the transom. Attaching to the side requires a method of clamping and a method of making it parallel to the direction of travel (a wedge). Attaching it to the rear requires a right angle join and a method of clamping. To make things complicated I decided to make a removable transom clamp with a pair of 14 inch by 5 inch plywood scraps with a bit of shaping and a triangular lump of wood 14 inches long and 7 inches wide at the bottom that I shaped roughly and wrapped a bit of fibreglass round to stop it from bowing. As you can probably see from the pictures a pair of cup head bolts and a some Prince Charles nuts (AKA wing nuts) serve to make an admirable connection - you will note the small section of wood above the bolts between the two plywood plates roughly the same thickness of the transom designed to keep the plates parallel while clamping onto the transom.
This set up made Die Foldermaus feel like it was running on rails. In fact I get the feeling that I probably over did it as it was probably a bit set in its ways when I wanted to get it to turn. In any case it worked so I decided to leave it as it was. A bonus that I discovered later is that the transom being clamped like this provides a backup to the thwarts as when I forgot to remove the fin before I removed the thwarts the boat held its shape a little better than I was expecting. Here is a picture of Die Foldermaus all completed and set up for paddling. As you may be able to ascertain the folding beach chair I use is not fully optimised for efficient paddling but is comfortable for bimbling about on the water. I may upgrade the floatation bags to something a bit more classy in due course and I have made another couple of hooks to put more lines across the flotation bags to help keep them in. The font used for the name on the bow is Kunstler Script.
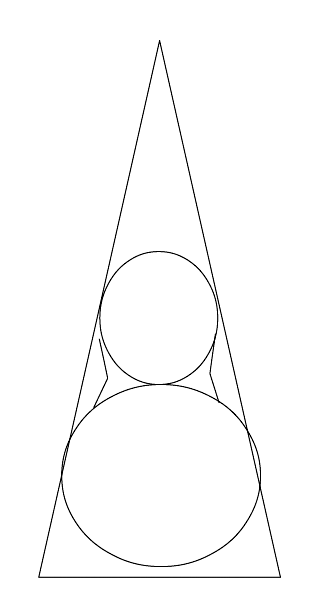
Final step Now for a complete mouse experience you need to get yourself onto the mouse boat yahoo group and ask for a mouse hull number. The Mouse hull number for this one is M237-FM. The usual warnings and disclaimers at the end. You should realise by now that this plan is for a small boats for use in sheltered waters. Please follow all local regulations as for recreational boating. These local regulations usually take into account local conditions like if you need an Arctic survival suit or a can of octopus repellent and let you know where things like designated water ski areas are. A water skier would be pulling bits of plywood out of his or her shins for a week if they hit this design at speed and while body piercing is fashionable, having it done to you by a pair of water skis is not likely to be a good look. Above all be sensible about the conditions, your abilities and the abilities of your children. Local authorities really hate asking questions like "We understand his father put him in a crocodile infested river in a canoe with 8 inches of free board - What was his relationship with his father really like?" or "Why did he attempt his maiden journey across the Atlantic during iceberg season?". Children should be schooled in water safety and taught to swim. You are legally responsible for your own actions and the supervision of children in and around water. Water is dangerous and cold water more so. I accept no responsibility for any damages consequential or otherwise if you attempt to make one of these designs, use these construction techniques, fall off your chair laughing at one of my stupid jokes, accidentally poke yourself in the eye with a pencil or attempt any body piercing techniques mentioned. While this boat (being a mouse) is open source (free) my regular method of distribution for my plans etc. is charitable donation ware. You don't need to but you can feel free to make a donation to the worthy charity of your choice because it would be a good thing to do anyway. If you don't have anything to give, time or blood are acceptable substitutes. Here is an idea on how you might use that left over 18 inch tall isosceles triangle with a 9 inch base to shape an interesting paddle head.
The end |