| Part 1 - Part 2 - Part 3 - Part 4
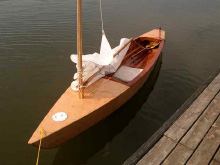
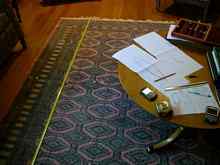
Here's my sailing kayak, after the first time out under sail the other day. It doesn't have a name yet, and there are a few tweaks to go, but I've thoroughly enjoyed the process of designing and building this thing, and the wonderful folks at Duckworks helped me a good bit with ideas and the sail so I thought I'd write up the experience and send it to them.
|
After the first sail, tied up at Hoover reservoir |
The boat is 13' LOA, with a 30" beam at the sheer, and the hull weighs around 55 lbs. I drew the plans looking for the following features:
- Hard chine (for simpler construction, at least for me)
- Light enough to cartop/single person launch
- Narrow enough to be a good paddling hull
- Sail well
- Enough keelson curve/freeboard/covered deck area to take open water
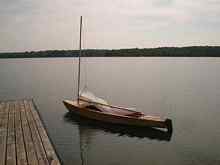
- Some cargo capacity I'm still buzzing from the first two days of sailing it. With the full 40 sq. ft sail up (there are two reef points available), in 10-12 knots it was an absolute blast. With the sheet in one hand on the windward rail, and the tiller extension in the other on the leeward rail, a little "elbow hiking" (leaning on the rail and sliding my seat uphill a bit) provided plenty of stability. The boat knifed through the water with fingertip control, approaching a plane now and then. Nothing broke, there was the proper slight weather helm, and I only had to luff once to stay up.
|
Profile, after the first sail |
The Idea
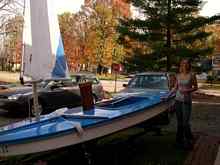
Ever since I saw my uncles push a sailfish off the beach into the wilds of Lake Erie (I was maybe 4 or 5 years old) I've loved sailing. Later we sailed a Highlander with my Dad, and I bought a sunfish clone
(Super Porpoise) with paper route money in Junior High School and sailed it for years. I eventually gave it away to some friends, but last year my daughter asked for it back as they were no longer using it, and we restored it. it now belongs to her and her new husband.
|
Beth Rudy Williamson with my old boat, restored |
I've always liked working with wood, and not long after Beth arrived back in 1985, I designed and built a wooden day sailor. It uses Thistle mast/boom/rudder/sails/centerboard, and my wife Debbie was infinitely patient during the build. Since its launch in 1988 our family's had innumerable fine times with it, in Lake Michigan, Lake Erie, Lake Huron, and the reservoirs around Columbus. Here's the boat at one of our favorite spots, loaded up with camping gear at Jackson Harbor on Washington Island, WI, about to head over to Rock Island.
|
My kids Steven, Michael, and Beth with my home design/built day sailor Cosmo, Jackson Harbor, WI |
Well the nest has been empty for a few years now, and the idea of designing and building this wooden kayak started rattling around in my head last winter. Deb came home alarmed to see the telltale signs again after 25 years. measuring tape stretched across the floor, chess pieces marking chine and sheer, plans underway.
Plans
|
October 2010, starting to scribble the plans |
I was encouraged to press on as I came across articles like this by Meade Gougeon (www.epoxyworks.com/16/evolving.html), bought an excellent guide to stich-and-glue kayaks by Vaclav Stjskal
(www.oneoceankayaks.com) but decided I wanted to follow the basic technique I used on my other boat, with ribs/forms and stringers (strakes), where the plywood pieces didn't have to be cut precisely in advance. I found my way to Duckworks for a custom sail, and with that clarified, started to build in April 2011.
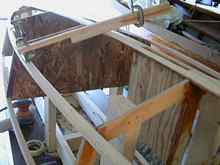
Framing on the Strongback
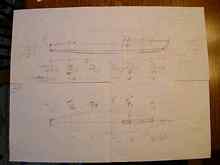
At this point I'd decided I'd have three permanent ribs (one each at the forward end of the aft deck, and aft end of the forward deck) and another about 2' in from the bow to help with bracing the mast step. With a former or rib every 2' or so, that meant two temporary formers in the cockpit area. On April 5th things got serious in the garage, working off of the plans below. In the course of the build, the boat came out close to this, though the keelson curve was adjusted some in the process, and the height of the arch under the decks got drastically reduced. I just wasn't picturing the curve required for such a narrow hull.
|
The Plans, after their job was done getting the ribs/forms onto the strongback |
But things wound up fairly close after all. I didn't want the daggerboard in the way, but didn't want excessive weather helm. The cockpit area is long enough for two to paddle fairly comfortably (8'), and there is room under the bow for some gear, even with flotation. With the patterns for the ribs and formers defined from these plans, I built the strongback from two 2x4s and 2x4 blocks between. I framed for a living for a while so it seemed the way to go, though in the end it wasn't super straight, and I had to string chalk line down the center, at the bottom and at the top, and plumb those lines to each other, so the lines became the actual reference points.
|
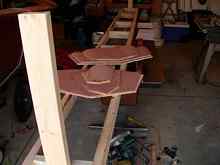
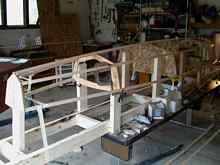
Strongback with posts at each end for reference chalkline, ribs/formers cut from patterns |
The permanent ribs are cut from 3/8" fir marine plywood. The two temporary forms I made from ½" "chip" board, which is not ideal, but I didn't want to buy a whole sheet of 5/8" proper particle board or worse yet ¾", and I had the cheap stuff handy. In the end, it worked out ok. By the end of that day, the ribs and formers were in place. It was tedious getting them at the proper height and level, with the mounts positioned so they would not be in the way with the stringers.
|
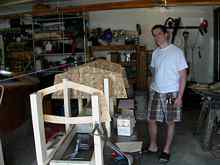
Formers and ribs, except for transom and rib 1 forward, observed suspiciously by Michael |
Verifying and Tweaking the Curves
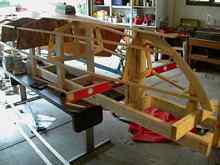
For the stringers I bought 1x1" clear white pine from the lumber store; I had to join two 8' sections by cutting a 9" overlapping piece and epoxying that on. This was ok, because in the end the sheer joint formed a bit of a stabilizing mount for the mahogany sitting on the cockpit edges. After cutting the notches for keelson and stringers, I spent a bit of time then trying to ensure the curves of the keelson, chine, and sheer were right, as shown here with the stringers taped and clamped in place. I ended up cutting a new rib 1 with a small change moving the keelson down forward to change the curves a bit.
|
Stringers taped/clamped in place to verify the curves were ok |
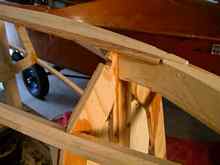
The stem was challenging too, figuring out the transition from the horizontal keelson to the vertical stem. In the end I rough cut a ¾" white pine board to a curve based on final eyeballing of where everything was landing, and notched it into rib 1 and onto a holder on the strongback.
|
With the stem in place, ready to make the keelson, and glue it and stringer in place |
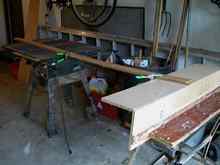
By May 2nd I was ready to commit to the shape of the boat by gluing the keelson and stringers onto the ribs and formers. I'd read in the stitch-and-glue book about scarfing. I made a scarfing jig and tried it out on my keelson, which was a strip of ¼" fir marine plywood leftover from the other boat project. It worked fine on this small piece but I had lots of trouble when I got to the scarf joints on the bottom and side plywood later on.
|
Scarf jig, set to make the joint for the keelson |
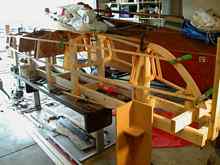
After allowing the keelson joint's epoxy to set for a day, the stringers and keelson are all glued on. I later glued an additional ¼" piece of white pine on top of the keelson, to create sufficient width as it was carved to shape.
|
Stringers and keelson glued on |
Carving the keelson and stringers was then a process of rasp and belt sander and framing square to check that the plywood for bottom and sides would sit properly. The jig shown below helped quite a bit. During this process I built the daggerboard trunk, installed it, and cut the whole through the keelson to it. The trunk sides were 3/8" fir marine plywood, with mahogany blocks ¾" by 1.25" at each edge. The forward end of the trunk glued to rib 2, which had a 1.5" vertical post set in it for this purpose, to form the primary side-to-side bracing for the forces on the daggerboard.
|
Daggerboard trunk is on, hole in keelson for it, and final shaping for hull plywood nearly complete |
I wanted to be sure water would run out of the compartments fore and aft of the cockpit and so cut drainage channels which have worked well. This shows rib 1's drain channels, and also the carved spot where the keelson turns into the stem.
|
Two layers of keelson carved to shape at transition to stem; drain channels in rib |
Next: Plywood

|