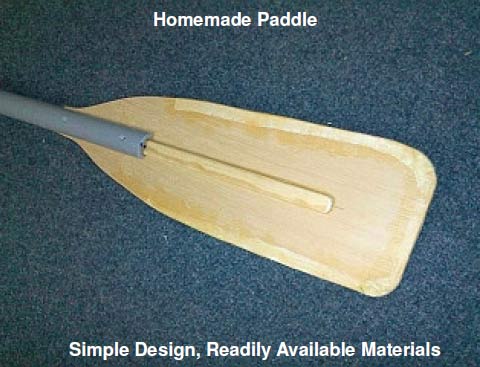
| Easy to Make, Inexpensive and Adaptable
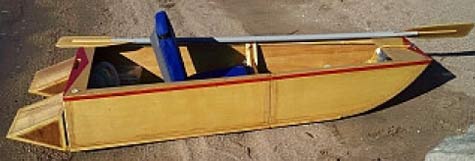
The design goal for this paddle was to develop a low cost, easy to make, adaptable paddle for a kayak, canoe or any other small boat that requires manual propulsion. The end result is a double-paddle that costs about $15 to make, and can be lengthened, or shortened, to suite the application. Because it is built in two sections, it can even be used as a single paddle for canoes or for just leaving the dock, or positioning the boat for launch. The design is not intended for rough water use, such as river rafting, but it can be ruggedized by adding a dowel to the entire inside of the handles, and by increasing the thickness of the paddles.
The following instructions are simple, but will provide
sufficient information to produce a successful build.
You can make changes to any of the dimensions to suite
your particular application. Keep in mind that material
strength and waterproofing are the key elements to long
term use. Repair any damage that may occur immediately,
as water penetration into the plywood will dramatically
weaken the paddles over time.
The use of marine or water resistant plywood is strongly
recommended, as is TiteBond III Waterproof Glue.
Good Luck with your project!
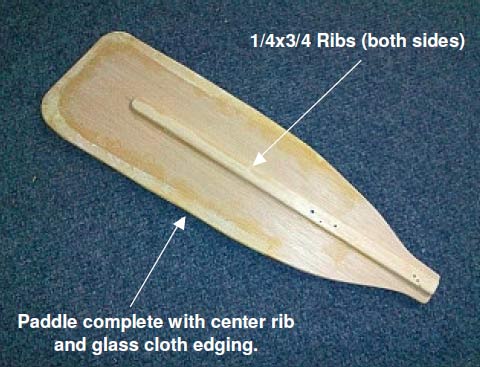
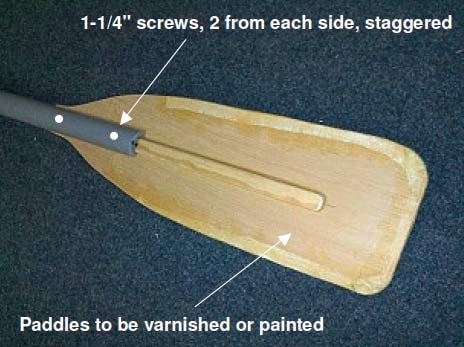
Apply 1-1/2" wide glass cloth tape to outside edges per
sketch above. Use the T&G method of application.
Download free from www.PortableBoatPlans.com
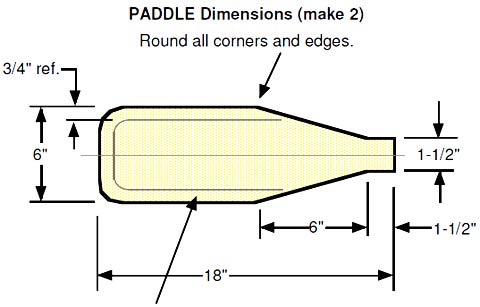
LIST OF MATERIALS:
- 1 - 10' Length of PVC Electrical Pipe, 1-1/4" OD,
- 1" ID, Underground Rated ($3)
- 1 - Plywood, 1/4" x 1' x 2' Scrap ($3)
- 1 - Lumber, 1/4" x 3/4" x 8' Long ($2)
- 1 - Dowel, 1" Dia. x 2' Long ($4)
- 1/4 - Yard 3.25 oz. Glass Cloth Scrap ($6)
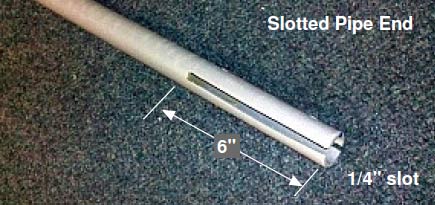
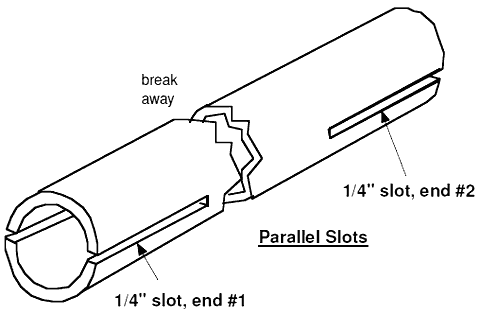
The paddle handle is made from the PVC Pipe.
Cut a 6 foot length (7' depending on your application),
and then cut a 1/4" slot, 6" long, on one end. I used a
jigsaw with a long balde. Next, cut a similar slot on the
other end, parallel to the first slot on end #1.
See sketch lower left & photo previous page.
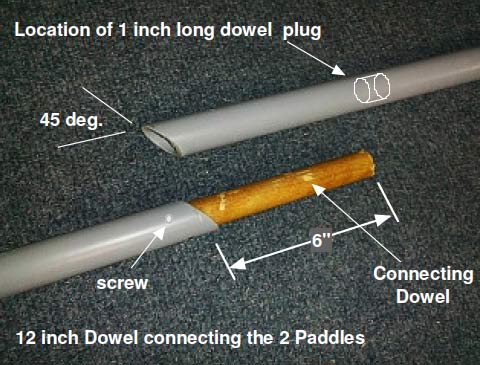
To allow the paddle to be more easily stored, cut the
handle 33 inches from one end (for the 6'), at a 45
degree angle. This will create 2 lengths, one 39 inches
long, the other 33 inches long. The different lengths will
end up the same when the connecting dowel is glued in
place. The purpose for the 45 degree angle cut is to
properly align both paddles during use.
Now cut a 1 foot length of dowel and glue it 6 inches into
the angled end of the 33 inch long handle. Small screws
can be used to hold it in place. See photo below.
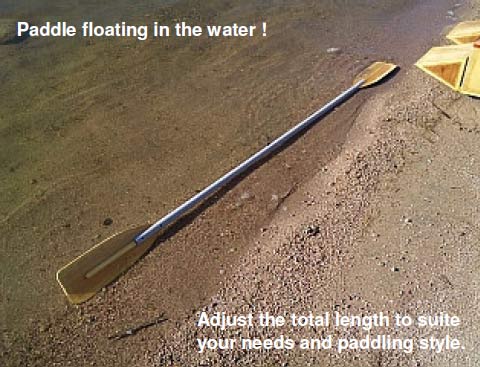
It would also be best if the paddles could float if
misplaced (dropped overboard). The plastic tubing is
heavier than water, but if filled with air they will float. So,
cut 1 inch long dowel plugs (3) and glue them in place in
the tubes, just aft of the paddles, and aft of the center
connecting dowel opening. Use plenty of glue to hold in
place. See photo above.
Depending on your specific application,
the paddle slots can be cut at a 15
degree angle to each other, thereby
reducing any wrist twisting motion.
That's all there is to making a working paddle, ideally suited to any little boat. Seal and varnish (or paint) the wood for protection.
Click HERE to download these plans in printable PDF format
For boat plans from Ken Simpson, CLICK HERE

|