|
Part 9: The Other 40%
In the last installment
of this series, I launched my Lake Skiff for a bit of a trial
run at the end of summer 2008, even though, as Chuck put it in
the introductory blurb, it was “95% done with only 40% left
to do." I’m not sure it was 40%, but there was quite
a lot to do before I could consider the boat truly finished. When
June came around again, I got to working on it.
The first job was to varnish the rubrails. Cutting and planing
those out of raw ash and bending and screwing them into place
was the last task of the previous season. Now I unfastened them,
half their length at a time, applied 3 coats of Cetol Light to
both sides, and refastened them, bedded in Sikaflex 291. Having
seasoned into shape on the boat, they were very easy to deal with.
Next I needed some seats, one all the way aft for me to steer
and work the motor and one (at least) for a passenger farther
forward. During the trial run I’d noticed that I had to
sit pretty high to see over the cabin, so my initial idea--to
hang what amounted to a big canoe seat from the washboards--wouldn’t
work. What I decided on was still a canoe-like seat, framed in
ash and upholstered with seat belt webbing (from Sailrite), but
let into notches in the coaming above the washboards rather than
below, and held in place with bungees. It’s very comfortable
(although somebody with shorter legs would need a footrest) and
I can see where I’m going with no problem.
 |
Seat |
The passenger seat had to do double duty as a rowing station.
A simple thwart would have worked, but then you’d have to
step over it every time you went forward. A store-bought pedestal
seat was a possibility, but the ones with backs would hinder rowing,
and the ones without backs were, in my estimation, way too expensive
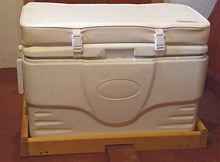
for what you got. Then I noticed that Coleman makes custom seat
pads for some of their marine coolers. A cooler would be a neat
thing to have anyway, and it could be moved around to make room
in the cockpit as needed. I built a base from yellow pine (scrap
from the stair tread material I’d used to frame the boat
--I knew those bullnosed edges would come in handy) to provide
firmer footing for the cooler and allow it to fit over the keelson
hump. My wife says the cooler/seat is very comfortable.
 |
Cooler |
The biggest remaining job was to enclose the slot-top cabin.
The doors were easy: I found some mahogany doors from an old sailboat
on eBay that were just about perfectly sized. These were fastened
to mahogany strips (also from eBay) with stainless hinges and
the whole assembly bolted to the cabin bulkhead.
The top cover was a bigger challenge. My first attempt involved
a heavy foam pool float. The one I got already had heavy-duty
grommets on all four sides, and I thought it would be stiff enough
without additional support if tied or bungeed down firmly. It
wasn’t. Everything looked great at first, but after a day
and a night in the hot garage it was pretty saggy. End of that
experiment.
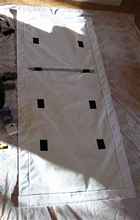
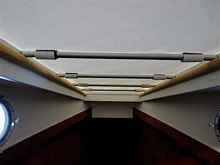
The next effort borrowed from the design of a tonneau cover I’d
had on the back of my pickup, featuring L-shaped rails on the
sides of the bed which supported tubular metal bows, which were
in turn attached to the vinyl covering with velcro strips. This
design had worked great on the pickup. The only problem with using
it on the boat was that I’d have to learn to use a sewing
machine. I did learn, and managed to do a serviceable job, I think.
The old, all-metal Singer machine had no trouble handling the
Sunbrella-Plus fabric (a remnant bought on--you guessed it--eBay),
and our local variety store supplied industrial-strength Velcro.
I relied on the adhesive backing to hold the Velcro onto the bows,
but sewed it to the cover because only the middle had to be fastened--the
rest wraps around the bows. Little squares of Sunbrella were cut
to place over the exposed Velcro adhesive to keep it from being
the best, most expensive, flypaper in the world.
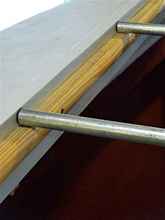
The bows are metal conduit cut to length and finished off with
plastic caps. The rails are more of the pine bullnose.
With grommets at the corners for bungees, the top worked fine
all summer, keeping the cabin completely dry in several fierce
rain storms, yet really easy to fold back when required.
 |
Underneath |
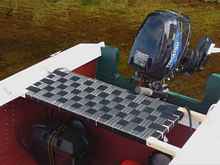
Completely outfitted, here’s what the cockpit and cabin
look like. The black thing on the bow deck is the rubber cup base
from an official Duckworks
LED running light. I got the one that’s supposed
to be glued to an inflatable boat, put a screw through the middle
of the cup, and bedded the whole thing in marine silicone. The
light itself removes with a simple pin arrangement for safekeeping
in the cabin when not needed.
 |
Cockpit |
The stern light, not visible here, is the same thing with a clear
lens, a pole, and a screw clamp. Since the nose of the Lake Skiff
is so high, and since the stern light is supposed to be higher
than the one in the bow, I had to extend the pole by about a foot
with a piece of aluminum tubing, but the whole thing is so light
anyway, even with batteries, that it doesn’t get wobbly.
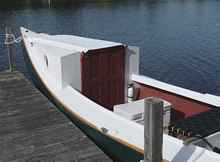
So how does it all work? Better than expected. This summer we
were able to use the boat for more than just a brief trial run,
and we’re quite pleased with its performance.
It fits (barely) under the highway bridge that divides one half
of our river/lake system from the other, so our cruising range
is effectively double that of a taller boat. But there’s
still enough headroom in the cabin for a smallish person (read
wife) to use the all-important porta-potty in complete privacy.
The Tohatsu 9.8 horse four-stroke is a lovely little motor, quiet
enough to have a conversation at cruising speed, extremely frugal
with gasoline, and more than powerful enough to do its job. Maximum
speed in relatively calm water is a bit more than 10 mph, according
to GPS. Adding more power pushes the nose up in the air more than
it adds speed; the boat/motor combination seems most comfortable
at around 7 mph or slower, which suits us just fine. I doubt that
a bigger motor would make much difference except to produce a
bigger wake, since my hull design is based on that of a sailing
crab skiff, not a planing powerboat. As is, nearly all of the
wake seems to come from the motor, not the hull, and the ride
is quite dry.
What would I do differently if I could start the build over again?
Not much. I’d take a little more time and care with the
joints in the chines and gunwales. I’d join all of the hull
panels on the flat garage floor prior to hanging them on the boat.
I’d use new, cut-to-fit pieces of fiberglass for deck and
cabin sheathing rather than scraps (too much sanding). And I’d
probably opt for a manual-start motor to save some weight. I bought
the electric-start version because it has a bigger alternator
and I thought that would be better for running electrical gizmos,
but as it turns out we don’t have any electrical gizmos
except the running lights, which run on their own little batteries.
The absence of gizmos means also the absence of wiring, fuses,
switches and such, and that’s all for the better, I think.
I’m also thinking about using my newly-learned sewing skills
to make a custom cover for the cockpit, since the tarp I used
this summer wasn’t nearly as reliable as I’d hoped.
And that’s about it. We’re well pleased with our new
boat and look forward to using it for a long time.

***** |