|
Part 7: Bulkheads
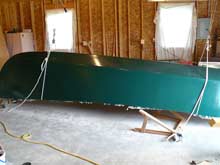
The Lake Skiff’s hull was planked and painted, but it was still upside-down on its sawhorses. What’s more, it was way too close to the back wall of the garage to get a trailer under it even after it was turned over. The best solution for this kind of problem is to enlist the help of muscular family members, friends, and neighbors. Unfortunately the only nearby family member was my wife, and she was on crutches from a bad fall. My neighbor, always the most helpful guy in the world, was out of town, and my best buddy, who had been involved in my boat projects since we built a canoe in his basement as high-schoolers, not only lived in far-off Connecticut, but had an even more decrepit back than mine. I was on my own.
 Once again my cleverness nearly killed me. My ingenious solution, designed to turn the hull over and move it back at the same time, wound up being another one of those “don’t try this at home” things. I rigged up a pair of come-alongs with pulleys and braided rope in a similar arrangement to the one I’d used to turn the hull over the first time. But this time, instead of hanging the rigs directly above the parts of the hull being supported, I attached them to the garage joists about three feet in the direction I wanted to move the boat, so that they pulled on a diagonal. Once again my cleverness nearly killed me. My ingenious solution, designed to turn the hull over and move it back at the same time, wound up being another one of those “don’t try this at home” things. I rigged up a pair of come-alongs with pulleys and braided rope in a similar arrangement to the one I’d used to turn the hull over the first time. But this time, instead of hanging the rigs directly above the parts of the hull being supported, I attached them to the garage joists about three feet in the direction I wanted to move the boat, so that they pulled on a diagonal. |
 I alternated lifting a little on first the front one, then the back one, and so forth. The process seemed to go smoothly for a while, and I was just congratulating myself on a job about to be well done, when a point was reached where the sawhorses fell down suddenly and violently, and the hull swung backwards and down RIGHT NOW. I was lucky I wasn’t standing in the way, and that even in their new vertical position, the lifting rigs were just short enough to keep the hull from crashing onto the garage floor. Whew! I alternated lifting a little on first the front one, then the back one, and so forth. The process seemed to go smoothly for a while, and I was just congratulating myself on a job about to be well done, when a point was reached where the sawhorses fell down suddenly and violently, and the hull swung backwards and down RIGHT NOW. I was lucky I wasn’t standing in the way, and that even in their new vertical position, the lifting rigs were just short enough to keep the hull from crashing onto the garage floor. Whew! |
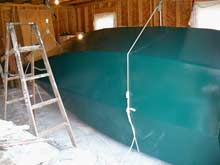 Next time I won’t try to do it all at once. But once the excitement was over I was able to turn the hull easily--the braided line/pulley system really works well--and slide the trailer under it. Next time I won’t try to do it all at once. But once the excitement was over I was able to turn the hull easily--the braided line/pulley system really works well--and slide the trailer under it. |
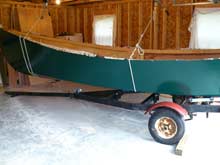 But not without first removing the winch strut. There just wasn’t enough clearance otherwise, even after I’d raised the hull as far as it would go with my lifting rigs. But not without first removing the winch strut. There just wasn’t enough clearance otherwise, even after I’d raised the hull as far as it would go with my lifting rigs. |
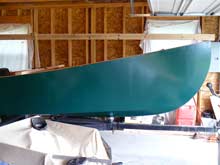
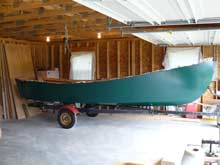 Once the trailer was turned around in the garage, the result of about a hundred 3-point turns, I was ready to start working on the interior fittings--but not before a lengthy pause to admire the shape of this hull, which had turned out despite all my bumbling and the still-protruding excess fiberglass cloth to be very pretty. Once the trailer was turned around in the garage, the result of about a hundred 3-point turns, I was ready to start working on the interior fittings--but not before a lengthy pause to admire the shape of this hull, which had turned out despite all my bumbling and the still-protruding excess fiberglass cloth to be very pretty. |
 The next step was to sand off that extra fiberglass and shape the top of the gunwales to the camber of the deck, a task made fairly easy by using the female template I’d made early in the construction process and my trusty old Craftsman belt sander. Then it was time to install the bow eye, a stainless one purchased from Duckworks. The legs of the eye were not quite long enough to go through the various stem layers and still provide room to attach the supplied keeper, so I left it off and just used the flat and lock washers under the nuts. Then, to add a bit of strength, I epoxied the hell out of everything. This photo shows the stem after sanding. The triangular opening at the very front, where the planking extends forward from the plywood stem, was filled with an epoxy pour from the keel to the top. I had visions of pouring gallons of expensive epoxy down this hole and having it disappear, but in fact it took a little more than a pint, and I’m convinced the added strength in this very important part of the boat was worth it. Not to mention the fact that if the bow eye pulls out now, it’s because the whole stem has collapsed and I’ve got a lot more to worry about than pulling the boat onto its trailer. The next step was to sand off that extra fiberglass and shape the top of the gunwales to the camber of the deck, a task made fairly easy by using the female template I’d made early in the construction process and my trusty old Craftsman belt sander. Then it was time to install the bow eye, a stainless one purchased from Duckworks. The legs of the eye were not quite long enough to go through the various stem layers and still provide room to attach the supplied keeper, so I left it off and just used the flat and lock washers under the nuts. Then, to add a bit of strength, I epoxied the hell out of everything. This photo shows the stem after sanding. The triangular opening at the very front, where the planking extends forward from the plywood stem, was filled with an epoxy pour from the keel to the top. I had visions of pouring gallons of expensive epoxy down this hole and having it disappear, but in fact it took a little more than a pint, and I’m convinced the added strength in this very important part of the boat was worth it. Not to mention the fact that if the bow eye pulls out now, it’s because the whole stem has collapsed and I’ve got a lot more to worry about than pulling the boat onto its trailer. |
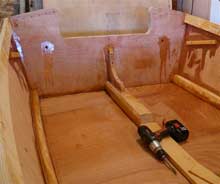
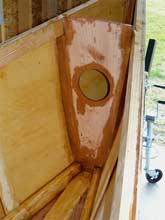 Next, the stem bulkhead was fitted and taped into place. The big hole in the middle is to accommodate a clear screw-out deckplate from Duckworks. I made extensive use of these plates throughout the Lake Skiff, to provide access and visual inspection capability to spaces that would normally remain sealed. The space between this bulkhead and the stem would later be filled with air bladders (wonderfully tough canoe end bladders from NRS), as would the space under the “slop shelf” aft (with a canoe midships bladder from the same source). I reasoned that the bladders would provide an extra safety factor in case of a puncture, without the fitting hassle and potential moisture trapping of foam floatation. In the off-season the bladders are deflated and removed, and the deck plates left open to allow for ventilation. When spring comes the bladders are stuffed back in and inflated, and the deck plates screwed shut. Next, the stem bulkhead was fitted and taped into place. The big hole in the middle is to accommodate a clear screw-out deckplate from Duckworks. I made extensive use of these plates throughout the Lake Skiff, to provide access and visual inspection capability to spaces that would normally remain sealed. The space between this bulkhead and the stem would later be filled with air bladders (wonderfully tough canoe end bladders from NRS), as would the space under the “slop shelf” aft (with a canoe midships bladder from the same source). I reasoned that the bladders would provide an extra safety factor in case of a puncture, without the fitting hassle and potential moisture trapping of foam floatation. In the off-season the bladders are deflated and removed, and the deck plates left open to allow for ventilation. When spring comes the bladders are stuffed back in and inflated, and the deck plates screwed shut. |
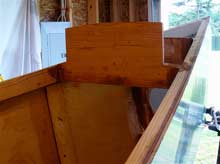
 I’d sketched some cabin designs, but now that I had to actually build a cabin in three dimensions, it took a while to visualize what it would look like and figure out how to apportion space between cabin and cockpit. I spent a lot of time looking at jury-rigged mockups, like the one in the photo below, before I finally settled on a design I hoped would work. I’d sketched some cabin designs, but now that I had to actually build a cabin in three dimensions, it took a while to visualize what it would look like and figure out how to apportion space between cabin and cockpit. I spent a lot of time looking at jury-rigged mockups, like the one in the photo below, before I finally settled on a design I hoped would work. |
 Leaving space on the forward deck for a little hatch (for anchors and stuff), the cabin front was fitted, and screwed and taped into place. Leaving space on the forward deck for a little hatch (for anchors and stuff), the cabin front was fitted, and screwed and taped into place. |
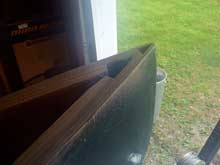
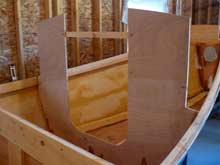 Then the aft cabin bulkhead was fitted and installed, with a temporary stiffener to keep it rigid. Note the temporary nails to hold the bulkhead in place while the first application of glue dries, and note also that at this point in construction the mold has not yet been removed. Then the aft cabin bulkhead was fitted and installed, with a temporary stiffener to keep it rigid. Note the temporary nails to hold the bulkhead in place while the first application of glue dries, and note also that at this point in construction the mold has not yet been removed. |
 The last bulkhead to be put in was in the stern, forming the front support for the slop shelf and the front wall of the aft floatation chamber. But first the shelf itself was constructed. Drain holes were drilled in the transom and the edge grain sealed with epoxy. Shelf supports were glued and screwed to the side planking. The last bulkhead to be put in was in the stern, forming the front support for the slop shelf and the front wall of the aft floatation chamber. But first the shelf itself was constructed. Drain holes were drilled in the transom and the edge grain sealed with epoxy. Shelf supports were glued and screwed to the side planking. |
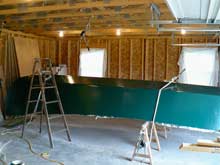
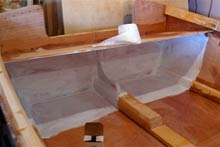 Once the shelf was in place, the floatation chamber was sealed with Kilz primer. Once the shelf was in place, the floatation chamber was sealed with Kilz primer. |
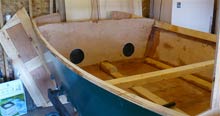 Finally the bulkhead was fitted and installed. Note the holes for deck plates. After this last bulkhead was firmly in place, I felt confident enough that the hull would hold its shape, to remove the mold and wedge a 2x4 in its place to keep the gunwales in position until the washboards were done. Finally the bulkhead was fitted and installed. Note the holes for deck plates. After this last bulkhead was firmly in place, I felt confident enough that the hull would hold its shape, to remove the mold and wedge a 2x4 in its place to keep the gunwales in position until the washboards were done. |
Next time: Finished enough to launch!
Afterword: If you read the last installment, you’ll remember the problems I had with random-orbit sanders. I’m happy to report that once I managed to maneuver through their customer support maze and talk to the right person, Bosch honored their warranty and repaired both sanders for free. They even sent me a UPS shipping label so that I’d have no out-of-pocket exoenses. Thanks, Bosch!
*****
|