| The Building of
my Harmonica "Gypsy"
Part
1 - Part 2 - Part
3 - Part
4 - Part
5 - Part
6 - Part 7
People have told me that I spend more time talking
about building boats than I actually spend building
them. However, as true as that may be, I have found
that if I will just spend a few minutes or maybe an
hour working on the boat each day, before I know it
the boat is almost finished. I say almost finished
because I don't believe a homebuilt boat is ever completely
finished!
In this section I will try hard to show more of the
actual construction of my Harmonica, "GYPSY",
and hopefully, spend less time talking about why I
did what I did! It will be hard…but I will try!
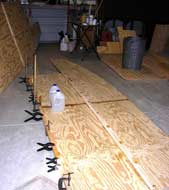
Compared to many boat designs, Jim Michalak's Harmonica
is very easy for an average person to build. Using
my dolly worktable it was easy to cut out the parts
for the bulkheads, and also cut the two plywood panels
that form the sides of the boat.
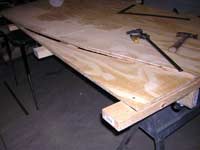 |
Photo showing
the cut bow curve on the side panels. |
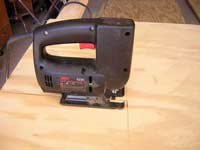
| I used a jig saw
and a skill saw to cut bulkhead plywood panel. |
|
After cutting out the side panels and setting them
aside, I started assembling the four bulkheads. Having
all of the parts already cut and in kit packages made
the actual assembly very easy. I used the surface
of the worktable to lay out the plywood and board
sections and to ensure that each bulkhead was square,
and all dimensions were in accordance to the plans
dimensions.
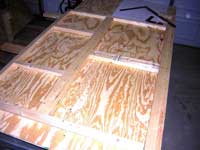 |
Bulkhead # 2
laid out on the worktable. |
Once a bulkhead was determined to be the correct
size it was taken to a heated area to be assembled
with epoxy and bronze ring nails. I used epoxy resin
to glue the plywood panels, but the bulkheads could
have easily been build with Weldwood Resorcinol Glue,
or a quality construction adhesive such as PL Premium.
| Bulkhead 2 assembled
with epoxy and nails. |
|
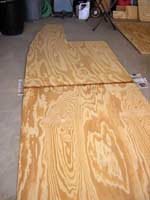
After the four bulkheads were glued and nailed together
I started the process of joining the two plywood panels
together to form the boat's sides. Taking the two
cut out 1/4-inch panels I laid them on the floor and
joined the two panel's ends together in a simple butt
joint. Nothing fancy, just a 1" by 4" board
under the two panels where the ends meet, with a bunch
of thicken epoxy, and some bronze ring nails to hold
it together until the epoxy cures.
 |
Side panel joined
with a butt joint. |
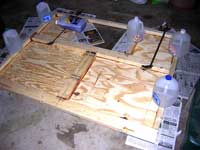
Once the side panel's epoxy had cured for about 24-hours,
I added the 1" by 2" and the 2" by
2" wooden strips to the sides for the sheer and
deck clamps.
| Adding sheer and
deck clamps to sides. |
|
I then started thinking about how I was going to
attach the bulkheads to the sides. I finally decided
that I would use my dolly as a jig to assist in holding
the sides while jointing the bulkheads with epoxy
and nails. The dolly/jig would also assist in ensuring
that the boat was built square, like the box it was
supposed to resemble!
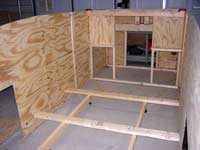
Since I was going to build the Harmonica with the
bottom up, I started the assembly process by standing
one of the side panel's upright with the bottom up,
and then placing the transom bulkhead at the aft end
of the panel. My sweet darling wife held the side
panel while I applied epoxy to the joining surfaces,
and nailed several nails through the panel and into
the bulkhead boards. I ensured that the insides of
the panel and the bulkhead were square to the outer
boards of the dolly/jig.
 |
Port side being
joined to transom bulkhead. |
| Close up view of
joined side and transom. |

|
With the side and transom bulkhead standing upright,
I moved the second side into position, and once again
with my wife's help, glued and nailed the side to
the transom.
 |
Second side
ready to attach to transom. |
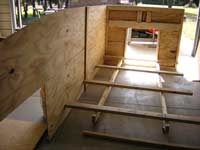
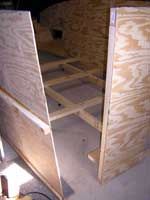
After the second side was joined to the transom I
slid the dolly/jig forward and attached bulkhead 3
to the sides with epoxy and nails. I then removed
the dolly/jig and attached bulkhead 2. Later that
day I glued the bow bulkhead to the sides. In the
bow photo you can see the bronze ring nails that I
used to attach the sides to the bulkheads. These nails
have great holding power and are much faster to install
than screws.
| Bulkhead 3 attached
to sides. |
|
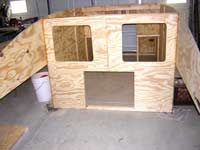 |
Bulkhead 2 attached
to sides. |
| Bow bulkhead attached
to sides. |
|
 |
Close up of
Bow |
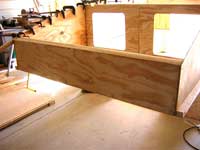
After the epoxy on the bulkheads had cured I then
took three 1" by 2" boards and ripped each
one into four or five strips. I then assembled enough
of these strips to form two soon to be laminated boards.
The actual measurements of these boards were 3/4"
thick by 1 1/2" wide. I could have built a form
to use to laminate the bow curve, but that seemed
to be a lot of work just for one boat. So I decided
to use "C" type clamps and wooden blocks
as jigs. Very simple and it worked very well. I believe
that you can understand how I did this by looking
at the photos showing the chine logs being laminated
and attached to the bottom of the boat's sides. In
a nutshell I used the top edge of a metal "C"
clamp to hold the wooden strips at the top of the
side, and a wooden block, held by the metal clamp,
to hold the strips from the bottom.
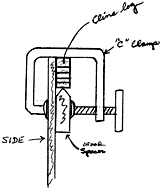
| Drawing showing
how a "C" Clamp would be used as a jig. |
|
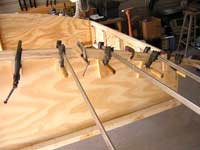 |
Bending the
laminated chine log. |
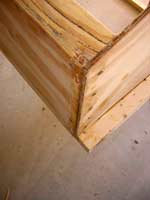
After dry fitting the wooden strips to test my proposed
jigs, I then wrapped the metal clamps and wooden blocks
with Glad Freezer Wrap so that the epoxy would not
make the "Jigs" a permanent part of the
boat! Laying the four or five wooded strips across
the bow and second bulkhead I coated the strips with
epoxy and joined them together. By attaching the first
metal clamp at the bow of the boat, and a second metal
clamp close by, I was able to form a bending jig of
sorts. I inserted the glued strips into the opening
formed by the first bow metal clamp, and bent the
laminated strips over the wooden block of the second
clamp. Working my way to the aft end of the wooden
strips I bent the strips and tighten the clamps so
that the top of the strips were even with the top
of the side.
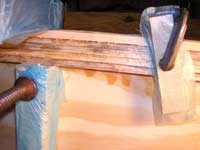
| Close up of laminated
strips and clamps. |
|
On
to Part 3

|