|
Sundowner Redux |

|
| By John Welsford - Hamilton,
New Zealand |
(Click
here for Part 1 - here
for Part 2)
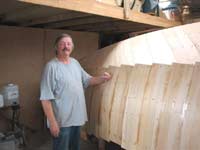
He’s back, the noises out in the workshop have
started again, the pile of shavings is growing, and
I have company once more. I’m used to working
on my own here but over the last few months have become
accustomed to having company so its good to have Charlie
back and things happening again.
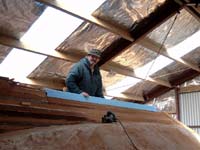
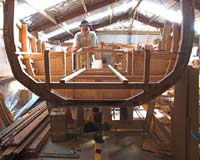
He’s pretty much got the first layer of planking
all faired off, and we will later today be working
out the angle and “lay” of the second
layer of 8.5mm kauri planking, and getting into the
swing of things again.
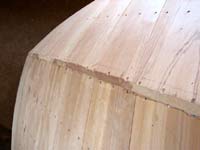 |
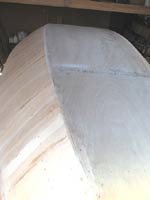
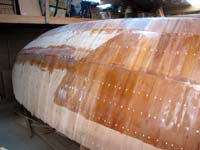
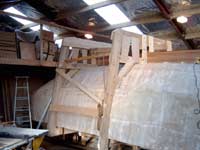
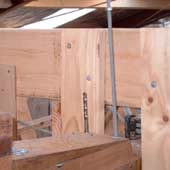
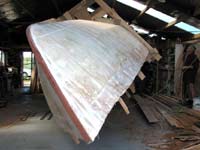
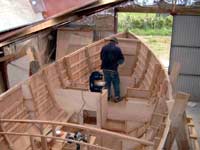
The chine
and surrounding planking all faired off
ready for the next layer to go on over
it. The topsides go on first, then the
chines and then the bottom so the overlaps
protect the edges in case of sliding off
some object that the boat is up against.
|
(click
images to enlarge) |
|
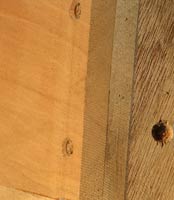
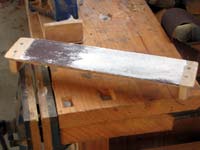
 Easier
than doing a scarf joint in place this fingerjoint
has about 4 times the area of a butt joint,
not normally enough to be really secure
but in this case the joint area is also
screwed down to a hardwood cross member
that acts not only to spread the stress
of the rig and keel but as a backing piece
for this join. There is also another layer
of 9mm ply and then fibreglass to go on
over the top. Strong! The joint itself is
easy, Charlie made a pattern to my drawing,
just a simple zigzag to the right proportions,
traced it on with a pencil and then cut
the toothed pattern with a saw. Easier
than doing a scarf joint in place this fingerjoint
has about 4 times the area of a butt joint,
not normally enough to be really secure
but in this case the joint area is also
screwed down to a hardwood cross member
that acts not only to spread the stress
of the rig and keel but as a backing piece
for this join. There is also another layer
of 9mm ply and then fibreglass to go on
over the top. Strong! The joint itself is
easy, Charlie made a pattern to my drawing,
just a simple zigzag to the right proportions,
traced it on with a pencil and then cut
the toothed pattern with a saw. |
|
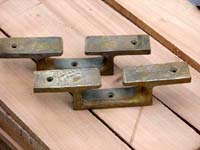 |
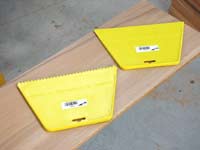
These
bow chocks will fit into Resolutions toe
rail up alongside the bowsprit, there
is room enough to drag a big anchor warp,
the eye splice and shackle and then the
chain in through them and they have good
solid bases for fastening them. Good buying!
|
|
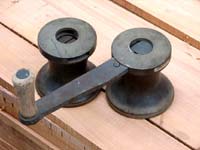
 Workshops
develop their own language after a while,
and we have fallen into the habit of describing
these as "wrenches" after a well
meaning helper filled out the shipping documents
for these nice bottom handle winches that
way. These "wrenches"will be Resolutions
jib sheet winches, good value as brand new
ones would be around $800.00! Workshops
develop their own language after a while,
and we have fallen into the habit of describing
these as "wrenches" after a well
meaning helper filled out the shipping documents
for these nice bottom handle winches that
way. These "wrenches"will be Resolutions
jib sheet winches, good value as brand new
ones would be around $800.00! |
|
|  Top
handle winches like this are great for
halyards, downhauls and so on, The Sundowners
rig being a gaff rig there is a lot of
rope, and these are destined for the after
end of the cabin top where each will handle
a group of halyards ( there are going
to be eight plus two downhauls ) through
a bank of sheet jammers. Top
handle winches like this are great for
halyards, downhauls and so on, The Sundowners
rig being a gaff rig there is a lot of
rope, and these are destined for the after
end of the cabin top where each will handle
a group of halyards ( there are going
to be eight plus two downhauls ) through
a bank of sheet jammers.
|
|
 |
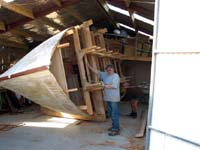
Thump
thump, grin! Solid, the second layer makes
a huge difference to the feel of the boat,
STRONG!!!!
|
|
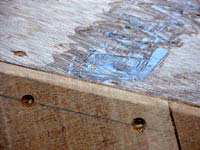
 Applying
glue in a controlled film thickness to large
areas of wood requires more than just buttering
it on, and the notched trowel leaves ridges
of set size at set spacings which when squashed
out in between two layers of wood give a
known and controlled thickness of glue film.
In this case we have allowed enough to fill
the gaps between the planks and any irregularities.
The flat spreader is used to apply a thin
layer to the "other" surface so
there is full glue coverage to seal the
wood. Applying
glue in a controlled film thickness to large
areas of wood requires more than just buttering
it on, and the notched trowel leaves ridges
of set size at set spacings which when squashed
out in between two layers of wood give a
known and controlled thickness of glue film.
In this case we have allowed enough to fill
the gaps between the planks and any irregularities.
The flat spreader is used to apply a thin
layer to the "other" surface so
there is full glue coverage to seal the
wood. |
|
|  We
took a day off to go to the big classic
boat regatta at Mahurangi, camped in my
tent at teh Auckland Regional Council
campground at O'Sullivans Bay on the other
side from the regatta headquarters. Heres
the view from the tent door of Charlie
looking out over the estuary mouth, no
doubt smelling the salt air and thinking
of the voyage to come. We
took a day off to go to the big classic
boat regatta at Mahurangi, camped in my
tent at teh Auckland Regional Council
campground at O'Sullivans Bay on the other
side from the regatta headquarters. Heres
the view from the tent door of Charlie
looking out over the estuary mouth, no
doubt smelling the salt air and thinking
of the voyage to come.
|
|
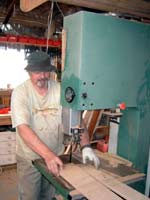
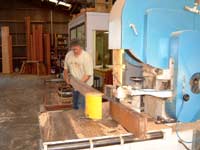 This
is a Band Resaw, quite a small one in sawmill
terms but still 25 horsepower and a 100mm
wide blade. That big drum alongside the
wood houses a power feed that is pulling
that lumber through the machine at about
50 ft a minute, and the narrow bandsawblade
is only taking out about 2mm. A circular
saw capable of doing the same job will take
out about 4.5mm and in repetitive cutting
that's a lot to lose. Charlies concentrating
hard on lining up that baulk of kauri, I'll
pick up the two pieces, slide the finish
cut piece off and send the other back for
the next cut. It took less than 15 minutes
to cut 32 pieces!. Thanks Malcom for letting
us use it. This
is a Band Resaw, quite a small one in sawmill
terms but still 25 horsepower and a 100mm
wide blade. That big drum alongside the
wood houses a power feed that is pulling
that lumber through the machine at about
50 ft a minute, and the narrow bandsawblade
is only taking out about 2mm. A circular
saw capable of doing the same job will take
out about 4.5mm and in repetitive cutting
that's a lot to lose. Charlies concentrating
hard on lining up that baulk of kauri, I'll
pick up the two pieces, slide the finish
cut piece off and send the other back for
the next cut. It took less than 15 minutes
to cut 32 pieces!. Thanks Malcom for letting
us use it.
If you need this sort of machinery
companies such as the bigger joinery companies,
millwork and wood machining outfits, sawmills
and fingerjointing companies and laminated
beam manufacturers all use them. If you
phone and are very nice they may do the
job for you, don't count on being allowed
to use the machine yourself though they
need a trained operator on both ends.
|
|
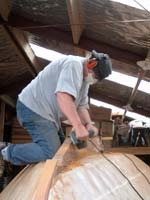
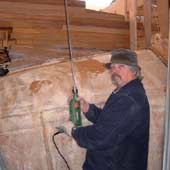
| 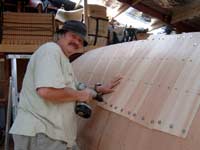 More
planks, back to the cordless drill, this
is the beginning of the chine panel, port
side. Although you cant see it in the
photos the second layer is seriously solid,
really good. Charlie gives it a thump
with his fist now and again and I can
"hear" him smiling when he does
as its really reassuring. I've been over
the completed area with a wooden mallet
sounding for voids or hollows, not a one!
The system is working! More
planks, back to the cordless drill, this
is the beginning of the chine panel, port
side. Although you cant see it in the
photos the second layer is seriously solid,
really good. Charlie gives it a thump
with his fist now and again and I can
"hear" him smiling when he does
as its really reassuring. I've been over
the completed area with a wooden mallet
sounding for voids or hollows, not a one!
The system is working!
|
|
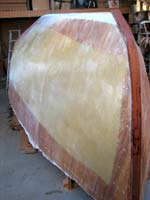
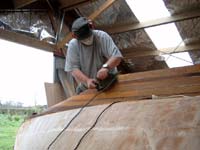
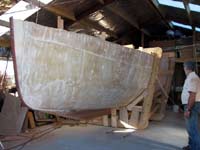
A view along
the bottom showing the bottom panel ready
for the next layer of 9mm plywood. The keel
goes along the centreline and will be through
bolted to the hardwood frame cross members
just through the plywood.
|
|
|
 |
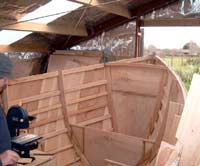
A shot
of the intersection of the double side
planking and the bottom panel before the
second layer goes on, nice tight joints
and you can see how solid the side panels
are. Its very important in this type of
construction to ensure that there are
no voids between the layers, that leads
to rot, loss of strength and bumps in
the hull.
|
|
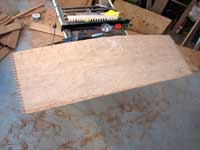
| This is one
of the panels ready to go on, note the template
for the tooth pattern on the panel ends,
this zigzag pattern when screwed to the
frame cross members underneath are as strong
as a scarf joint but is much easier to make
in place on a curved surface. |
|
|
| 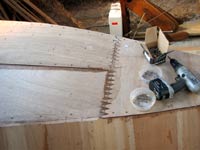 Working
back from the bow, the second piece on
and the screws going in. Across the joints
and down the centre of the bow piece the
screws are 25mm x 10 g as there is material
behind to screw into. But after the glue
is applied the main parts of the panel
are fastened together with 12mm x 10 c/s
head screws on a 200mm grid spacing to
ensure that there are no voids between
the panels. Working
back from the bow, the second piece on
and the screws going in. Across the joints
and down the centre of the bow piece the
screws are 25mm x 10 g as there is material
behind to screw into. But after the glue
is applied the main parts of the panel
are fastened together with 12mm x 10 c/s
head screws on a 200mm grid spacing to
ensure that there are no voids between
the panels.
|
|
 We
laid on 200mm wide tapes cut from the same
10 oz biaxial fibreglass as the boat is
skinned with, then sanded off the rough
edges and spikes. Next we primed the wooden
skin where the Kevlar was to be, and pre
cut the fibreglass and Kevlar cloths ready
to drape on and saturate with epoxy. We
laid on 200mm wide tapes cut from the same
10 oz biaxial fibreglass as the boat is
skinned with, then sanded off the rough
edges and spikes. Next we primed the wooden
skin where the Kevlar was to be, and pre
cut the fibreglass and Kevlar cloths ready
to drape on and saturate with epoxy. |
|
|  With
the fibreglass on and wetted out you can
see the Kevlar crash mat between the 'glass
and the wooden skin. The Kevlar covers
the area most likely to be damaged if
the boat hits a floating object, whether
a container, a dead tree or ice. The intention
is that although Kevlar does not add greatly
to the strength, it's very hard to puncture
and will greatly reduce the inflow of
water; improving the chances of effective
damage control should Resolution hit something
hard. With
the fibreglass on and wetted out you can
see the Kevlar crash mat between the 'glass
and the wooden skin. The Kevlar covers
the area most likely to be damaged if
the boat hits a floating object, whether
a container, a dead tree or ice. The intention
is that although Kevlar does not add greatly
to the strength, it's very hard to puncture
and will greatly reduce the inflow of
water; improving the chances of effective
damage control should Resolution hit something
hard.
|
|
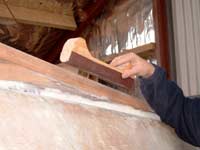
 Getting
a nice even finish on the fibreglass takes
a lot of work. I am sure that Charlie's
shoulders grew noticeable with the work
that he put in over a couple of weeks. This
is a short 'longboard" with 60 grit
commercial sandpaper contact glued to it.
It sands the tops off the bumps and leaves
the hollows showing clearly so they can
be filled. We used West Resin with 410 Microlite
mixed in and applied with a roller, then
spot filling with a steel putty knife. Getting
a nice even finish on the fibreglass takes
a lot of work. I am sure that Charlie's
shoulders grew noticeable with the work
that he put in over a couple of weeks. This
is a short 'longboard" with 60 grit
commercial sandpaper contact glued to it.
It sands the tops off the bumps and leaves
the hollows showing clearly so they can
be filled. We used West Resin with 410 Microlite
mixed in and applied with a roller, then
spot filling with a steel putty knife. |
|
|  With
the glass on, it's the keel next. Great
big lumps of 150mm x 70 mm Kwila. This
stuff is HEAVY! There will be about 300
kg of it in the keel structure, plus of
course the 720 kg of the lead casting!
Here is a view of the area around the
propshaft and propellor aperture. There
is a lot of shaping to go as yet and although
we use an angle grinder with coarse sandpaper
to sculpt softwood, it just makes clouds
of smoke on this very dense wood so we
are looking for a tungsten carbide tipped
wood carving disc to complete the job. With
the glass on, it's the keel next. Great
big lumps of 150mm x 70 mm Kwila. This
stuff is HEAVY! There will be about 300
kg of it in the keel structure, plus of
course the 720 kg of the lead casting!
Here is a view of the area around the
propshaft and propellor aperture. There
is a lot of shaping to go as yet and although
we use an angle grinder with coarse sandpaper
to sculpt softwood, it just makes clouds
of smoke on this very dense wood so we
are looking for a tungsten carbide tipped
wood carving disc to complete the job.
|
|
Charlie will
have this in his hand for a lot of hours,
the tiller is laminated from layers of lovely
rich red Jarrah hardwood and pale honey
coloured Fiji Kauri. It has a nice, reassuringly
solid feeling about it and looks stunning.
|
|
|
 |
Its a
slow and noisy job planing the deadwood
smooth and getting the beginnings on the
foil shape on the leading edge, not only
noisy but the dust is nasty stuff to breath
so its on with all the protective equipment.
|
|
There is a
capping to go on that leading edge yet,
and another big piece of hardwood to go
on the after section of the keel. Lots of
shavings, and a lot of freehand work with
the planer to get it all smooth and streamlined.
|
|
|
|  The
mainsail with its unbattened hollow leach
all spread out. Note that this sail has
3 rows of reefing, the storm staysail
takes over when it gets beyond this, the
boom and gaff can be then strapped down
to the gallows and with the small jib
the trysail gives enough drive to control
the boat in really heavy weather. The
mainsail with its unbattened hollow leach
all spread out. Note that this sail has
3 rows of reefing, the storm staysail
takes over when it gets beyond this, the
boom and gaff can be then strapped down
to the gallows and with the small jib
the trysail gives enough drive to control
the boat in really heavy weather.
|
|
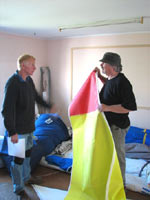
| Sailmaker
Tony Thornburrow ( left) and builder Charlie
Whipple under his famous hat talking over
colour and cut for the gaff topsail. This
sail, although small is set right up high
and will make a real contribution to the
boats light weather performance. |
|
|
|  Tony
and I talking over the fitting up of the
staysail, there is a set of reefing points
on this sail and there are several options
as to how the fittings and reef lines
will work. With a boat as stable as Sundowner
the reef will not be required until its
seriously rough so getting the gear easy
to use is very important. Tony
and I talking over the fitting up of the
staysail, there is a set of reefing points
on this sail and there are several options
as to how the fittings and reef lines
will work. With a boat as stable as Sundowner
the reef will not be required until its
seriously rough so getting the gear easy
to use is very important.
|
|
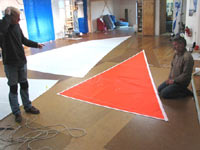
 Left
to right, Storm Trysail, Staysail (that’s
the inner jib) and the storm jib. This high
visibility 10 oz cloth is made for use as
storm sails, its really tough and the sails
are constructed very strongly. These sails
are as tough as you will see on any boat
under about 40 ft long and the highly visible
colour scheme is part of the strategy to
make a very ambitious voyage as safe as
possible. Left
to right, Storm Trysail, Staysail (that’s
the inner jib) and the storm jib. This high
visibility 10 oz cloth is made for use as
storm sails, its really tough and the sails
are constructed very strongly. These sails
are as tough as you will see on any boat
under about 40 ft long and the highly visible
colour scheme is part of the strategy to
make a very ambitious voyage as safe as
possible. |
|
|  My
purchase of an Arbourtech power wood carving
tool has made the prospect of having to
remove a lot of wood from the area around
the propellor aperture a much less daunting
prospect. There is a lot to carve out
to fair the waterflow in that area, and
the Arbourtech when fitted to my little
115mm Ryobi angle grinder made very short
work of shaping up an offcut. My
purchase of an Arbourtech power wood carving
tool has made the prospect of having to
remove a lot of wood from the area around
the propellor aperture a much less daunting
prospect. There is a lot to carve out
to fair the waterflow in that area, and
the Arbourtech when fitted to my little
115mm Ryobi angle grinder made very short
work of shaping up an offcut.
|
|
 We
sliced up the 2ft x 8 ft x 2in ( 600 x 2400
x 50 mm) blue polyurethane foam sheets on
the table saw, cut just a couple of mm wider
than the lead casting needed to be. Charlie
has spent a couple of days up on the boat
gluing a stack of these baulks together
with Gorilla Glue. Note that this glue foams
and swells the joint unless well weighted
down so we had to carry in a stack of brick
sized blocks of stone to weight it down. We
sliced up the 2ft x 8 ft x 2in ( 600 x 2400
x 50 mm) blue polyurethane foam sheets on
the table saw, cut just a couple of mm wider
than the lead casting needed to be. Charlie
has spent a couple of days up on the boat
gluing a stack of these baulks together
with Gorilla Glue. Note that this glue foams
and swells the joint unless well weighted
down so we had to carry in a stack of brick
sized blocks of stone to weight it down. |
|
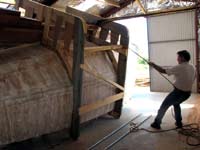
|  The
rollover cradle doubles as the boats supports
and cradle when upright, and it has to
be strong enough to enable the hull to
be rolled onto its side, then slid sideways
to give enough space for the next half
rotation. You can see that we have a lot
of gear to move in the morning so we can
roll the boat. The
rollover cradle doubles as the boats supports
and cradle when upright, and it has to
be strong enough to enable the hull to
be rolled onto its side, then slid sideways
to give enough space for the next half
rotation. You can see that we have a lot
of gear to move in the morning so we can
roll the boat.
|
|
| A long drill
bit, the longest hole required is about
850mm, this extended bit is just under a
metre long. So far it seems to run very
true. |
|
|
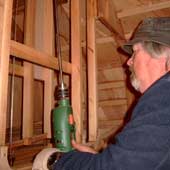 |
Starting
the drill in one of the holes, you can
see the plumb bob in the background and
how hard Charlie is concentrating. The
drill is to push the drill in about 20mm,
pull it out and clear the waste and then
in for another 20mm. Takes only a few
minutes, perhaps 5 or so to drill 600mm
and it tracks perfectly. |
|
| One of the
temporary bolts in place, just 9mm mild
steel threaded rod to temporarily secure
the keel while the boats being moved around.
You can see the drill has just broken through
the surface to complete the second hole
of this pair. |
|
|
 |
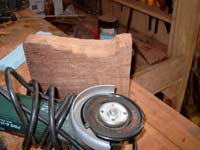
The Arbourtech
, mounted in my Bosch angle grinder is
doing a fair job of carving the complex
shape around the prop shaft tube. I need
some more practice but its going to do
the job. |
|
| To shape the
fillet that fairs the keel to the bottom
is a slow job, so I got Charlie to make
up this little shaped sanding block, its
got 40 grit commercial sandpaper contact
glued to what is just an offcut piece of
two by four, and handles cut with the bandsaw.
Useful tool! |
|
|
 |
A good
shot of the cradle and the block and tackle
set used to heave the boat over. A similar
block and tackle set was used on the other
side to take control as the hull came
past the balance point. |
|
| I'd eyeballed
the ceiling height as being just adequate,
and with her part way up it was time to
check. We were ok, just! We lost one light
bulb when the cradle contacted it, but otherwise
we had about a handspan width to spare. |
|
|
|  Halfway
- the building frame is about to come
off, and the hull can then be moved across
on the pipe rollers to position her for
the next stage of the rollover. This workshop
is only just big enough to flip the boat
without having to drag her outside, but
with some care it worked out fine. Halfway
- the building frame is about to come
off, and the hull can then be moved across
on the pipe rollers to position her for
the next stage of the rollover. This workshop
is only just big enough to flip the boat
without having to drag her outside, but
with some care it worked out fine.
|
|
| Up the right
way! Yeehah! No accidents, not even any
"oops's". |
|
|
 |
Done,
the happy builder sitting at what will
become the galley. How’s that for
a big grin! |
|
| Ready for
the next few months intensive activities,
there's lots to be done but its mostly a
lot of small jobs rather than huge pieces
of lumber and heavy work. |

|
|
|  Use
your imagination here. Right up in the
bow is the forward crash bulkhead, Charlie
beginning the process of bonding it to
the skin with wooden fillets and glass
tapes. Forward of that will be an anchor
well up at deck level, and an awning locker
behind a watertight hatch under that.
Just in front of the builders knees is
a half crash bulkhead ahead of which is
to be a chain locker, with sail storage
each side of that. The chain will live
in a canvas bag slung from supports low
down in the boat, and it will run in through
a deck fitting and chain pipe. Where Charlie
stands there will be a portapotty, and
an area set up as a washroom and ablutions
area, each side of that there will be
big bins with smaller lockers up under
the decks for Bosuns stores. Plenty of
room up here. Use
your imagination here. Right up in the
bow is the forward crash bulkhead, Charlie
beginning the process of bonding it to
the skin with wooden fillets and glass
tapes. Forward of that will be an anchor
well up at deck level, and an awning locker
behind a watertight hatch under that.
Just in front of the builders knees is
a half crash bulkhead ahead of which is
to be a chain locker, with sail storage
each side of that. The chain will live
in a canvas bag slung from supports low
down in the boat, and it will run in through
a deck fitting and chain pipe. Where Charlie
stands there will be a portapotty, and
an area set up as a washroom and ablutions
area, each side of that there will be
big bins with smaller lockers up under
the decks for Bosuns stores. Plenty of
room up here.
To port with the little
bandsaw on it is the galley, not large,
just a single burner stove and a bucket
for a sink. The KISS ( keep it simple,
stupid) principle applies here while to
starboard you can see the framing for
the chart table and the storage drawer
underneath it. |
|
 A
photo from John Leathwick, looking in where
the transom will be fitted soon, you can
see the shaft and propellor loose fitted
in the stern tube, the supports for the
cockpit floor, the seat framing and the
back of the engine bay. The after end of
the cockpit has a big locker that reduces
the cockpit volume and provides secure storage
for smellys such as paint, kerosene for
the stove and lights, alcohol primer, and
spare gas cylinders for a little camping
stove that might be used in storm conditions.
John Leathwick photo. A
photo from John Leathwick, looking in where
the transom will be fitted soon, you can
see the shaft and propellor loose fitted
in the stern tube, the supports for the
cockpit floor, the seat framing and the
back of the engine bay. The after end of
the cockpit has a big locker that reduces
the cockpit volume and provides secure storage
for smellys such as paint, kerosene for
the stove and lights, alcohol primer, and
spare gas cylinders for a little camping
stove that might be used in storm conditions.
John Leathwick photo. |
|
 |
There
seems to be a lot of space up here in
the forward end of the empty hull, but
have a look at the next pic, there are
a lot of functions and storage to fit
in. |
|
 Big
deep storage bins each side, mostly for
heavy and bulky items, smaller lockers up
under the decks, the big space at floor
level will be home for the portable head
that you see sitting on top of the lockers
to port, and of course the navigation table
/ office. Note that there is a chain locker
forward of that half bulkhead, a hanging
locker just forward and to port of the galley
bench, and the house battery box down low
just to port of midships forward of the
galley. That empty space is about as crowded
as you'd want it. Big
deep storage bins each side, mostly for
heavy and bulky items, smaller lockers up
under the decks, the big space at floor
level will be home for the portable head
that you see sitting on top of the lockers
to port, and of course the navigation table
/ office. Note that there is a chain locker
forward of that half bulkhead, a hanging
locker just forward and to port of the galley
bench, and the house battery box down low
just to port of midships forward of the
galley. That empty space is about as crowded
as you'd want it. |
|
| 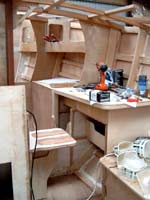 The
Navigation Station/Office iis a particularly
nice space, just the right size to enable
the skipper to wedge himself in securely,
room for the laptop, a chart, books and
all the rest to be laid out. As you read
"THE BOOK" ( by Charles T Whipple,
there will be one, count on it) you will
be able to visualise the Author sitting
in here while the boat rests in a tranquil
anchorage somewhere, hammering away at
his laptop composing the words that you
read as you sit in your armchair. The
Navigation Station/Office iis a particularly
nice space, just the right size to enable
the skipper to wedge himself in securely,
room for the laptop, a chart, books and
all the rest to be laid out. As you read
"THE BOOK" ( by Charles T Whipple,
there will be one, count on it) you will
be able to visualise the Author sitting
in here while the boat rests in a tranquil
anchorage somewhere, hammering away at
his laptop composing the words that you
read as you sit in your armchair.
Under the chart
table you can see a large tray which is
chart storage, I'd guess that it will
take about 40 charts if needed. There
are a couple of smaller lockers under
that, set back to give clearance for knees,
and the tall opening is for a rubbish
( trash) sack. Its uncommon to see a decent
workspace in such a small boat, and even
in one as roomy as this its only the specialised
singlehanded layout that will accommodate
such a luxury. Nice though! |
|
 This
space started out as a narrow access from
the main cabin to the forepeak, but with
a slight change and that little folding
seat its a near perfect workspace for a
sailing journalist, so when you read the
stories written while away on the voyage
you will be able to see in your minds eye
the author seated at his desk, pen in hand
and hard at work. This
space started out as a narrow access from
the main cabin to the forepeak, but with
a slight change and that little folding
seat its a near perfect workspace for a
sailing journalist, so when you read the
stories written while away on the voyage
you will be able to see in your minds eye
the author seated at his desk, pen in hand
and hard at work. |
|
 |
That's
Charlie at my big 20inch bandsaw slicing
up some more plywood, another piece marked
out, cut, sanded, drilled and fitted.
One less to do. |
|
 The
really keen of eye will see that the camber
of the foredeck varies, and yes there is
a reason. It is flatter forward where the
hatch will be fitted, and the lower camber
makes it easier to walk on. There is more
camber at the after end to give adequate
headroom under the deck where the "Office"
is and to allow easier access when going
forward. Mind your head! The
really keen of eye will see that the camber
of the foredeck varies, and yes there is
a reason. It is flatter forward where the
hatch will be fitted, and the lower camber
makes it easier to walk on. There is more
camber at the after end to give adequate
headroom under the deck where the "Office"
is and to allow easier access when going
forward. Mind your head! |
|
We expect a big box of silicone bronze keelbolts
from Port Townsend Foundry in the next day or so,
and when they are in place will be swinging the engine
up and over the gunwale to sit in place while the
exhaust, fuel tanks and lines, and all the other engine
stuff is positioned and fitted. I’ve got to
draw the engine beds and the rest of the engine box
and will have to get going so all the details are
all ready for the installation.
John Welsford,
Designer.

More on Sundowner/Resolution:
|