|
Sundowner So Far |

|
|
By John Welsford - Hamilton, New Zealand |
click
here for Part 1
Sailing around the globe is a dream that quite a
few have, sitting by a winter fireplace and reading
the likes of Lin and Larry Pardey, Eric Hiscock or
perhaps Shane Acton. Dreaming of dark blue water and
startlingly white foam, tradewinds and pure white
beaches with palms nodding, the wind in the rigging
and a shout of “land ho”! Charles Whipple
has that dream, a long time sailor whose family is
now able to do without him for a while he’s
out in my workshop right now, hear the banging? The
Sundowner (his name for her is Resolution) is intended
to carry Charlie from New Zealand, around Cape Horn,
across the South Atlantic to Capetown, then the long
long sail across the Southern Indian Ocean to Perth
in Western Australia and backl to New Zealand. After
that the sail back to Wife and some of his family
in Japan will be easy stuff!
Here is a picture story of Charlie's progress so far:
|
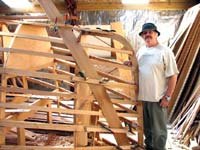
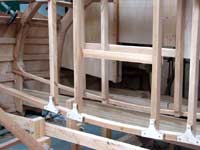
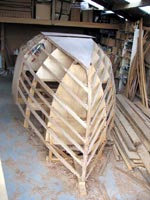
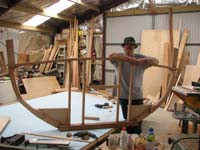 Charles Whipple, boatbuilder, author, adventurer. The frame is B#7, the one across the aft end of the main cabin, you can see the uprights that outline the engine bay, wet locker ( starboard side) and battery box and tool locker ( port side) and the shape of the quarter berths each side of those. Charles Whipple, boatbuilder, author, adventurer. The frame is B#7, the one across the aft end of the main cabin, you can see the uprights that outline the engine bay, wet locker ( starboard side) and battery box and tool locker ( port side) and the shape of the quarter berths each side of those.
(click images for larger views) |
|
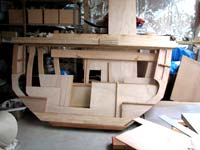
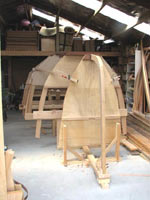
| The pile of finished frames grows, a new one every couple of days. You can see here the shape of the galley and chart table on B# 5, this bulkhead is about where the aft chainplates are and the plywood webs are in part there to spread the rigging loads. |
|
|
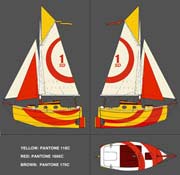 |
Resolution, a possible colour scheme, certainly highly visible |
|
| Aristocat Lord McLeod of Matangi CBW (Cloudy) doing the rounds of the workshop. All well? If not, why not! |

|
|
 |
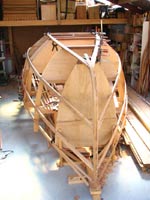
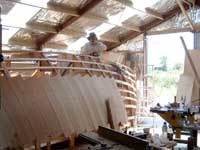
A view from forward, the stem is close to 6ft high where it intersects the 12mm plywood crash bulkhead (B#1), and you can see the powerful hull form emerging from what was a collection of odd looking parts.
|
|
| Chines in place |
|
|
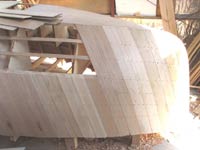
The first plank! Yeehah ! Note too the height of the stem, the gunwale at the stem is only about 100mm off the concrete floor, so you can get an idea here just how tall that stem is, this is a big boat, for a little boat, if you know what I mean.
Also visible, just! Are the inner breasthooks that we have put across the stringer pairs to reinforce the stringer to stem joint, if this boat hits something, I don't want the stringers and planking being sprung off the stem and leaking so we have built in a bit of insurance here.
|
|
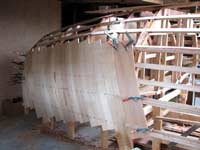 |
From outside, these angled planks are the first layer, each one an easily handled piece of wood that fits relatively quickly over the faired stringers. It feels impressively stiff even with just one layer on.
|
|
| From inside you can see just how strong the frames and stringers are, remember this is a boat that is only 6.5m ( about 21 ft) long. This is the view of the inside of the port side topsides from the engine bay under what will be the forward section of the cockpit. |
|
|
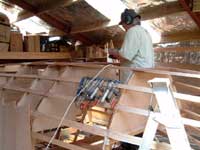 Heres Charlie hard at work with the planer, carving the Jarrah cross member on one of the frames down so the plywood will fit the bottom in a nice even curve. For those who wonder, its summer here, balmy weather and about 27deg C today, very little wind and the glue kicks off pretty quicly without it being so hot that we melt into a puddle of sweat.
|
|
A shot along the port topsides showing the inner skin of the topsides making progress forwards.
|
|
|
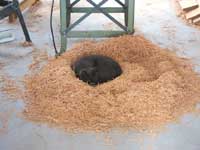 |
A Cats bed, took ages to make and only the very best wood shavings will do. He only sleeps there until we get the machinery going in the morning and I caught him still in bed this morning.
|
|
Bottom panel on from stem back to B#4. This is the first layer of two thicknesses of 9mm ( 3/8in ) plywood that forms the bottom, and each join is placed on a hardwood cross floor and staggered by one frame so there are no weak spots.
|
|
|
 |
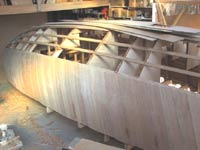
Planking up to the bow, real progress visible here. Although only dry fitted when the pic was taken the 8.5mm planks formed the hollow entry easily and with some attention will fair up well for the next layer when glued on. The boat has a much sharper entry than one might expect, part of my attempt to reduce pitching in a head sea.
|
|
The bow section, we are beginning to get an impression of just how big this boat is. Charlie of course will have more of a feeling for that than I as he is the one with the blisters on his hands from fitting all that planking.
|
|
|
|
 We will have to move all the machinery soon so we can get you a good photo from a little distance, but even from this close up the view from alongside the bow aft show that the little boat is a very curvy lady, the way she is planked up with curves in her topsides makes her not only a great deal stronger than a flat panel but much nicer looking that a slab sided sheet ply boat of these proportions would have been. We will have to move all the machinery soon so we can get you a good photo from a little distance, but even from this close up the view from alongside the bow aft show that the little boat is a very curvy lady, the way she is planked up with curves in her topsides makes her not only a great deal stronger than a flat panel but much nicer looking that a slab sided sheet ply boat of these proportions would have been.
|
|
A brand new grandson, Welcome to the world Hibiki. (Otherwise known as "Prince", I suspect that grandmum had a say in that! )
|

|
|
|
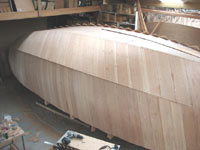
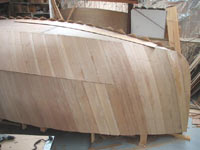 Planked up, the first layer complete. The shape is looking good, and she is almost ready for the second layer of kauri. Note that the skin will be close to 20mm ( ¾ inch) thick when complete, that's two layers of 8.5mm wood, and a layer of 10 oz fibreglass in epoxy over the outside, plus a Kevlar crashmat in between the glass and the wood in the forward sections where she might hit something sharp. Planked up, the first layer complete. The shape is looking good, and she is almost ready for the second layer of kauri. Note that the skin will be close to 20mm ( ¾ inch) thick when complete, that's two layers of 8.5mm wood, and a layer of 10 oz fibreglass in epoxy over the outside, plus a Kevlar crashmat in between the glass and the wood in the forward sections where she might hit something sharp.
|
|
We want her to be tough, remember that this little boat is only 21 ft 4in on deck, and I know of a lot of boats twice that length with less strength. Its survival and comfort that's important here rather than making 15 knots on a screaming reach.
|
|
|
Charlie is off home for about two weeks , its been 6 months since he arrived and during that time he’s achieved a great deal in terms of building his dreamboat. He’s also had a visit from his Wife Yukiko and showed her a little of New Zealand, and now has a brand new Grandson back at home so wants to go and hold the little fellow and get to know him a little.
The day before he left he put the last piece of kauri on the port side chine panel so “Resolution” now has the first of her two layer skin complete. Its made a big difference to the way the boat looks, both inside and outside. Her shape is now well evident, deep and wide, but with a fine entry and easy run back to the stern from her powerful midship sections. I try to visualise the shape in my mind when drawing, but its always a revelation to see the real thing, and this looks good.
Well, its awfully quiet out there, the cat thinks that he has been abandoned, the machinery is all idle, and I’d guess that I should get on with grinding and resetting the knives in the planer so the next layer goes on easily.
John Welsford
Designer.

For more on Sundowner/Resolution:
|