|
Building Tree Frog Pram
By Terry Lesh
Decisions:
I needed a pram/tender for my 18’ Baymaster
Cuddy Dory Sloop when I visit the San Juans or other waters needing
shore access. I enlisted the help of my friends on our interest
list and got lots of feedback. I wanted a pram as
small as possible, as light as possible, yet able to carry 425#
safely with adequate freeboard, stable entry from another boat,
towable, beachable and salty looking.
I considered a number designs from Bolger,
Michalak, Vartalia, Welsford,
McCallum and others. These included: The Elegant Punt, Tender
Behind, Micro Auray, Minnie Auray, Tween,
Nymph, Rubens Nymph, Peanut Pram, Simple Dinghy, and the Tree
Frog.
I did a lot of work here: I downloaded all the
basic dimensions of each of these boats, rescaled them to a two-dimensional
drawing and compared each of them for buoyancy, freeboard, looks,
and weight.
The winner is John McCallum’s Tree
Frog. It’s dimensions are 7’ 8”
x 4” 2”, with a good 14” freeboard. John estimates
the weight to be about 75#. It’s an interesting design with
a modified garvey style bow and slightly twisted side panels running
some tumblehome along the side panels as they run aft toward the
bottom of the transom.
What happened here was I liked the Auray Punt
redesigns by Hannu Vartiala (Hannu’s
Boatyard) so much I tried to rescale his computer
design to meet my requirements. But they were a little lacking
in my requirements. I rescaled his design to meet my requirements,
posted them, and got feedback that I had just designed the Tree
Frog! This gave me some ethical issues to think about. Having
experience enough in boat building to build from my own sketches,
should I go ahead and do it, or should I honor John by buying
his plans? Thanks to my buddies, the Coots, I was advised to just
go ahead and buy the plans as $38 gets complete instructions,
offsets, support and goodwill from a fellow boater. Well advised.
Fortunately John lives in my area so I went
out to see him and look at the original Tree Frog he had built.
I was quite impressed with the appearance, room, freeboard, buoyancy
capacity and general layout for such a small boat. Tree Frog has
unique seating arrangements for an 8’ pram, which can get
crowded with even one passenger. John says it will fish two adults,
and ferry three ship to shore. Tree Frog has a good size transom
seat, and a two-position rowing seat amidships, with two strategically
placed rowing stations to adjust trim/load requirements.
A perusal of the plans impressed me and of course
I bought them. John has gone to a lot of work here. There are
some 10 pages of detailed written instructions, materials list,
screw schedule, scaled offsets, panel layouts and patterns for
the scantlings fitting out. John is hell for stout using some
200 screws and bracings everywhere for stress points like corners,
bow and transom, chines and gunnels, seats, floors and skeg. His
specs call for the best ¼” marine ply, the best epoxy,
the best hardwoods and multiple taping of all joints.
A week after I bought the plans, John was thoughtful
enough to bring his prototype of the Tree Frog to the Messabout
we had at Fern Ridge Lake in Eugene, Oregon. We all got a chance
to try her out on a very windy, stormy day with some good-sized
waves hitting our windward beach. I was real curious to see how
she handled in the chop, especially with two big guys in her.
When I tried her out she handled smoothly on the wind whipped
lake after launching off the beach without getting a drop inside.
I turned her every which way in the swells, backed her down against
them, and rowed her sideways in the troughs. She stayed dry and
smooth, no pounding, splashing or crankiness. With two 200# men
aboard she still showed good freeboard and kept her manners. An
amazing little dinghy!
The Prototype:
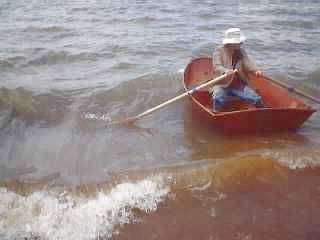
Pic # 1: Designer John McCallum
Getting Off Windward Shore at Fern Ridge
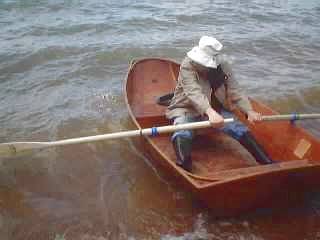
Pic # 2: John Getting 1st Good
Oar Pull
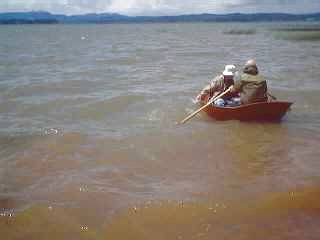
Pic # 3: Two Big Peas In a Punt
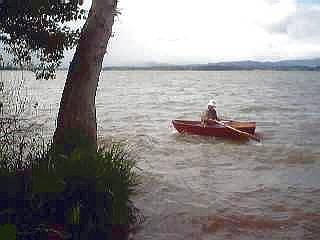
Pic # 4: John does an aesthetic
Row by
With already 5 boats in my yard, a limited budget,
and lots of boat stuff leftovers in my shop, I cheated some (maybe
a lot) on Johns quality control. I had some left over epoxy, lots
of left over pine, 1 sheet of luan that has been laying out in
the rain for two years, a little fiberglass cloth, and about 1000
stainless, bronze and brass screws but hardly two of a kind. I
had to order some more cloth and tape from Raka, Coot buddy Pat
Pateson promised to mill me some nice fir gunnels.
That left a little more epoxy, paint, hardware
and oars I had to get. I have found the Rustoleum latex primer
and latex Painter’s Touch colors have worked very well on
Toto. Toto is now over 2 years old and, very
easy to touch-up and still looks like new. This primer is gray
and very tough stuff, easy to sand and seals well. These paints
are only about $7 at the local BiMart. Also I found a great price
on epoxy from www.jgreer.com
in San Diego. He sells Aeromarine Epoxy, which comes in 1:1 and
4:1 ratios. I got a 5 quart kit for $50 + $9 shipping.
For rowing hardware I ordered the nylon
oarlocks and sockets from Duckworks
and plain made my own oars. I used sheet metal screws as clamps
for all the scantling fittings (knees, braces, seats, etc),then
took them out and filled with epoxy putty after cure. I don’t
know how much 200 screws weigh but I saved some here.
A word about luan. I get 6mm underlayment from
Crosscut Hardwoods for $12 a 4’ x 8’ sheet. Toto is
made from this stuff, as is my Windance (Thomson’s Moondance).
Both boats have stood up very well. Toto made it through a hurricane
sitting on top of my car in Loreto, Baha, last summer. The only
damage was 100 mph driven wet sand into some of the deck seams
(which I had not glassed) separating the plys for about an inch
into the decks. A tough test! It was an easy repair as I just
cleaned them up and fiberglass taped them like I should have done.
Also I was impressed to find the sheet I had laying out on the
woodpile for a couple years that was exposed to the soggy Oregon
winters had no damage and no separations. It’s the lightest
plywood to use for small boats, and if it's well glued and sealed
I see nothing wrong with it. The wood techs at Crosscut tell me
they use waterproof glue now in all luan. The panels I got had
one very good face, and one face that needed some patching and
sanding to smooth. I used Elmer’s exterior wood putty for
doing this, it spreads smooth, is tough and sands very well.
Instead of using multiple coats of epoxy to
fill the glass weave, I faired the sheathed surfaces with the
Elmer’s prior to painting. In the past I have used marine
polyester filler to do this and it worked fine. One of the builders
of the Redwing 18 used it to fair the hull that had been fiber
glassed with epoxy. There is an argument that polyester does not
adhere well to epoxy, but the filler fairing compound has worked
well for me when the epoxy surface has been well cleaned and roughed
up some. It sands well also. I like using the fillers as you just
use what you want where you want and you don’t have to remove
any epoxy in the sanding.
Building It:
After getting out all the panels for Tree
Frog, I sealed them on both sides with two coats of epoxy and
tied them together with those nylon electrician’s wire ties.
Before assembling the panels (which I had cut out leaving about
a 3/16” cut line), I planed them to the line and put in
a 1/16” bevel in all seam edges. I have made some 8 boats
(including some of my own design) using the sewn seam method and
I must say that this one fit together the best of any of them.
John’s design measurements are very accurate. The hull assembles
easily using no forms or jigs or bulkheads.
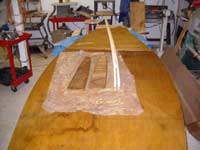
Pic # 5: Panel and Oar Layouts (note swept sweep)
(click images to enlarge)
|
|
|
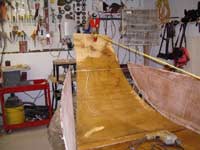
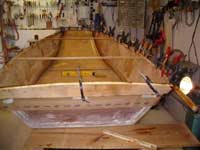
Pic #6: Stitching Side Panels to Bottom |
Pic # 7: Stitching Bow (yellow line
is on a Spanish windlass) |
|
|
Pic # 8: Bending Bow Rail: |
Pic # 9: Attaching Transom Rail and
Gunnels |
|
|
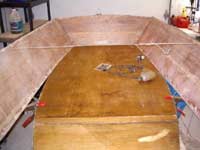
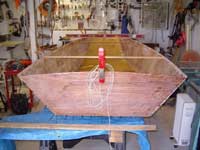
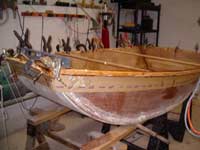
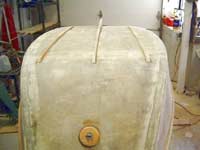
Pic # 10: Leveling and Truing Hull |
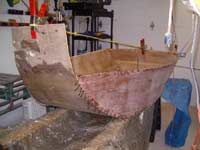
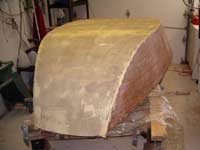
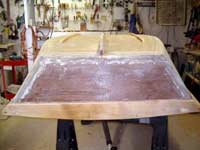
Pic # 11: Bottom Glassed and Filled |
|
|
Pic # 12: Attaching Bow Rail
|
Pic # 13: Bow Rail and Gunnel Detail |
|
|
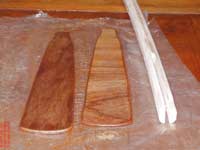
Pic # 14: Oar Detail |
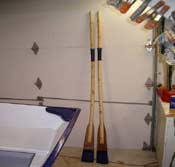
Pic # 15: Completed Oars |
|
For the oar shafts I selected two 1” x
4” x 8’ bird’s eye pine boards of the lightest
color and weight I could find at the local lumberyard. I thought
about using doug fir 2” x 2” , but they were so heavy
and cost so much, I went for the pine (about $5 worth). I ripped
them along the curvature of the grain, glued them in opposite
grain runs, watching for the shape (trying to get a spoon type
curve to them);* 8 sided shaped them with the angle grinder, then
finished them out with an orbital sander to get more or less round.
For the blades I epoxy glued two left over pieces
of luan with a glass cloth liner inside. Measured the resulting
thickness. Then I ripped a slot in the oar shafts with my bandsaw
to fit the blades. Epoxied them in with a thixotropic blend of
wood flour. Ground and sanded all to shape and finished them with
Teak Oil.
* They turned out beautiful, but this
experiment of curving the sweeps did not work well. They gripped
and pulled—too well, as they wanted to twist in my hands
and was very tiring. Wanting to get going, I broke down and
bought some real oars (7'). A note on finishing oars—I
talked to a number of drift boat owners trying to determine
the best finish. They said oil was the best, as varnish is just
too hard to keep nice on these working parts. I finished them
with multiple coats of teak oil, and will keep them as spares.
|
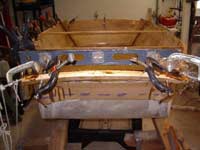
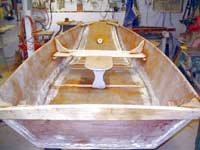
Pic # 16: Row Seat & Knees |
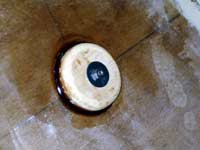
Pic # 17: Tow Bit Inside |
|
|
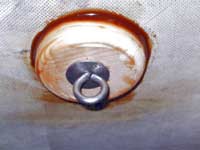
Pic # 18: Tow Bit Outside |
Pic # 19: Skeg & Strakes (note twisted
panel) |
|
|
Pic # 20: Seats and Knees (note floor
braces, the outside hull strakes are screwed through the
hull into these giving a good strong box effect.) |
Pic # 21: Skeg and Strakes 2 |
|
|
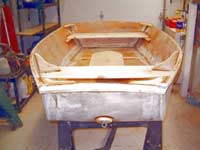
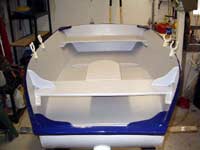
Pic # 22: Finished! |
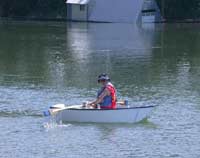
Pic # 23: Author's Maiden Voyage |
|
© 2004 Terry Lesh, 2nd rights
reserved |