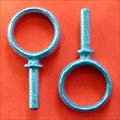
Sockets
The sockets are made just like in Bolger’s version, so refer to Jim’s article. Actually I changed them a little bit to I could have no holes in the top surface. I threaded some plain steel rod and welded it to the bottom of the top plates. But this is not at all necessary.
If you don’t want to paint, find some 1” brass strapping. It costs more, but still shouldn’t be much. At my local hardware store I can get a 12” x 1” piece of .064 brass for about $4.50. That’s enough for one set of sockets. Not too bad. But you also should use brass fasteners then, and there are no brass nylon insert nuts, so you’ll also need some thread locking compound. Be sure to wash the threads or of the locking compound won’t stick. Bear in mind, though, that this is not BRONZE. Brass will darken with tarnish. I don’t care, but you might. Bronze usually costs more than brass.
In fresh water painted steel works fine. When it finally rusts, pull it off, wire brush it and give it some more Rustoleum. Or pitch it and spend an hour making a new one. One word of warning on steel, though. If you plan to use the high class bronze oarlocks in your sockets, steel will chew up the bronze. I think the narrow edges of the brass plates might too. Avoid using these sockets for anything but cheap homemade oarlocks.
I recommend bedding the plates in PL400, which is available for under $3 for a caulking gun tube from any hardware store. It sticks to nearly anything that’s not oily and stays somewhat flexible indefinitely, similar to 3M 5200 but without the “marine” price. PL Concrete and Masonry Sealant costs about the same and stays even more flexible, but takes a long time to be dry to the touch.
In any case, the construction of the sockets is very simple. You cut pieces 3” long, then drill a hole 1/2” from each end with the small bit, and right in the center with the big bit. Use the big bit to counterbore the metal so the screwheads lay close to flush. Some folks add a piece of 3/8” (steel or brass) plumbing pipe epoxied inside the hole, but I don’t think this is really necessary. Though I’d probably do it if I were using expensive bronze oarlocks.
If you don’t want to do the metalwork, there’s an alternative. Hard maple is strong enough to withstand rowing stress for a while. Find some scrap hard maple flooring. Make sure your plane is sharp! After you plane off the grove and tongue, and get the bottom flat, you’ll have a perfect “thole pad” blank. Drill the holes and smooth the edges and you’re done.
Mostly. I recommend coating such maple “hardware” repeatedly with thinned linseed oil. On parts of my Piccup rig I went one better and actually made a double boiler out of two sizes of coffee cans and cooked the small maple parts in thinned linseed oil for an hour or so. Then I let them cool in the oil. Be especially careful with this – it’s essentially a bomb. I started my piccup pram out with maple thole pads and it worked fine. But it didn’t slide onto the cartop rack so well with those extra lumps, so I switched to the low-profile metal version discussed above.
Thole Pins
Of course these oarlocks are basically thole pins. We’re just using a standard 1/2” bolt to make it happen. Using a bolt and rope eliminates the need for the welding and brazing found in Bolger’s version. If your local hardware store doesn’t have bolts this big, check building supply places and agricultural supply places. In the Midwest, Farm & Fleet stocks things like this for good prices. Of course you could always thread some plain steel rod if you can’t find them. The washers are just to keep our rope loop on the pin and elevate it above the socket if necessary.
Rope Bands
Here’s the trick that makes this all work. The first version of this had regular nylon braid rope (maybe poly) bent into two loops, stitched and seized. I found the seizing did not hold well on the stretchy rope, and over time I wound up with a frayed mess of loose seizing twine. Then I tried tying on poly rope. It stretched most inconveniently, allowing the oars to move around when pulling hard – just when you most wanted them to stay put! Use Dacron. I suppose manila or cotton would be OK too, but you’d have to be careful of rot, and you’d have to find a decent example of it. Not easy in the age of synthetics.
Simply tie each end of the larger line to the bolt with a pair of half hitches. You’ll want these a snug as possible, so tie it snugly around the narrow part of the oar, then force the oar into the loop until it is centered on the leather.
I have a feeling that this “quick & dirty” method is actually much stronger than the method I originally used. In my original method I was relying entirely on the seizing to maintain enough friction between the lines so they would not slip. Probably fine with 3-stranded natural fiber lines, but not a chance would it hold with slippery synthetic braided line. Rather than explore whether it worked with 3-stranded line, I decided I didn’t mind how the quick & dirty version looked.
Setting It Up
Now this will seem backward to many of you. I like to use this arrangement with the oar pulling against the rope band rather than the pin. The slight shock absorbing effect is nice when pulling hard, but even more importantly it allows the oars to trail along politely outboard of the pin when let go. This is ULTRA handy when fishing or trying to row in intermittent calms and sail during the puffs. When you’re pulling against the pin, the oars can’t do this. They try to lever against the hull and mess with the steering. This “backwards” method also allows the oars to live on the gunwale with perfect ease – out of the way, yet ready at a moment’s notice. This is what you need in a small boat. I think I read somewhere that old-time lobster fishermen did this. I’ve always had my Piccup rigged this way and I cannot imagine ever having the time to fish oars out of the cockpit and ship them. If I need the oars, I most likely need them NOW!
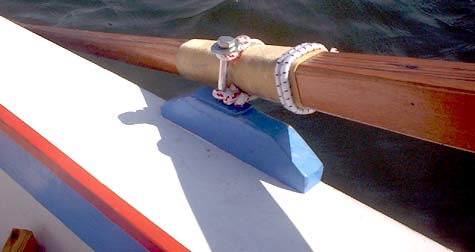
Here they are stowed on the gunwale, inboard of the thole.
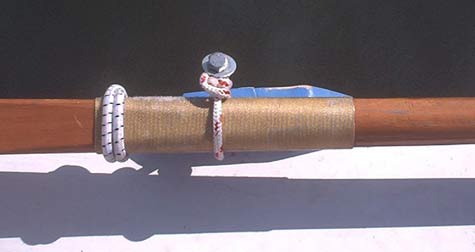
Here they are in rowing position, viewed from the oarsman’s position.
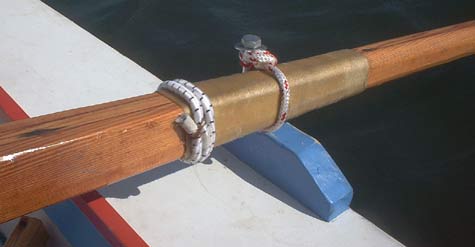
Here they are trailing when let go.
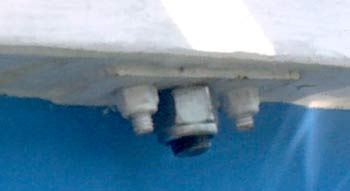
And here’s what the underside of the gunwale looks like.
It may seem obvious, but having the oars more or less permanently attached is fine insurance. Not so much that they are harder to steal, but that they are guaranteed to be there when needed. Let me share an embarrassing story about my first time in high winds with standard oarlocks. I started off rowing just fine inside a rubble breakwater. But then the wind shifted, putting the breakwater to my lee. And I was only maybe 10 feet from it! I had to turn fast and pull much harder, but my angle of attack was not quite perfect. It wasn’t a big deal pulling with less power, but when I gave it all I had, the starboard oar jumped right out of the lock. The port oar smacked me in the ribs twice while I fumbled to replace the starboard oar. By now my starboard oar’s tip was hitting rock, so I just levered against the rocks to turn the stern to the breakwater. I got in 3 good pulls, which only put me about six feet off the rocks, and the same oar jumped its lock again. You can guess at some of the words that came out of my mouth. Now I was slipping starboard onto the rocks again and had no choice but to fend off. I got lucky and this time was parallel to a level chunk of rock maybe two feet square that was wet, but not very slimy. I leaned over the starboard side and grabbed the edges of this rock, snaking one leg onto it. Then I scooted up on the rock and sat there while I used the end of my painter to TIE that @#&^%$ oar to its lock. I turned the boat bow on and cut the painter, then finished the turn and tied the port oar on too. I bet people downwind were wondering why the guy in the little dinghy was laughing manically as he leaned into the oars to claw upwind of the breakwater.
Ever since then I have viewed any rowing setup with great suspicion if it is possible for the oars to jump free under load. Particularly with oars that don’t let you feather. All it takes is the angle not being exactly right during a strong pull. Save yourself the stress. Keep your oars tied down, and use round looms so you can adjust the angle of attack under load.
One final advantage of this system. Even if you simply must have all the bronze goodies, this is a cheap and reliable backup for when your gold-plater oarlocks jump overboard. They love diving, you know. It’s surfacing they’re not so good at. Put lanyards on your wrenches, though, ‘cause you’ll need to hold one of them overboard to set this up. Keep the lanyards tied to your life jacket or belt loop when in use, and keep a third wrench just like you keep a third oar. They work best in pairs.
If you don’t like carrying wrenches, another approach might be to use a regular nut and lock it with a wing nut. But carry extras of whatever hardware you use. It’s cheap and sooner or later you’ll have a set fall into the drink.
Rob Rohde-Szudy
Madison, WI
robrohdeszudy@netzero.net