|
“Start to Finish”
Part IV
With the lower unit removed form the engine
and clamped in a well-padded vise, I removed the roll pin from
it’s hole near the top of the vertical driveshaft. This
pin is what the seal hardware on the top of the driveshaft sits
on. The pin needs to be removed in order to slide the pump body
and impeller up off the driveshaft. The pump body itself is held
down with 4 screws. Remove the pump body and old impeller and
be mindfull of the tiny key on the driveshaft which engages the
impeller.
If the pump body does not look too scored, it can be reused (I
almost always reuse the old pump body) There will also be a tiny
passage in the pump body that allows water from the puimp to flood
a cup surrounding the driveshaft. The water in this cup is what
seals the driveshaft to the pump body and you should make sure
that the tiny hole that supplies this water is not plugged.
Also check the metal plate under the impeller for wear - I have
occasionally replaced the plate.
Slide the new impeller down the shaft and then the pump body
down over it. Make sure the impeller has engaged it’s drive
key. The easiest way to get the pump body down over the extended
fins of the impeller, without causing the impeller to come off
the drive key, is to gently push down on the pump body while manually
turning the driveshaft in the direction of normal rotation (clockwise
when looking down on the shaft.) the fins will fold back and the
pump body will drop down until it is fully seated. Screw the pump
body down and put the pin back in the top of the driveshaft.
The tube that conducts water from the pump up to the powerhead
should have stayed installed up in the “leg” of the
motor when the lower unit was removed. If the tube came out attached
to the pump body, pull it loose from the pump and insert it up
in the “leg”. Make sure that the rubber grommet in
the pump body looks decent, or replace it. I reused the old one
on the Johnson.
As you install the lower unit back on the engine, you need to
make sure that the driveshaft and the shift shaft go up where
they are supposed to, and you must be sure that the water tube
is seated in the grommet on the pump body. With the Johnson, it
took me a few tries to get all of this done. Try to have the outboard
vertical when you do this, and a good light helps.
Once the lower unit was bolted back on the Johnson, I connected
the shift linkage up and placed the seal components back on the
driveshaft. then I reinstalled the powerhead, using a new gasket
underneath it. The gasket under the power head directs cooling
water to where it should be, and keeps it out of where it shouldn’t
be. The gasket also plays a large part in determining the amount
of crankshaft “end-play” (remember from part
2?) Too thin a gasket can reduce end play to the
point where there is extra wear on the crankshaft and bearings.
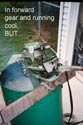
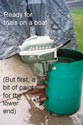
With the lower unit and powerhead back on, I was finally ready
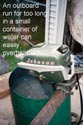
to try to start the engine for the first time. The motor was clamped
to a drum of water, and after a few pulls and some needle valve
adjustments, it started up and idled well.
But there was not much water being sprayed from the exhaust bypass,
which is the cooling water indicator for this engine. After a
few minutes running, I tried touching various areas of the cylinder
head and block with a Thermomelt crayon which melts at exactly
175 degrees F. If the engine was running “cool,” the
crayon should not have melted, but it did. I had a over-heating
problem.
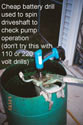
I removed the power head , and put the “headless”
outboard back into the water barrel. I chucked my cordless drill
to the protruding driveshaft and spun the shaft with the drill
to see if the pump would shoot water out the top of the water
tube. It barely trickled out.
I removed the lower unit and the pump body to make sure that
the impeller was engaging it’s drive key, but that did not
appear to be the problem. The pump body does not have any sort
of gasket to seal it, and thinking that the body may have warped,
I used some ‘gasket in a tube” to seal the pump body
down on it’s base. I also replaced the water tube grommet
in the pump body.
With the “headless” outboard back in the water barrel
and the cordless drill reattached to the driveshaft, I got a stronger
trickle of water but not near what it should have been. I put
the power head back on and started up the motor and the Thermomelt
crayon still indicated an overheating engine.
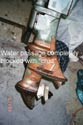
The water intake screen directly behind the propeller appeared
to be clear, so I removed the rectangular cover on the lower unit
that serves as a water intake when the motor is in reverse and
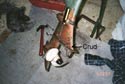
discovered crud almost completely blocking the water passages.
I cleaned the crud out with a screw driver, put the reverse intake
cover back on, started up the motor and it ran cool. the Thermomelt
crayon did not melt.
After about 30 minutes of ‘bucket cruising,” the
engine had proved itself worthy for ‘boat testing,”
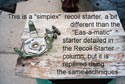
but before I do that, I like to have a look at the recoil starter,
the part of an outboard that seems to take the most abuse, and
give the most trouble.
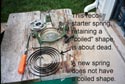
The starter rope was an old one; cotton fiber over a metal wire
core, so I decided to replace the rope and also the recoil starter
spring. Once removed, the old spring demonstrated it’s age
by retaining a coiled shape, and the rope was replaced with ordinary
nylon braided rope. This work was accomplished on a Saturday morning,
less than one week after the Sunday degreasing of the motor.
At some point in it’s life, the lower unit of this outboard
had been painted a copper color- I suspect to match the copper
bottom paint on a wooden boat. Of course, everyone knows that
one should never paint an aluminum outboard motor with a copper-based
anti-foulant paint because of the risk of corrosion, so I assume
that an ordinary enamel was used.
A couple years ago I bought several cans of automotive spray
paint at a Big Lots closeout store because the colors appeared
to be close to those of some old outboard motors, and anyway the
paint was only 29 cents a can. I used some General Motors green
paint, over zinc-chromate primer, to repaint the outboard from
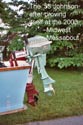
the bottom of it’s cowling down. Then I clamped the motor
onto the auxiliary motor bracket on my AF4 in preparation for
the upcoming Midwest Messabout, which would be the motor’s
first test on a boat.
During the Messabout, the little Johnson was run for about 45
minutes total time, on two different days. It preformed well with
no problems arising, and will now serve as my auxiliary engine
for the AF4, replacing a 1958 Johnson 3 hp which was really too
small to push the boat against current and wind.
It has been said that there are no guarantees in life, and certainly
there are no guarantees that the old outboard that you buy will
turn out to run just as sweetly as this one has (in fact, this
one could “blow-up” next week), so if you want a guarantee,
you are going to have to buy a new outboard. But considering that
I paid 50 dollars for the motor, and put about 80 dollars or so
(retail) worth of parts into it, I don’t really have all
that much at risk. And those new parts could be transferred to
another old OMC engine, should the need arise. I have a couple
of early ‘50s Evinrude 15’s that both make an awful
bearing noise; At some point in the future, if I can not repair
the problem, I will pirate the new parts installed in them for
use in other engines.
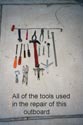
Working on old outboards does not entail rocket science; these
engines are about as “low-tech” as tech can get
With a good manual and some studying and some thought, you can
do this.
Later
Max

Parts used to repair 1955 Johnson 5.5
hp outboard;
| Item |
Sierra part number |
List price |
| Gasket |
18-2901 |
$3.00 |
| Impeller |
18-3001 |
$15.40 |
| Tune-up kit |
18-5006 |
$18.00 |
| Recoil spring |
18-6501 |
$8.60 |
| Carb kit |
18-7043 |
$12.70 |
| Fuel filter |
18-7828 |
$4.45 |
(2) Champion J8C spark plugs
(3) ft copper-core spark plug wire
Misc. small hose clamps
Misc. fuel hose
Nylon rope (for starter)
Rubber bushing for pump housing
Gasket sealant.
NOTE The cracked magneto coils were replaced with
“Used but good” coils I had on hand.
New Sierra coils, part # 18-5181, list for $21.45 each
Often, “Used but good” coils can be purchased at
swap meets for much less, or a cheap” parts motor”
may supply you with coils (as mine did).
You should be able to find a boat dealer
willing
to sell the Sierra parts for slightly less than list price;
be sure to shop around.
|