|
Impossible Dream Album |

|
|
By Kristofer J. "Harley" Harlson - Lynnwood, Washington - USA |
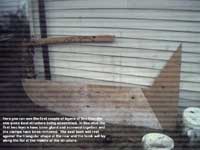 .- .-
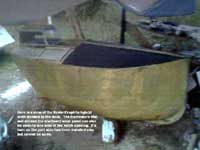
Here you can see the first couple of layers of Sea Biscuit's
one-piece keel structure being assembled. In this shot the first two layers have been glued and screwed together and the clamps have been removed. The seat back will rest against the triangular shape atthe rear and the bunk will lay along the flat at the middle of the structure. |
|
|
 Here you can see a front view of Sea Biscuit as she is being put together from scrap plywood. The plank through the middle will become my bunk. You can see the seat sitting in place. The two main bulkheads can be seen. They will later be reinforced with two by fours on the sides and more layers of plywood elsewhere. The keel structure can be seen here also. It is made from three layers of plywood above the seat and five layers within the bottom of the hull below the bunk/seat level. As you can see, the plywood for the sides is quite thin and will be reinforced later. This plywood serves mainly to create Sea Biscuit's shape and has little to do with her structural integrity.
(click images for larger views)
|
|
|
 Sea Biscuit's hull has been turned upside down and the starbord side has been covered with Keviar and epoxy. The Keviar cloth overlaps the seam between the hull and the keel. This seam will be further reinforced with a wide band of fiberglass woven roving and epoxy as will the seam atthe forward edge of the bow. All will then be covered with fiberglass cloth and epoxy. Fiberglass tape will reinforce the seam where the deck and sides meet Sea Biscuit's hull has been turned upside down and the starbord side has been covered with Keviar and epoxy. The Keviar cloth overlaps the seam between the hull and the keel. This seam will be further reinforced with a wide band of fiberglass woven roving and epoxy as will the seam atthe forward edge of the bow. All will then be covered with fiberglass cloth and epoxy. Fiberglass tape will reinforce the seam where the deck and sides meet
|
|
 Here the layer of Keviar has been applied to the port side. You can see that the Keviar cloth from
both sides overlap at the forward
edge of the keel. Here the layer of Keviar has been applied to the port side. You can see that the Keviar cloth from
both sides overlap at the forward
edge of the keel.
This will also be reinforced with a layer of woven roving and epoxy and coated with the final layer of glass and epoxy. |
|
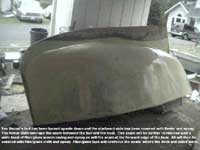
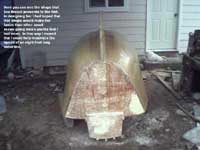 Here you can see the shape that Sea Biscuit presents to the fish. In designing her I had hoped that this shape would make her Faster than other small ocean-going micro-yachts that I had seen. In this way I mused that I could help maximize the speed of an eight-foot long waterline. Here you can see the shape that Sea Biscuit presents to the fish. In designing her I had hoped that this shape would make her Faster than other small ocean-going micro-yachts that I had seen. In this way I mused that I could help maximize the speed of an eight-foot long waterline. |
|
|
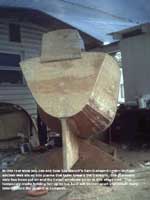 In this rear view you can see how Sea Biscuit's barrel-shaped center-bottom
section was sliced into planks that taper toward the transom. The starboard
side has been put on and the Lexan windows go on at this stage also. The
temporary cradle holding her up by her keel will be torn apart and rebuilt many times before the project is complete.
In this rear view you can see how Sea Biscuit's barrel-shaped center-bottom
section was sliced into planks that taper toward the transom. The starboard
side has been put on and the Lexan windows go on at this stage also. The
temporary cradle holding her up by her keel will be torn apart and rebuilt many times before the project is complete.
|
|
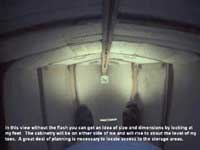 In this view, without the flash, you can get an idea of size and dimensions by looking at my feet. The cabinetry will be on either side of me and will rise to about the level of my toes. A great deal of planning is necessary to locate access to the storage areas. In this view, without the flash, you can get an idea of size and dimensions by looking at my feet. The cabinetry will be on either side of me and will rise to about the level of my toes. A great deal of planning is necessary to locate access to the storage areas. |
|
|
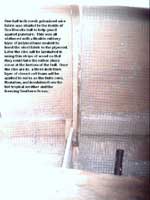
 A view looking aft of the seat. You can clearly see that the layer of galvanlzed steel fabric has not yet been applied to the port side of the hull. The steel fabric overlaps at the section where the bottom of the hull meets the side panels. A layer of one half-inch thick steel plate was bonded to the bottom of the hull at this point for ballast. When the ribs are laminated in, they will actually help hold the steel plates in place. The layer of closed cell foam will encase the steel ballast as well and the inner hull will be built over it.
|
|
|
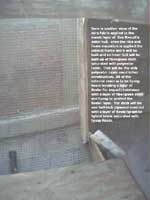
 One half inch mesh galvanized wire Fabric was stapled to the inside of Sea Biscuit's hull to help guard against puncture. This was all slathered with a flexible rubbery layer of polyurethane sealant to bond the steel fabric to the plywood. Later the ribs will be laminated in using thin strips of wood so that they could take the rather sharp curve at the bottom of the hull. Once the ribs are in, a three inch thick layer of closed-cell foam will be applied to serve as the hulls core, floatation, and insulation from the hot tropical weather and the freezing Southern Ocean.
|
|
|
 Here is another view of the wire fabric applied to the inside layer of Sea Biscuit's outer hull. Once the ribs and Foam insulation is applied the cabinet frame work will be built and an inner hull will be built up of fiberglass cloth saturated with polyester resin. This will be the only polyester resin used in her
construction. All of the
Here is another view of the wire fabric applied to the inside layer of Sea Biscuit's outer hull. Once the ribs and Foam insulation is applied the cabinet frame work will be built and an inner hull will be built up of fiberglass cloth saturated with polyester resin. This will be the only polyester resin used in her
construction. All of the
exterior resin is to be Epoxy
bonding a layer of Keviar for impact resistance with a layer of fiberglass cloth and Epoxy to protect the Keviar layer. Her deck will be one half-inch plywood covered with a layer of Kevlar/graphite hybrid fabric saturated with Epoxy Resin.
|
|
|
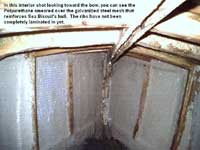 In this interior shot looking toward the bow, you can see the Polyurethane smeared over the galvanized steel mesh that reinforces Sea Biscuit's hull. The ribs have not been
completely laminated in yet.
In this interior shot looking toward the bow, you can see the Polyurethane smeared over the galvanized steel mesh that reinforces Sea Biscuit's hull. The ribs have not been
completely laminated in yet.
|
|
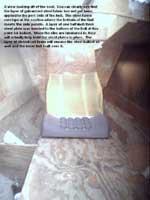
 Here you can see the closed-cell foam being fitted
in. The framework for the Cabinetry will be built onto the ribs before the layer of glass goes in. Here you can see the closed-cell foam being fitted
in. The framework for the Cabinetry will be built onto the ribs before the layer of glass goes in. |
|
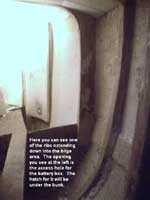 Here you can see one of the ribs extending down into the bilge area. The opening you see at the left is the access hole for the battery box. The hatch for it will be under the bunk. Here you can see one of the ribs extending down into the bilge area. The opening you see at the left is the access hole for the battery box. The hatch for it will be under the bunk. |
|
|
 Here you can see the framework for the cabinetry that will hold Sea Biscuit's supplies. Most everything will go in the bilge and in these cabinets to prevent my supplies from becoming dangerous projectiles at Sea.
|
|
 Now you Can see how the cabtrtetry defines the coffin-sized space that my body will be in for the entire voyage. The cabinets will be built with light wIght plywood after the inner hull is layed in. The cabinets and their framework are an intregal part of Sea Biscuit’s structural integrity. Now you Can see how the cabtrtetry defines the coffin-sized space that my body will be in for the entire voyage. The cabinets will be built with light wIght plywood after the inner hull is layed in. The cabinets and their framework are an intregal part of Sea Biscuit’s structural integrity. |
|
|
 Here is a view of the Kevlar/Graphite hybrid cloth bonded to the deck. The framework that
will encase the starboard solar panel can also be seen to one side of the hatch opening. It's twin on the port side has been installed also but cannot be seen.
|
|
|
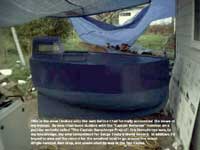 This is the view I leaked onto the web before I had formally announced the news of my voyage. By now I had been dubbed with the "Captain Nemesis” moniker on a popular website called "The Captain Humphreys Project”. Eric Humphreys was, to my knowledge, my only competition for Serge Testa’s World Record. In addition, I'd hoped to also set the record for the smallest boat to go around the world single-handed, non-stop, and unassisted, by way at the five Capes.
|
|
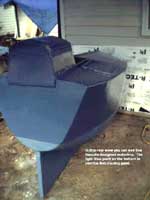 In this rear view you can see Sea
Biscuit's designed waterline. The
light-Blue paint on the bottom is
Interlux Anti-Fouling paint. In this rear view you can see Sea
Biscuit's designed waterline. The
light-Blue paint on the bottom is
Interlux Anti-Fouling paint.
|
|
 Looking down from a standing position on the rear decks you can see the solar panels which will keep a trickle charge on the battery. The hatch opening is just large enough for me to squeeze through comfortably. At sea the hatch will never be open like this. Looking down from a standing position on the rear decks you can see the solar panels which will keep a trickle charge on the battery. The hatch opening is just large enough for me to squeeze through comfortably. At sea the hatch will never be open like this. |
|
Read Harley's article about the boat:
Impossible Dream

|