This may be a relevant option:
- For those of you who - like myself - do not have space for a dedicated workshop;
- Or those who have concerns about tools evaporating (due to other users) or corroding (due to humidity or cold) and want to put your stuff in a secure place while you are away;
- Or those that have access to a larger workshop, and want to have certain tools readily available where you work without having to always have to head back to wherever they are located.
I have the issue that I do not have a dedicated workshop space. In our (multi-tenant) house, we have a private basement room, well rather a cell than a room. Anyway, there is so much stuff in it that certainly what is left free is just a cell. If I want to do some mid-sized dirty work like sawing, drilling, milling, painting on anything that I cannot do in our living room, I would like to use the basement, but our cell is simply too cramped.
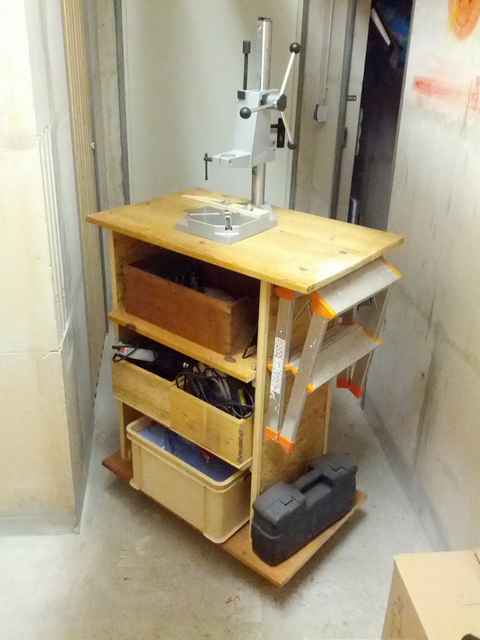
My solution was to come up with something I saw with tradeshow booth building staff and elsewhere. I now have a workshop cart that holds all the tools that used to be spread across various lockers and boxes in our basement room. Whenever I want to do some work, I roll it out of its little parking spot (and that spot is really little) into the fairly spacious aisle and work there. Of course I have to clean up behind myself in order not to upset anyone else, but that should be good practice anyway.
Click Here to Open A Free PDF Plan
The basic idea is that you build this from remaining pieces that you have lying around in your stack of interesting bits and pieces anyway. The only parts you might consider actually purchasing could be the benchtop - you need something fairly thick with a hard, even, true surface - and the wheels. If there is one near you, try a scrapyard for used wheels, they might have some stuff that is still great for the purpose. I personally want to be able to hammer or chisel on the benchtop. This means I must have solid wheels (hard rubber coat is OK), otherwise they would absorb part of the energy of the blows and make my job harder. Even when working with a hand plane or a drawknife, this effect might become perceivable. On the other hand, Dave Lucas and the Florida Tiki Hut people - a truly magical place as it seems - as well as everyone else that does not have a solid floor might want to use air wheels, otherwise you will get stuck in the ground very quickly. For hard floors, at least two wheels with blocking brakes are a must. The loaded cart may be heavier than you think.
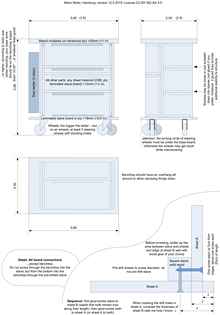
The drawing more or less speaks for itself. I have shown the body panels connected with inside "chine logs", so to speak. Of course you could also do some of them on the outside instead, whatever works for you. You could well use nails instead of the screws I am showing in the drawing. If you are just working with epoxy anyway, you could join the panels with epoxy fillets of course and do away with any mechanical fasteners. However, in that case you would need some kind of temporary fixture to keep the structure straight, upright and true until the epoxy cures. So maybe "chine logs" with mechanical fasteners are not so bad for a quick-and-cheap build.
I have dimensioned the shelves on either side in an asymmetric manner. The depth of one side of shelves was given by the average of a few boxes I had lying around and wanted to re-use. I am sure you will find something creative here... old drawers, smallish fruit crates, shoe boxes if sturdy enough, or again, just build a few boxes from more scrap bits.
Have fun!
|