At the end of his very good article on an Epoxy Ratio Scale, Joe Tribulato asked for some feedback. I have used his ideas and updated them for what I think is better performance.
The major change is to move the pivot axis of the beam, cup and weights above the vertical center of gravity of the loaded beam assembly. What this does is to make the balance point with the beam horizontal a stable system. Joe's design with the pivot axis below the upper surface of the beam is unstable in the balanced position. What this means is that as one adds liquid to the cup with the weighted side of the beam resting on the table top, the scale suddenly snaps over center and rests with the cup end of the beam on the table. There is no warning that you are approaching the correct amount of resin or hardener. Modifications of Joe's design with a pivot made of a plastic card or pointed screws beneath the beam are even more unstable.
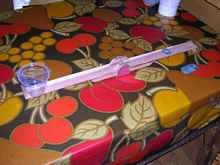 |
overall view |
The first photo gives the overall idea. The beam hangs below the pivot wire sort of like a porch swing. As you add liquid to the cup, the weight side of the beam starts to lift but is still lower than the cup side. When the beam is level, the scale is in balance, and it is stable.
It makes sense when you think about it. For the old beam scales in doctors' offices, the nurse would slide the weight until the pointer at the end was centered on the balance mark. If the pointer was low, but clearing the lower stop, the weight still needed to be moved out. If above, but free of the upper stop, move the weight in. Similarly the "scales of justice" have the pans for the sample and the weights hanging way below the beam and its pivots.
|
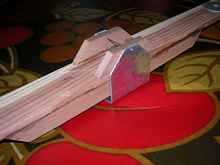
closeup of the pivot |
The second photo shows details of the pivot. I've had good luck with the pivot wire about 5/8" above the top of the beam. The side plates are 1/4" by 3/4" light redwood glued with titebond. It feels almost like making an old stick model airplane. At balance, the scale is sensitive enough that it moves from a gentle puff.
The other updates are mostly to make the scale more "extreme" for increased sensitivity. The beam is lighter and longer and the pivot is lower friction. I made the beam from light redwood, 1/4" by 1 1/2" wide with 1/4" by 3/4" stiffeners in the center section. It's 26.5" long, which allows a balance distance of 300 mm for the resin plus hardener. With 5:1 by weight West System, the balance distance for resin is 250 mm. The beam has end stops like Joe's.
For weights, I use 3/8" fender washers that are 1 1/2" OD. This makes them easy to slide on the 1 1/2" beam. One washer is 0.050" thick and weighs 10 g; it's useful to balance out the empty cup. The other 4 are 0.063" thick and weigh 12.5 g. One washer's worth of mix is just shy of 1/2 oz, which I find is a handy batch for little jobs. It works well in practice.
Taking a tip from the old Hot Wheels gravity-racing toys, I made the balance pivot wire as small as I thought I could get away with to reduce friction. It's 0.032" music wire. The pivot holes in the 1/16" aluminum stand are #59 wire gage (0.041") drill.
I fully support Joe's reasons for wanting to mix small batches of epoxy by weight. I've had nothing but grief with pumps. Left in the can, they pump liquid out with temperature fluctuations in my shop and make a mess. They break and gum up. They drip.
Try the stable balance. You'll like it.
|