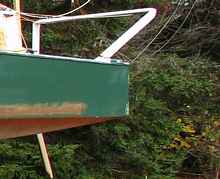
Dinghy #1
Almost a decade ago I built a Bolger Tortoise because I had just acquired my first sailboat, a 26' Norman Cross Trimaran, and I had no way to get to and from it when moored. It was indeed an easy build.
 |
Tortoise on test sail on front pond |
It introduced me to plywood boat construction with glue and wood strips and continues to serve me well, especially if I keep it under roof over the winters so the paint doesn't peel off. I used an alkyd enamel called "Fisherman's Boat and Dory Paint" which is quite durable but extremely slow drying in cool weather - like 3 or 4 days near freezing!
 |
Storage for the winter |
A Short Dinghy
As time went on, I began to worry about the storage of the dinghy on the deck. I had a good place for it to fit upside down on the foredeck until I raised a part of the forward cabin to get more headroom for the head. That on-deck space was lost. On top, the cabin was too high to clear the boom. Besides, it was blocking the view forward. I could just barely store the Tortoise upside down bridging two of the forward hulls, but it then blocked one side entirely and needed a very strong person to flip it and launch it.
Perhaps a smaller dinghy would be good - about 6' long and sized to fit on a side deck. Just enough to transport two people in moderate seas. By that year, I had experience with Epoxy on the Trimaran, which had been built in 1986 of epoxy-coated/saturated plywood with a fiberglass outside sheathing. The big boat had already gotten all sorts of repairs and modifications, which were easily done with the wood base. So I decided to build a stitch and glue boat and modified someone's rough set of sketches for the shorter length thus violating one of the fundamental principles of boat design by expecting a radically-altered plan to work without problems. As a small model taped together out of stiff paper, it looked good. What could go wrong!
Stitch & Glue Construction
One winter I marked out the cuts on two sheets of ¼" plywood on the warm living room floor and then cut the pieces in the garage with a saber saw. Drilling small holes about every 4" along the edges, I fished heavy plastic cable ties through matching pairs of holes and pulled the pieces together into a boat shape. I think I did the first bonding of all the joints with epoxy and short pieces of fiberglass tape on the inside between the ties. Once the Epoxy had set and bonded the pieces together, it was a simple matter to clip off the cable ties and then grind the outer edges smooth. I found a 4 ½" angle grinder to be the tool of choice. Any bits of cable tie left would never give a rust problem. Then I finished the fiberglass/Epoxy taping on the outside all with 4" wide fiberglass tape. When that had set, I finished the inside seams. Then I clamped and Epoxied 3 additional 1" wide strips of curved ¼" plywood along the top edge, the gunwale, to provide a stiffer edge and to hold the oarlocks. "Sanding" involved the angle grinder, and then I coated it all with epoxy and painted it.
Oarlocks and Seating
Initially, I built this second dinghy with a transverse (across the middle) seat and a best-guess location for the oarlocks about 12" behind the rear edge of the seat. Bad News! On the trial run I discovered that the weight distribution for such a short boat is critical and the seat allowed no adjustment of position. Since the bow section was relatively narrow the buoyancy was too little in front and the boat rode with its stern so high the bow was almost under water! I had to have a second person, or a few cement blocks, at the stern just to hold level. Why not adopt the front-to-back longitudinal seat idea from the Tortoise? Also, with the seat up near the gunwale, the side-to-side stability was poor and boarding was a challenge. So I adopted the idea of a Scandinavian fellow who was posting free plans (I do not remember his name now), and set a pair of boards quite low for the seat. The space between was to fit one's tailbone.
 |
View of inside showing lowered seat (pre-painted days and experimental bumper shown). |
That modification was great. The boat is quite stable when you are sitting just above the bilge. Since it allows positioning of both the rower and the passenger to balance the load, I decided to buy 8 of Duckworks' nylon oarlock bushings and a pair of clamp-on fittings that go into them. Then I positioned the bushings along the sides about 12" apart to allow the use of whichever pair was best for the position and orientation of the rower. The oars were made of about 7' long poplar saplings from the woods with pieces of plywood nailed on to form the blades - really sad looking, but no one steals them!
Buoyancy Chambers
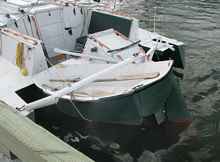
Under the front and rear seats, still there from the original design, are closed spaces for flotation if it were submerged. A horrible thought in the cold water we usually have here in Atlantic Canada. I epoxied them on both sides and added an access hatches from Duckworks ¼-turn round access hatches. It seems to work OK although I have never personally had to put it to the test. One autumn I forgot the dinghy and it floated loose around the harbor until it came to rest on a sand bar where the breaking surf must have filled the bottom 12' with sand and up to the top with water. When rescued, I found the flotation compartments full of water, so I guess the flotation would not hold up indefinitely if I were lost at sea.
Davits
While the dinghy is quite short, with all the epoxy it is not light. As old age sets in, the idea of muscling it over and dropping it into the water between two of the hulls had less and less appeal. The side decks are too narrow for storage, so, in the end I built a frame as a sort of davit to hold the dinghy until needed. Glassing over rounded 2 x 4s, I built a frame to provide a crossbar sitting over the open water. There are pulleys to lift the dinghy up out of the water far enough to avoid the waves and yet not obstruct the view or catch the wind excessively.
 |
Permanent frame added to stern to hold dinghy. |
Positioned over the open space between the hulls at the stern, it is right at the ideal place for launching and boarding. It is easy to sit on the deck between the hulls and step directly into the center of the dinghy. Since it stores upright, it is ready to board as soon as it hits the water. Initially, I tried a cloth cover, but that was too much trouble and came off, so now I have painted the interior white to protect the Epoxy from the sun and added a drain plug that I remove during storage to allow any rainwater to drain out. After a bad experience when the dinghy almost got lost in heavy seas, a rope can now go under the center to adds an extra measure of security and lift it higher out of the water.
 |
Dinghy before extra under-girding rope. |
 |
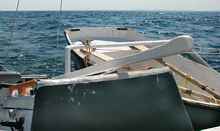
Various pictures of the dinghy as it rides in its hoist. |
 |
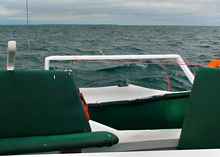
View of dinghy from cockpit on lovely moderate-wind day. |
The dinghy is too small for more than two people, which makes ferrying very tedious, but it holds up well in all weather and provides a handy solution for the my specific boat. The only complaint is the lack of back support when sitting practically on the bottom and rowing. I have vague plans to build something that would hook on the seat to support the back, but there remain several engineering hurdles to overcome.
Never the Same Mistake Twice
As you read about the modifications over the last 5 years, you can see how the dinghy has changed. How nice it would be if I could have arrived where I am now at the beginning! Still, it gives me things to talk about and plan over the winters. The caption of this section is the subtitle for a book I hope to finish by next Fall, derived from a line in Anne of Green Gables where she offers the encouraging word that she always makes new mistakes!
If you wish to read more, I have a blog at:
www.woodislandssailing.com.
|