Part 1 of 4 - Concept and Components
Part One - Part Two - Part Three - Part Four
This year winter seemed to come very late as I was working on the boat well into December, but it was not possible to do any epoxy work at this stage due to the cold. Unfortunately the schedule had been delayed a little bit, otherwise, another week and the boat would have been covered with its fibreglass skin. Just because the weather is cold that is no reason for the work to stop, even though some work requires warm weather other parts, like the trailer, do not. I needed the trailer to put the boat on after turning the hull over, this could have been made when the boat was completed but in view of the fact that we were trying to sell our house and the boat may need to be moved in a few months, best to build it sooner rather than panic later that I had no means to transport the boat myself, or be held to ransom by a removal company, who would no doubt charge a hefty fee that could have been put towards the cost of materials. Also the trailer would form a stable base to support the hull during the rest of the build, saving on the design of props and the worry of having them correctly adjusted and placed for a long time.
Looking around the net is a very useful exercise that gives many pauses for thought. Two of my favourite websites (apart from Duckworks, which has to be number one) are the ones by Ray Macke detailing his two boats Therapy and True Grit, he gives clear, detailed information and is not afraid to do his own thing, you just have to respect his honesty and passion about what he does with his boats. The part that I found currently applicable was his aluminium trailer, which was something I realised I needed. When deciding to build the Noyo Trawler I was very aware of the trailing limitations in Great Britain. The width of the boat was fine at 8 foot, length and height were not an issue, but the weight was. We have a towing limit of 3.5 tons (including trailer weight), unless you get a truck and have a special license. So the trailer had to be light, particularly as the boat will no doubt have lots of extra essentials added over its lifetime, like that 12volt vacuum cleaner that gets left on board. Couple this with the corrosive effects of salt water on steel, even galvanising has a limited life, the best option seemed to be an aluminium trailer.
Looking around there didn’t seem to be that many, and the ones I found were mostly light weight, and very expensive. Now as a guy who likes things to be solidly made (a Land Rover fan), I recon I could put together a better rig, customised to my boat for less cost. I know businesses tend to get a large bulk discount on materials, but to counter that you can take away the labour costs, shareholders profits, plant costs and last but certainly not least taxation overheads (for nearly everything you buy or sell the UK government takes 20%. It’s a touchy subject with me, better say no more otherwise this article will be a rant on the iniquities of taxation). The only way was to build my own aluminium trailer.
To say that my welding skills were appalling would be boasting, so a different method of joining the frame components would have to be used. Even though I had the plans and book from Glen-L, and got a lot of information from them, they were of limited use in the specifics as most of the design was for steel trailers based on North American standards and components. Looking at the excellent pictures of Ray’s trailer helped to formulate some concepts and decide the components to be used. David Bordman from my local trailer component company Autow a subsidiary of Peak Trailers, was a great help in providing information on the components they sold and manufactured and giving advice on general trailer construction.
So far so good, now what about the specifics I mentioned:
Aluminium
I guess the first priority must be the aluminium structure. The only place I found selling suitable aluminium profiles was Simmal, who stock a 8” x 3” I beam, (it isn’t mentioned on their website but is available), it didn’t work out too bad at £174 per 6 meter beam plus tax. After considering the design I reckoned no matter how I cut the pieces I would need 6 beams at 6 meters long each. When I phoned to order they were out of stock of these items which were made in Norway, but it was my lucky day as an order was in transit as we spoke and would be in next week. I found Simmal a bit expensive for other aluminium profiles it is worth looking around and comparing prices. I plan to cut the aluminium with my woodworking saws, but have purchased a special aluminium cutting blade, designed for use on window frames.
 |
I plan to use this 8” bar to reinforce the joints top and bottom of the beams. |
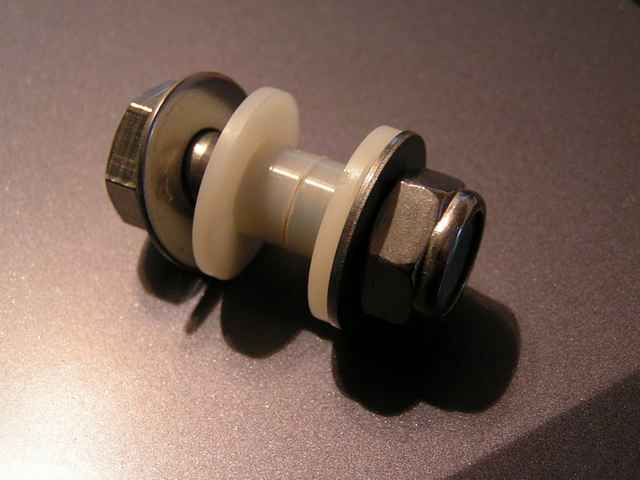
Isolation washers
As I will be bolting aluminium with stainless steel there will be some galvanic action in sea water (see table below), so some form of isolation is needed. The aluminium has a potential of -0.75 and the stainless steel a potential of -0.35 giving a difference of -0.4 volt, this will corrode the metal with the most negative potential, i.e. the aluminium. Initially I thought shoulder washers would need to be made from some hard material like delrin, but found that nylon would be suitable and that these were easily obtainable from Nylon Alloys who were happy to send me a sample. I chose their SW14 for M10 bolts, which were too long but easily cut down to the required size.
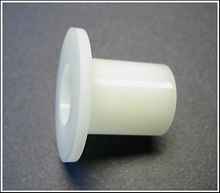 |
These shoulder washers are a bit long so they will need to be cut down to 7mm depth. |
Galvanic table of electrochemical corrosion potentials
Material - Potential (volts)
- Magnesium & its alloys - -1.60
- Zinc die casting alloy - -1.10
- Zinc plating on steel - -1.10
- Zinc plating on steel, chromate passivated - -1.10
- Zinc coated (galvanized) iron - -1.05
- Tin-Zinc (80/20) alloy plating on steel - -1.05
- Cadmium plating on steel - -0.80
- Aluminium & its alloys
- Wrought aluminium-alloy-clad aluminium alloy - -0.90
- Cast aluminium - -0.75
- Wrought aluminium - -0.75
- Aluminium-manganese alloy - -0.75
- Aluminium-magnesium alloy - -0.75
- Aluminium-silicon-magnesium alloy - -0.75
- Duralium (unclad) - -0.60
- Irons & steels
- Non corrosion resisting - -0.70
- Stainless steel (CRS304) - -0.45
- High chromium stainless steel (CRS316) - -0.35
- Austenitic - -0.20
- Lead & its alloys
- Lead - -0.55
- Lead-silver solder (2.5% silver) - -0.50
- Tin & its alloys (other than zinc plating) - -0.50
- Tin-lead solders - -0.50
- Tin plate - -0.50
- Tin plating on steel - -0.45
- Chromium
- Chromium plating on steel - -0.50
- Chromium and nickel plating on steel - -0.45
- Chromium - -0.45
- Copper & its alloys (bronze, brass etc.) - -0.20
- Nickel & its alloys
- Nickel copper alloys - -0.25
- Nickel plating on steel - -0.15
- Silver & its alloys
- Silver solder - -0.20
- Silver - 0.00
- Silver plating on copper - 0.00
- Silver-gold alloy - +0.05
- Electrical contact metals
- Rhodium plating on silver plated copper - +0.15
- Gold - +0.15
- Platinium - +0.15
- Carbon - +0.10
Bolts
The only option here would be stainless steel, my regular supplier I used for bronze screws Anglia Stainless. They have a good range at competitive prices and Garry is always a good source of advice, something you always need when working ‘outside the box’, as I usually seem to end up doing. By the time the thickness of the various washers and aluminium was taken into account I reckoned M10 x 35mm hex bolts would be the best choice. I got the spring washers wrong by not specifying a rectangular section, and felt the square section ones they sent would not spread the load sufficiently on the nylon shoulder washers, but Anglia were very happy to do an exchange with my next order.
 |
These bolts are to be used to fasten the I beams together. I originally decided to buy Nyloc nuts, but more of that next article. |
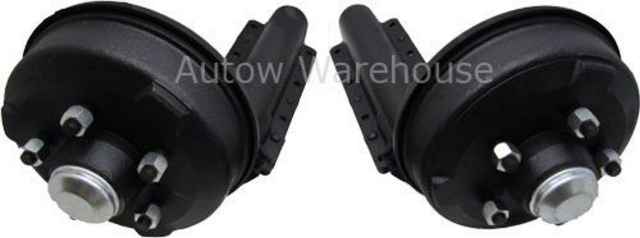
Suspension
One part that caused most uncertainty was the suspension units this size and capacity of trailer would need two axles but I was in a quandary whether to go for the axled units or the suspension stubs which bolted to each side of the trailer, both had pros and cons. In the end what decided the issue was that the stubs had adjustable splines. As the weigh and balance of the boat would not be unknown till it was built, but the weight on the car towball had to be within a specific range, these splined units would allow me to adjust the angle of the suspension arms on each wheel in steps of 6˚. Between the two axle this would tilt the trailer until it was riding level with the correct nose weight.
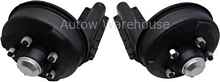 |
The suspension units will take a loading of 1.8 tons per pair. |
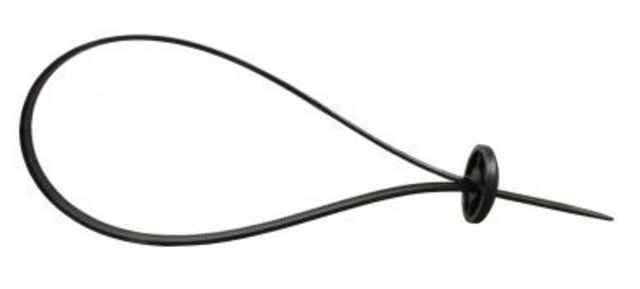
Zip ties
On Ray’s unit he shows the attention to detail the manufacturers have paid to the electric wiring, this sounded like a good idea so I sourced some panel zip ties that are used to hold wires to a flat material. This would be just what was needed to hold and support the wires along the length of the trailer when it was constructed. A company I had not dealt with before Beal UK provided these. I think I will need a small nylon washer for the inside, between the wire and the aluminium, these I can get from Nylon Alloys.
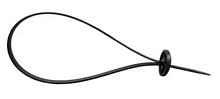 |
I had to look a long time to find these zip ties, in most of the ones for sale the heads are at 90˚ to the zip. |
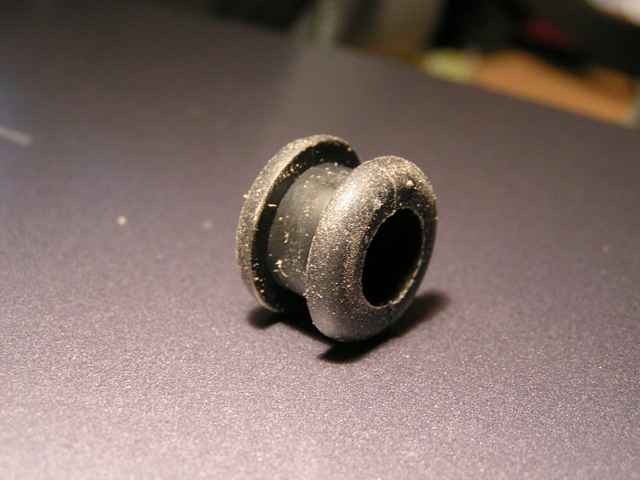
Grommets
Where the wires need to go through the aluminium grommets would be needed to prevent damage to the wires, this was the item that was difficult to source, the best fit I could find was for 6mm thick metal and my aluminium was 7.14mm. They were £28 + tax for 100, I needed only a dozen or so depending on the design of the wiring, there was also the question of would they fit or not? Another option would be to try and make some grommets from Sikaflex, but not sure how to mould them to the right shape, after taking so much time and trouble I don’t want to just stick a blob of silicon round the wire.
 |
Not sure if these will fit or should I try and make some the exact size, but that can wait till I get to the wiring. |
Well so much for ‘Concepts and Components’ next article I will start to design the specifics of the trailer.
Click HERE for a list of articles by Mike Machnicki
|