 Custom Search
|
|
| |
| sails |
| plans |
| epoxy |
| rope/line |
| hardware |
| canoe/Kayak |
| sailmaking |
| materials |
| models |
| media |
| tools |
| gear |
 |
 |
| join |
| home |
| indexes |
| classifieds |
| calendar |
| archives |
| about |
| links |
| Join Duckworks Get free newsletter Comment on articles CLICK HERE |
|
|
| Waterdog's Birthday |
By Craig Holm - Penn Yan, New York - USA |
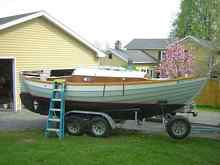
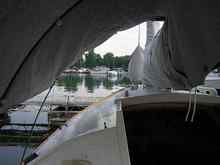
The Waterdog is eight years old.
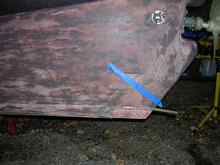
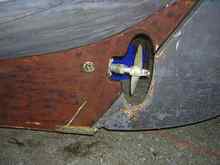
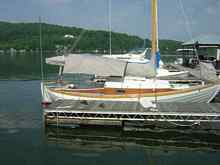
Many people ask what's it's like to take care of a boat like this, how much trouble it must be, how it's beautiful, but... I will say that after 8 years he still draws my eye (what is this nonsense about all boats being female?) and makes me smile. The maintenance is not arduous. I might ask " Why would you want to have something you don't want to take care of?" On the subject of beauty, it is established fact that things you love get more care than the things you don't. The boat has basically been wonderful. A good sailor in any winds and exhilarating in a blow, where it surges along like a Colin Archer lifeboat. When left untended it takes care of itself. I have not modified anything (except to take the prop lock off, which in my youthful enthusiasm I thought would be more worth than it was trouble). I have found that I never use the centerboard - it is just not needed. I keep the jib on deck in a deck bag and have resisted the urge to put roller furling in. I started out with lots of varnish and now have more paint. Beyond that what follows are a few thoughts on upkeep and use. Epoxy lapstrake boats have become very common in the last several years; they are presumed to be very durable but one of the original criticisms of this monoque hull form was that it would be difficult ("Impossible") to repair in the conventional ways. 1. Lead keel interface: Some builders advocate gluing and bolting the lead keel to the built-up wood keel. I believe there are problems with this practice. Although epoxy is a very substantial barrier to water, it will allow some transfer of water over time. Wood swells; lead does not. Thus you will find over time that the lead/wood interface separates. Since the lead bonds epoxy less well than wood you may hope that the glue remains intact on the wood, but there may be some disruption of the wood seal. I have found that some of the seams have split within the keel implying that water is entering along the lead surface. So this year I sanded down the old epoxy, filling these cracks with WEST G flex (a new flexible formulation) to allow for some expansion, and resealing the keel over all with two coats of epoxy before bottom paint. I have found the underlying wood (ash) sound everywhere it is exposed, but I worry about it. Using a wood that is more dimensionally stable may help some but if I had to do it again I would seat the lead with bedding compound in the traditional way. (Here's hoping I don't have to do it again anytime soon.) The other place where differential movement occurs is with metal fittings. I now use bedding compound on all metal below the waterline (eg. keel band screws). 2. Structural damage: This boat has seen some heavy weather, including a memorable sail across Lake Ontario during Hurricane Gustav, that put a indefinite moratorium on my wife cruising with me: 8 foot waves on 12 seconds intervals with a beam sea and 20k winds. Over 5 hours the average speed was 6.5 k, faster than theoretical limit; surfing down the waves we were going 10 by GPS. In that whole time we got water over the bow twice, but those hours holding him up into the wind put a strain on the rudder, and there is now a crack between the stern post and the keel at the bottom.
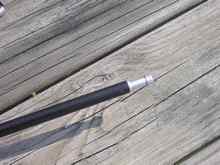
(It may be that this crack began where there was a keel band screw embedded in epoxy.) I can't move this piece at all with my arms but I suspect it will move with 2 tons of boat fighting it. I was only able to get a thin feeler gauge in about 3/4 of an inch at the very bottom. The photo shows blue tape where the designer specified a bolt. I drilled and placed another below it parallel to the keel bottom. Epoxy was squirted in with a syringe and plunged with a dowel into the hole repeatedly; as I did this I found glue seeping out along the crack, insuring good penetration. The crack exterior was routed out with a rabbet plane to about 1/8 " and filled with G flex. All the ash I exposed looked new.
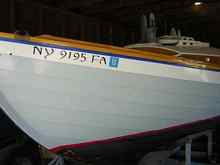
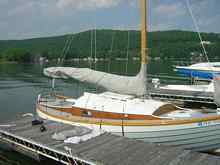
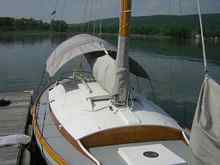
The marine plywood used for the planking and all the interior wood work looks entirely sound to me: no checking or cracking. 3. Deck cracks. In spots along the plywood deck (mahogany sealed with WEST) there are athwart ship hairline cracks; most are just behind the front hatch and they cover at most 1% of the deck area. I have painted the deck about every 3-4 years with interlux deck paint. It does not appear there is any breach in the underlying epoxy surface. Of note, if one rolls this thick paint on with a roller it will not necessarily flow into the crack: a small brush is need to get the paint to penetrate. 4. Paint and varnish: I have found single part polyurethane paint to be very durable . The photo shows a three year old paint job.
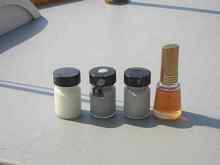
The only place I have found any peeling is in the bilge where there has been exposure to diesel and antifreeze. I also am now using a two part varnish that is very durable; I find it harder to do well (and I have a limit on how hard I will try so don't get sniffy please about sags) but it only needs to be done every 3-4 years up here in NY. The product (Bristol) allows multiple coats in a day. I tape off for the varnish and then cut the paint in without tape, saving time. While I was varnishing the rub rails I did some spot touch up to the spars; I will re-do them next year. It is handy being able to stage jobs over years, doing the hull one year, varnish the next, etc. I keep little bottles of paint on board to touch up dings.
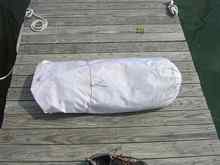
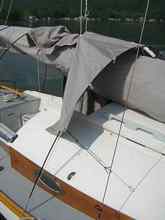
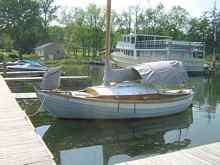
When it is time to do the spring ritual you will appreciate having a smaller boat. Read this article for other justifications to stay small: https://www.classicmarine.co.uk/Articles/small.htm 5. Trailer maintenance: don't forget the trailer. Bearings, tires, lights and those tiny bits that you don't recall until you have driven to the boat launch. God help me, I have thought of giving my wife a clipboard with a check-list to bark out at me. Get a good trailer, particularly if you take the boat on trips. I have hydraulic surge brakes and have equalization bars that put more pressure on the tongue to hold the front of the tow vehicle down. Be sure this added pressure does not exceed your recommended tongue weight or the surge brakes may not work: https://mrtruck.net/wdh.htm 6. The engine: I was amused to find an authority on one of the boat forums expostulating the view that the grey seal is too small for an inboard diesel; I'm glad I didn't find that out before I put one in. I could use a little more room to avoid busting my knuckles changing filters etc, but the Volvo MD 2010 has been trouble free. Follow the maintenance schedule and don't pinch pennies on upkeep. I keep a spare impeller on board and have a quick change impeller cover with hand knurled screws. Likewise, I have had zero trouble with the other systems: electric, toilet, fresh water, etc. Added featurette: The chuck wagon. There are times when you are cruising on a small boat and you wish you had a little more space, to get out of the way of the galley, to stretch your legs, or to gain a little personal space from your beloved traveling companion. A cockpit canopy is the obvious solution but the available designs often don't fill the bill very well, or look right, or shed the wind or... A few years ago I set up a "chuck wagon" on my boat that doubles the living space aboard.
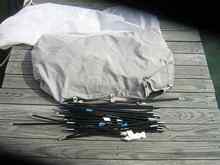
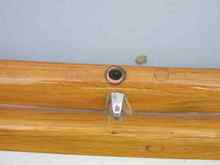
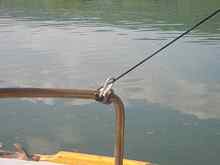
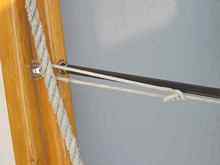
It is constructed of aluminum tent poles, with internal shock cords (so the poles socket into place automatically) and a sunbrella cover. It is open fore and aft, but extends down far enough for good shade and to shed water outside the cockpit. The toe rail fittings are simply pieces of flexible copper pipe set into the wood: the holes are 3/4" deep and the copper pieces are 3/8", leaving a wider space below the collar of the pipe to lock the fittings on the end of the poles.
In designing this cover I started with the idea of having the cover above the furled and covered sail, to maximize headroom and to use the sail cover as anchor points. I measured the curve at intervals from gunwale to gunwale over the cover and cut the poles to length. The aft most pole required a permanent bend in the center segment to make the curve but the others are straight when disassembled.
The poles socket into the holes and the cover snugs down to the adjacent hooks, nestling unobtrusively below the toe rail.
I use taut line hitches on these lines to tighten them up. There are also shock cords at each corner that attach with little carabineers at the shrouds (forward) and to the traveler (aft).
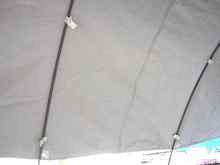
The fabric was measured to span the interval between poles, to come to a uniform height above the deck, and to allow for an entrance on one side at the level of the lazy jacks. It was a fiddly process keeping all the poles upright and trying to decide how much fabric was needed. With the poles in place, I lay the cover on and roll it in whatever direction the wind is blowing - usually aft; the first row of snaps hold it in place
and the tie down hooks are lightly tensioned as I go.
(A thank you in advance to those scrupulous first lieutenants among you kind enough to point out I haven't cleaned up the bedding compound yet; It is much easier to clean up when dry ... but in any case I forgot). The poles attach on the inside with snap loops,
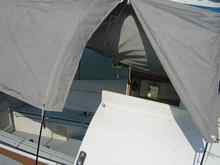
which makes it possible to set up the poles and then lay the fabric over them; I am not sure I could imagine springing this whole thing into place if the poles were in sleeves. There is a single zipper to open the entrance,
although there is enough room underneath to crawl out forward,
and the top ends are stretched fore and aft by webbing belts attached to d rings sewn into the sail cover. When the whole thing is set up it sheds wind and water well. I have left it set up for days with 20+ winds. It would be simple matter to hang bug netting with velcro strips if needed.
So back in the water for another season and time for sailing; work will resume on the Keuka Whaler in the fall. For now, here's a taste of the Keuka Whaler's recruiting song: "In these days of virtual internet there's little a man can do to pit his mettle gainst his foes and prove his derring-do, you're stuck behind a keyboard making tiny clicking sounds growing dull and flabby as you push the mouse around. Don't settle for a job that has you lashed down to a chair daydreaming of retirement and struggling with despair, for a man must be a hero if his heart's to be at ease that's why we hunt the jet ski on the stormy Keuka seas". |