|
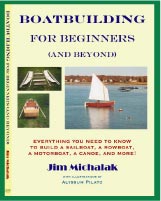
About three and a half years ago I discovered Duckworks and my first purchase was to buy and devour “Boatbuilding for Beginners” by Jim Michalak. It is a great book, full of good sense, practicality, and a can-do attitude. Three aspects of the book have shaped and enhanced my boating life since then. Jim advises that if you want a 20+ foot sailboat, unless you want unusual features, the plethora of capable, reliable, and cheap used fiberglass sailboats on the market offers instant availability and incredible value. Jim also advises that smaller, easier to build, and easier to launch boats get more use and therefore provide maximum pleasure for minimum investment. His book also includes plans and instructions for 5 different boats that can be built in a garage with simple tools and readily available materials: a sailing skiff, a rowing skiff, an outboard skiff, a johnboat, and a sleek rowboat.
This was music to my ears. I have long wanted to resume the sailing I did before kids, houses and divorces soaked up the time and money I might otherwise have devoted to my passion for sailing. My life has changed and though I have little money, I can now invest the time and effort to enjoy boats and the water. Last summer, heeding Jim’s advice, I bought a Starwind 19 that for a thousand dollars that gives me a “sleep over boat” (to quote my wife) that is rewarding to sail and came with a galvanized trailer, a reliable outboard, and a decent suit of sails. This summer, in between lots of work for my employer, going for a short cruise with my wife Eileen aboard our plastic trailer sailer “Patience”, heart surgery, getting a new dog, and (did I mention this already?) lots of work, I built a QT rowing skiff from plans found in Jim’s book.
|
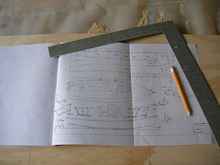
The plans for the QT rowing skiff are part of Jim Michalak’s book. |
The plans for the QT rowing skiff are part of Jim Michalak’s book.
I chose the QT skiff because I wanted something that rowed reasonably well but that I could load up with another adult and maybe a kid or two when I wanted to. I also wanted to be able to put it on top of the car and take it everywhere. I liked the simplicity of the QT. The nail and glue construction used skills I knew I had, and I figured that if I later wanted a more capable rowboat, I could build the Robote included in the book nearly as simply as I had built the QT.
|
Trying out a retrofitted skeg and movable thwart. |
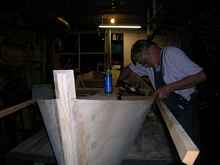
I started with three sheets of some excellent ¼” pine underlayment available at a local lumber yard for $25 a sheet, four 14’ x 1” x 8” select pine boards, a half gallon of epoxy, a bottle of polyurethane glue, and a whole bunch of stainless steel screws. It took two evenings to get the plywood for the sides and transom marked, cut out and strapped together. Another evening was spent on cutting gunwales and chine logs, and another building the forms out of some cheesy lauan plywood I had floating around the shop and pine framing from the same boards as the gunwales and chine logs. I stitched these parts together into the shape of a boat using temporary screws.
|
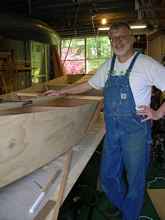
Using a 1 x 8 to keep the hull straight. |
It was here that I decided I wanted internal chine logs instead of external. I agonized quite a while about this but my aesthetic preference was for internal and I didn’t anticipate they would cause any trouble. They did, however, require some modifications to the components I had already built. I cut relief notches in the forms to allow me to fit the chine logs while the frames were installed. I also used a router to carefully cut down the butt straps just enough to allow the chine logs to snug up against the plywood for the entire length of the boat. These went in easily and I was able to install the first layer of the gunwales, the chine logs, and put the bottom on the boat in a weekend.
|
Notice the notches in the forms to make space for the internal chine logs. |
|
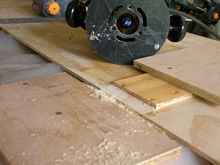
Cutting relief in the butt straps to allow the internal chine log to run the full length of the boat. |
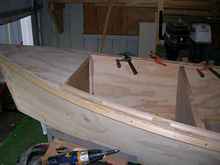
As I was working, I decided to add gapped inwales to the boat to increase its rigidity and allow a reduction in the depth of the gunwale. Over the course of another weekend, I rolled the boat over, cut relief notches in the forms so I could add the inwales, and glued and screwed the inwales and their spacers in place. At the same time I added short decks to the bow and stern to replace the breasthook, corner braces, and cross braces Jim’s plans specify.
|
I used urethane glue where the parts wouldn’t be immersed for long periods. |
|
Gapped inwales and foredeck in progress. |
In a month of evenings and Saturday/Sunday afternoons I had the entire shell of a fine rowing skiff. Now I was faced with the devilish details and I knew it would take me at least another month, if not two to finish the boat.
Many of the finishing touches applied to a home built wooden boat involve extensive use of epoxy and this posed a challenge for me. Epoxy and I have never been friendly and my relationship with epoxy’s cousin polyester resin has been fraught with swearing, sticky messes and delamination. I do not respond well to the time pressure imposed by curing resins, I fear the toxicity (both documented and alleged) of the chemicals they contain, and I HATE working in gloves in July. Yet, with proper planning, a good respirator, proper measuring devices, and the calming influence of having my wife assist in the bigger glue-ups, I was able to actually enjoy putting my boat together with this amazing adhesive. I used epoxy wherever there was a chance for soaking water contact or I needed its gap filling powers. However for the wales and the decks I used polyurethane glue with which I have a much more peaceful relationship.
Slowly but surely I finished off the boat. I swathed the chines and butt joints with fiberglass tape and epoxy. I sealed joints and filled gaps and gouges with fillets of epoxy and sawdust. I faired fiberglass to wood with epoxy and microballons. And, of course, I sanded and sanded and sanded. But smoothing out every wrinkle and hiding every imperfection at the expense of many many evenings is not a bargain I am willing to make. So, when it became “good enough” I began painting it.
I had not laminated fiberglass cloth to the entire bottom nor had I spit coated the bottom with low viscosity epoxy. Instead I used as a primer a moisture cured polyurethane coating called Aluthane that is laden with aluminum powder. While the stuff is intended to be used on weathered metal structures to stop rust, the vendor discovered that it seals wood very effectively against water intrusion and is extremely durable. Once this was painted on the entire outside of the hull and lightly sanded to remove roughness, I used Behr porch and deck enamel to give the boat its exuberant color scheme.
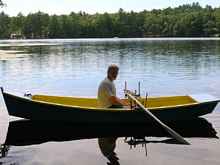
I allowed the paint several weeks to cure in the sun and in late July Eileen and I hoisted it up on the roof of her Subaru and took the boat to a local lake. Our goal was to find the right seating positions and oarlock locations to trim the boat for three configurations: single rower, two rowers, and front seat rower with rear passenger. To accommodate these positions the boat uses three pair of galvanized oarlock sockets. For seating we use a seating box for the forward spot and a sliding thwart for the aft seat that can be adjusted for single or dual rowers. However, for this trial run, we clamped the oarlock sockets to the gunwale so we could readily try many settings.
|
Getting the oarlock and seat positions right for proper trim. |
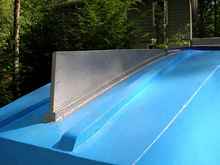
The trials were a moderate success, but the boat showed an alarming tendency to lose directional stability when rowed fast. At first we thought this was a trim problem, but no amount of fiddling made the problem go away. With the boat traveling forward, the stern would lose its grip on the water and slide rapidly around the bow resulting in what resembled the spin out of a car on ice. After an email consult with Jim Michalak I decided to add a skeg to the boat. Since Jim commented that he had heard no other complaints about the directional stability of the QT rowing skiff, I surmise that my use of internal chine logs had deprived the boat of essential stabilizing surfaces. Adding the skeg set everything right and now the boat rows straight and true.
|
A retrofitted skeg gave the boat directional stability. You can see that the skeg is still wearing its Aluthane primer. |
Looking back on the decisions I made as I built, there are a few I would do differently. Most importantly, I would have made the gunwales full depth. This would have allowed me to use top mount oarlock sockets and avoid having the sockets jut out beyond the gunwale threatening the topsides of any boat we might approach. I could have mounted sockets on the inwales, but that might not have given me the width necessary to carry the seven foot oars I made. I really like the stiffness the inwales added to the structure and I think I could have reduced the size of the rear deck without any difficulty. I also think I would like to have glassed the entire bottom. Lastly, if I had used ocoume plywood, lightweight oarlocks, and really paid attention to weight, the boat could probably be built at 65 lbs instead of the 80 lbs it now weighs. But, I like its workboat roots so ordinary plywood and galvanized oarlocks seem to match its personality.
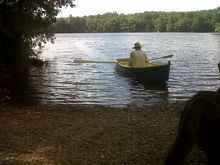
|
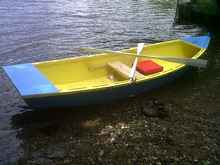
Gliding in for a landing. |
Eileen and I are looking forward to using the QT to explore the salt ponds and tidal inlets that dot the New England coast. It can be used as a cargo boat to carry a tent, supplies, and the dog to a nice shoreside campsite while Eileen paddles her kayak. Or, we can leave the dog home and both row as we explore Cape Cod’s Pleasant Bay or Rhode Island’s Point Judith Pond.
 |